When creating an application, being able to send emails from it may be something a User wants to do. JNIORs have email blocks in their configuration that can be setup to send emails.
Setting Up JNIOR Email
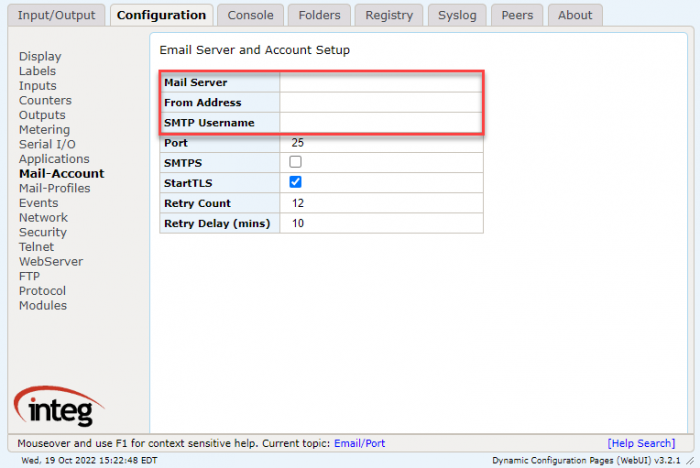
To properly setup an email for the JNIOR to use, you’ll want to use the JNIOR’s Web UI and navigate to the Email Account section under Configuration. Here you’ll want to include the Mail Server, From Address, and SMTP Username your JNIOR will use to send the email. These are required in order to send emails from the JNIOR.
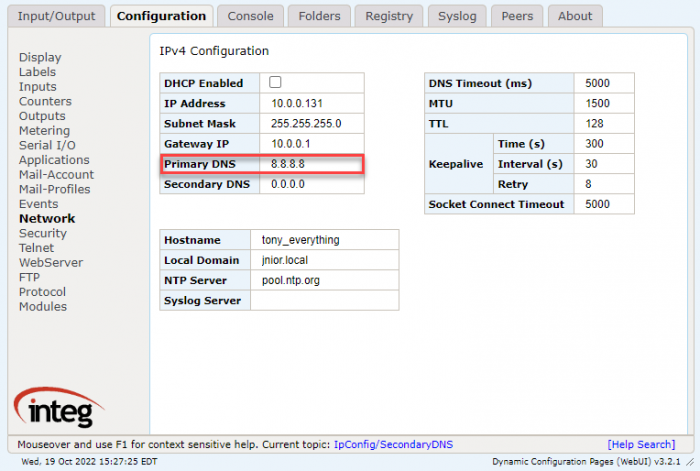
Next, in the Network section you’ll want to make sure you have a DNS Address declared. For our examples we use 8.8.8.8, which is Google’s.
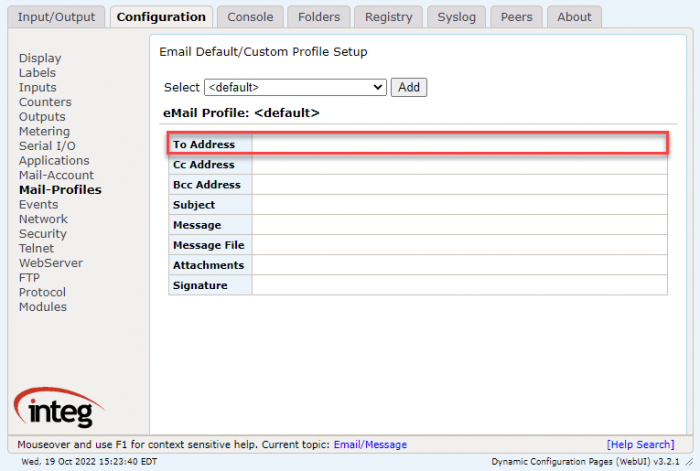
Lastly, we’ll want to make sure we give the address we are sending to to the Mail-Profiles section. Only a ToAddress is needed, but additional information can be entered to be used as a default. This is used for the JANOS.sendmail() class.
Now that this is setup, we can now create an application that can use these settings to send an email. The following example shows two different ways that an email can be sent from an application. The first way uses the JANOS class, and the other uses the MailComposer class.
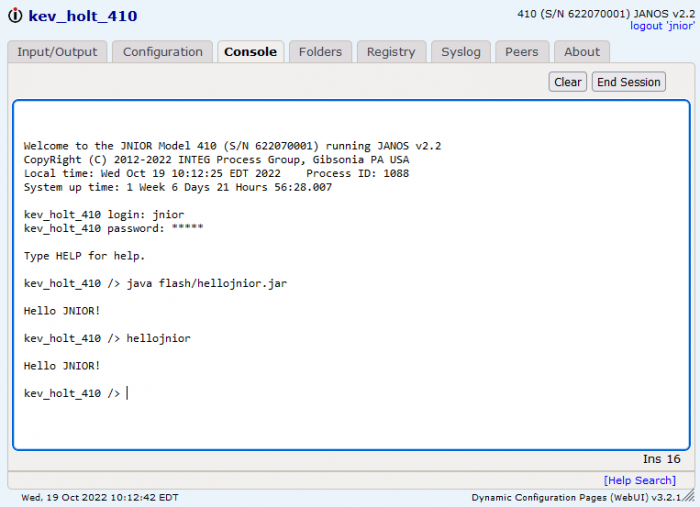
I put the built jar file of this example application into the JNIOR’s flash folder and ran it from the Web UI’s console tab. Once its run an email should be sent to the address, subject, and message you declared.
The concept of using a watchdog is to ensure that the application continues to run as expected. JANOS provides a Watchdogclass that has a couple of options. A sample of how to use that class can be found here.
Single Instance
Most times we only want one instance of an application running at a given time. Use the JANOS.registerProcess() method to check to make sure there is not another instance running. Here is an example of using the registerProcess() method.
String applicationName = "TestApp";
if (1 < JANOS.registerProcess(applicationName)) {
    JANOS.syslog("Another instance of " + applicationName + " is running");
    System.exit(-1);
}
Versioning
A great way to be certain that specific code is running is to implement versioning. If the application is going to be released or there are going to be multiple releases then versioning is nearly a must. Many times versioning takes the form of major.minor.build. This is not always the case. Sometimes you will see version numbers that start with the year that it was released. For example, Ubuntu uses year.month to get 22.04. The format you use is completely up to you.
Model and I/O Count
One issue that your application can have is handling the different models of JNIORs and the differing input and output count. The following code can help you with that.
    /**
     * @return the number of inputs based on the model of jnior
     */
    public static int getInputCount() {
        // if a 412 or 412 DMX then return 4.  If not then check if a 414 and return 12.  If not
        // then return 8.
        String modelString = JANOS.getRegistryString("$Model", "");
        return (modelString.startsWith("412")) ? 4 : (modelString.equals("414")) ? 12 : 8;
    }


    /**
     * @return the number of outputs based on the model of jnior
     */
    public static int getOutputCount() {
        // if a 412 or 412 DMX then return 12.  If not then check if a 414 and return 4.  If not
        // then return 8.
        String modelString = JANOS.getRegistryString("$Model", "");
        return (modelString.startsWith("412")) ? 12 : (modelString.equals("414")) ? 4 : 8;
    }
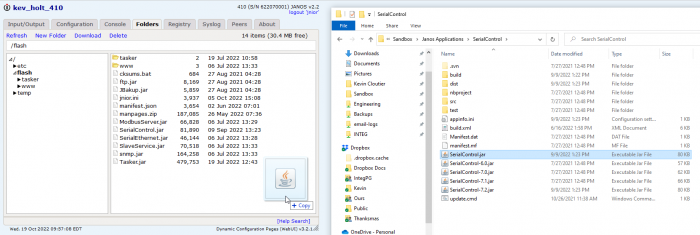
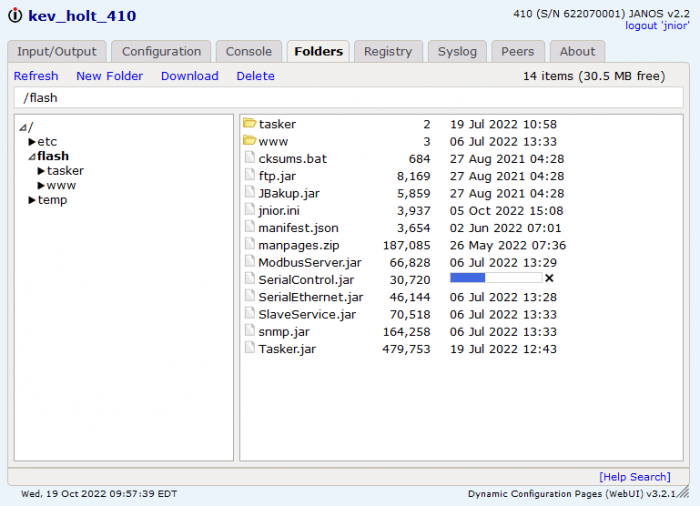
We recommend that all applications are saved in the /flash directory. There are multiple ways to upload a file to the JNIOR. How you decide to do that is up to you but the WebUI is a great tool for accomplishing this task.
Open the WebUI and go to the Folders tab. Click on the /flash directory in the tree view on the left. You can now drag and drop your JAR file to the view on the right.
Once you drop the file you will see the transfer progress bar.
Great, the application is on the JNIOR. We now need to decide how and when it should be executed.
Running the Application in the Foreground
When should we run an application in the foreground?
Answer, when we are developing, debugging or when an application needs to interact with the user from a command prompt. Notice I said from a command prompt. There are other ways to interact with the user. For example, a web interface. But that will be discussed later.
To execute an application from the command line we can enter java APPLICATION_NAME.jar or simply APPLICATION_NAME. if only the application name is entered then JANOS will look for a JAR file. If the file is found then it is executed.
Running the Application in the Background
When would we want to execute an application in the background?
Answer, when we have an application that we are running that we will not interact with but we still want to be able to interact with the command line. To do this we will append a “&” to the end of the command we use to launch the application. The command line prompt will be returned immediately.
Setting an Application to Run on Boot
When do we want to execute an application on boot?
Answer, when we have a production application that should always be running. To set this up we will make a run/ registry key. The name of the registry key can be anything you want. The content of the key is the way that you would execute the program from the command line as we did above. This is the same as executing an application in the background but without the user having to start the application manually.
Series 4 JNIOR’s have a file directory that can be interacted with via a command line connection or from the Web UI. Being able to interact with the file directory and read/write files to it can be a useful tool when creating applications, from recording versioning numbers to writing data to reference later. Below is a small example below that writes and then reads to a file.
Directories and File Interaction
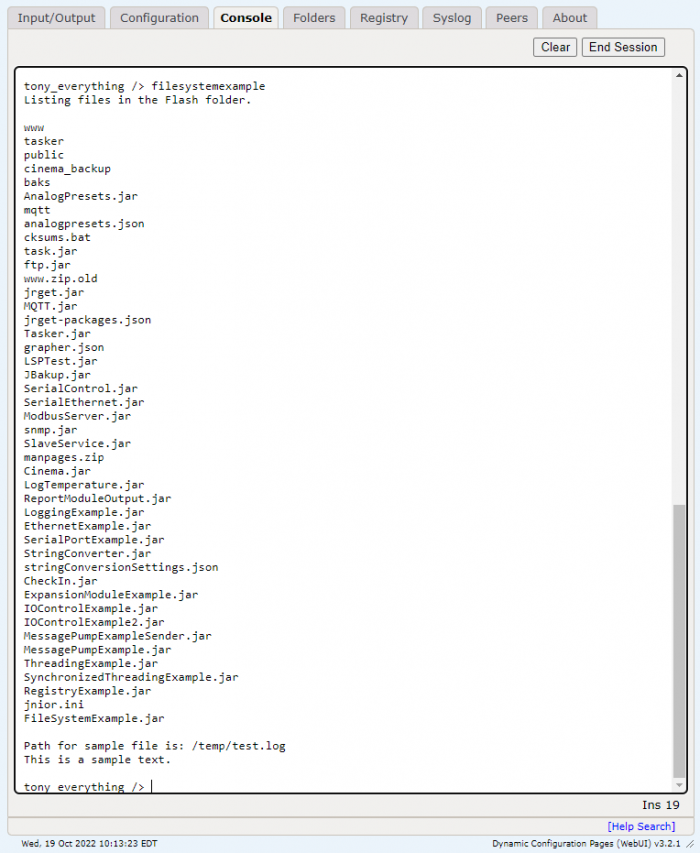
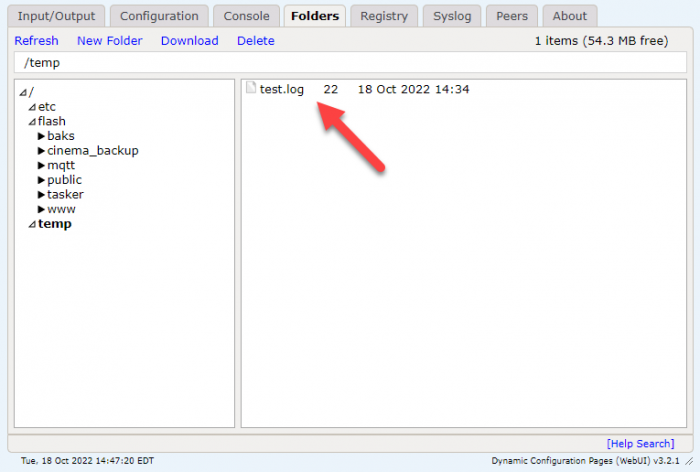
To start a file object is declared with the directory of the temp folder and the name of the file we are creating which is “test.log”. We also create another file object called directory and we are going to use this to display all the files located under the flash directory in the JNIOR by. We get the files in the flash directory by assigning the value ‘/flash’ to it, and then using the .list() function we can return a string array of all the files under that directory. We declare a local string array called files and populate it with the file names we just got. Then we go through and print out the name of each one. After this we declare a BufferedWriter to create a FileWriter. The FileWriter is then used to write a string to the test.log file we just declared. Next a BufferedReader is declared to create a FileReader. The FileReader is used to the read whatever data is on the file as a string, and since we just wrote to it, it will print out what we’ve writer to the file.
I put the built jar file of this example application into the JNIOR’s flash folder and ran it from the Web UI’s console tab. As you can see it, application runs and prints out the text that was written to the file. You can also see the test.log file is created in the temp folder.
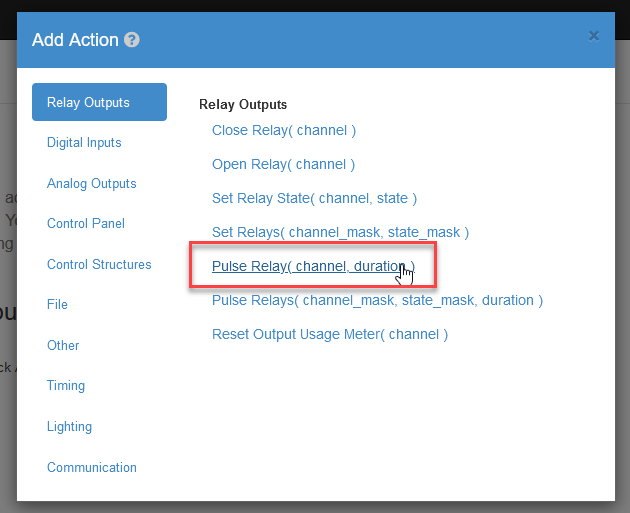
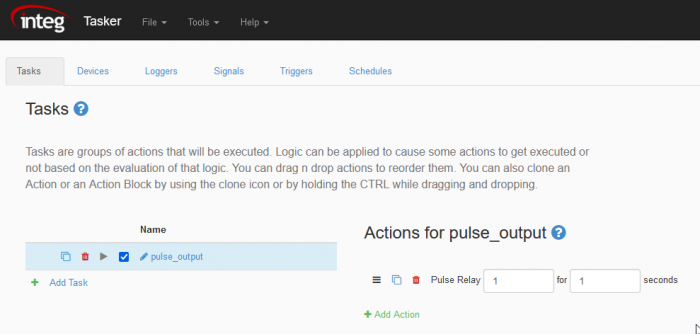
You can easily pulse an output using Tasker. From an open Workspace you will click + Add Action… to get the Add Action dialog. From there you will select Pulse Relay (channel, duration).
Once the action has been added you will need to configure the correct channel and duration.
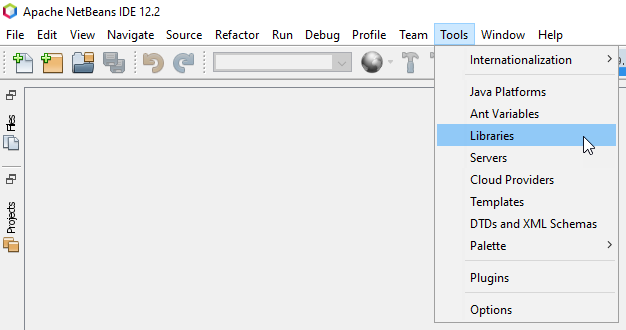
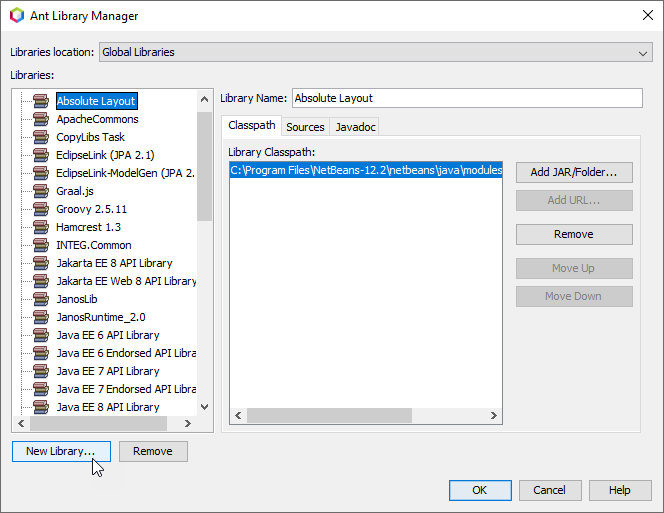
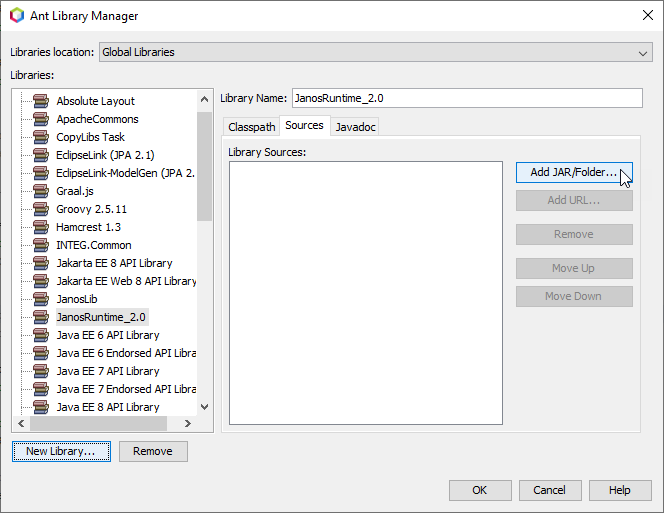
The JANOS Runtime Library should be installed as a Library in your IDE. Here is how to do that in the Apache NetBeans IDE.
Open Libraries Dialog
Open the IDE and select Libraries from the Tools menu.
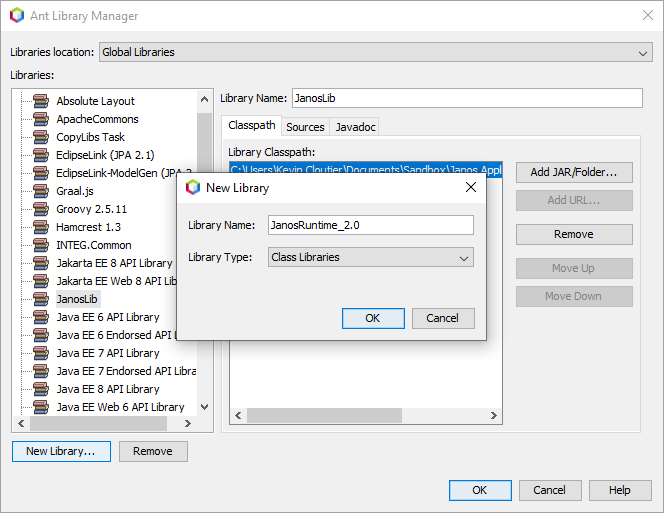
Create New Library
Click New Library…
Give the Library a name. We suggest JanosRuntime_2.0
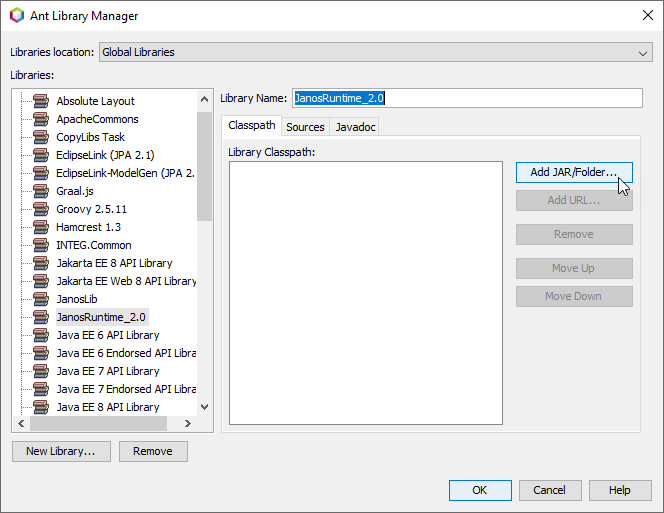
Add JAR to Library
On the right side of the dialog you will new click Add JAR/Folder…
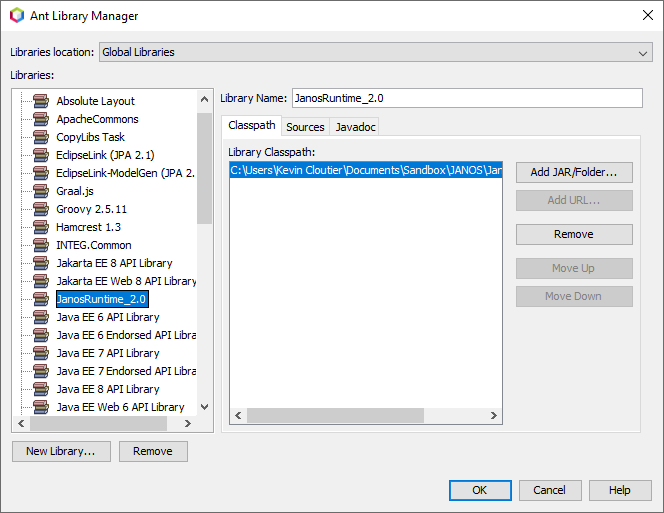
Navigate and select the location where the Janos Runtime JAR file was saved.
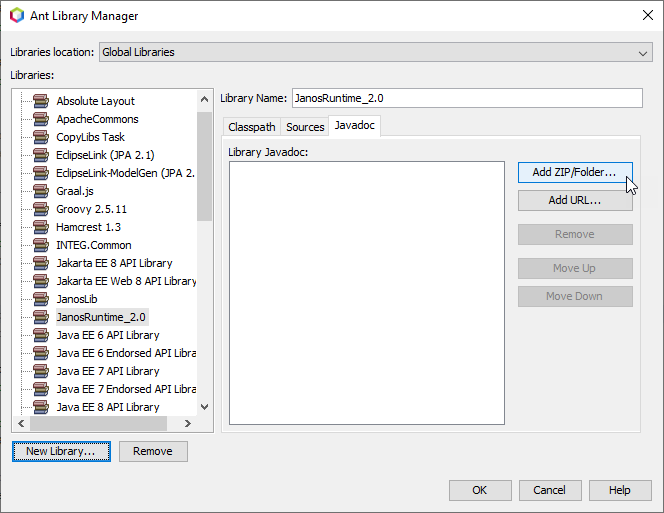
Adding in the sources
Now that the JanosRuntime library has been created, we want to add the sources so that we can reference them while working with our code. We do not distribute source code but the method stubs are still extremely helpful.
To do this we will click on the Sources tab and then repeat the steps to Add JAR/Folder as you did when creating the library.
Add Javadoc
Adding the javadoc will enable the NetBeans intellisense. To do this we will click on the Javadoc tab and then repeat the steps to Add JAR/Folder as you did when creating the library.
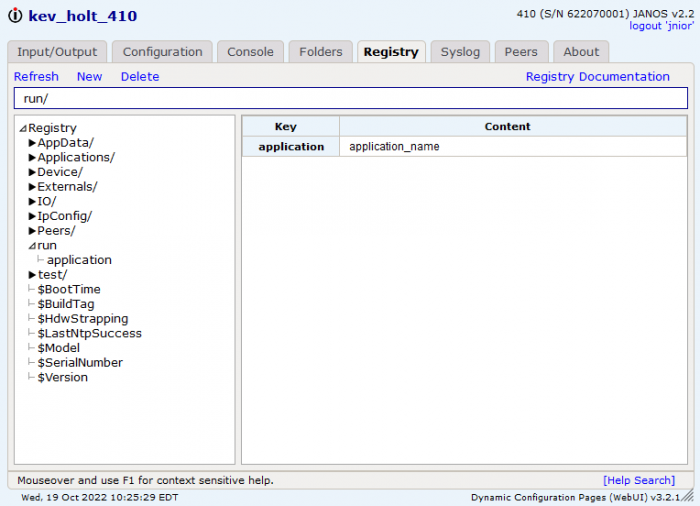
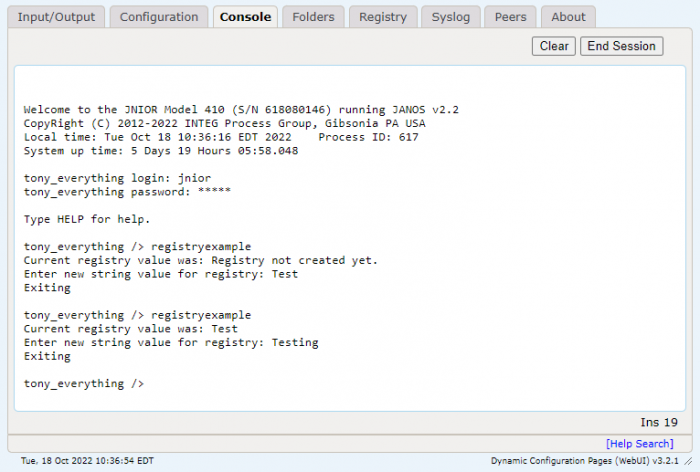
The registry on the JNIOR is what defines how it is configured. Registry keys hold information that persist past reboots, allowing applications to set them and save settings that have been created. This information can be connection settings, device identification, versioning, etc. Below is a quick example that prints out a specific registry key’s information, and then prompts the user to enter a new value for it.
In this example the registry key being referenced on the JNIOR called AppData/RegistyTest. This registry key doesn’t exist the first time the application is run, and it will print out “Registry not created yet”. It will then prompt the user to enter a value for it, and once that’s done it will exit the application. Running the application a second time will show that the value entered for the registry key will now be what’s displayed for its value.
I put the built jar file of this example application into the JNIOR’s flash folder and ran it from the Web UI’s console tab. As you can see it, the registry key report empty the first the application is run, and the second time its run the registry key contains the value enter for it the first time it was run.
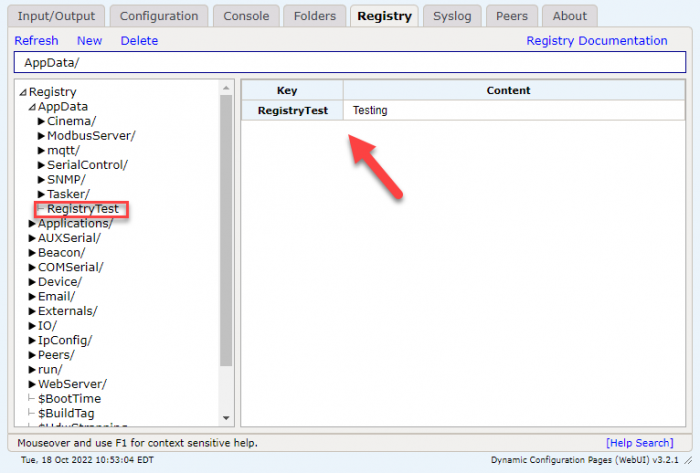
Here shows the registry key we created in the Registry Tab of the JNIOR Web UI.
So you’re looking to write your own code to run on the JNIOR? You have come to the right place. Writing code for the JNIOR is as easy as writing code for your PC. The JNIOR will run the JAR that is created by your favorite IDE. There are almost limitless possibilities when it comes to what you can program on the JNIOR. Most of the applications that we have written have come from customer requests over the years.
This section of our website is not meant to teach you how to code but rather to show you how to enable your IDE to write JNIOR code that is targeted for the JNIOR.
Note: Additional Libraries cannot be used with JNIOR applications.
Prerequisites
Java JDK
Java IDE (We use Apache NetBeans)
JANOS Runtime Library
Understanding of Java Programming
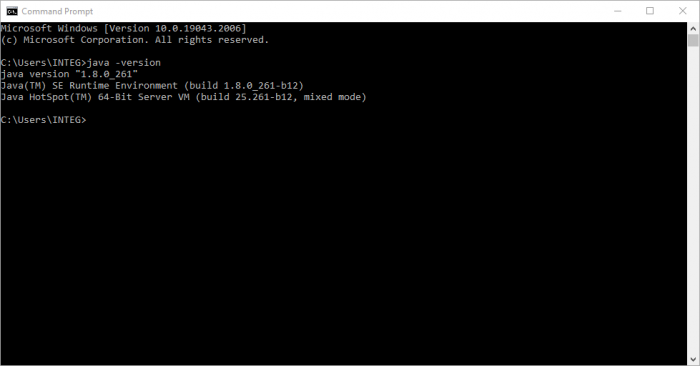
Check for Java
Type java -version at a Command Prompt
JANOS Runtime Library
Applications targeted to run under JANOS must be built against the JANOS Class Library. This library can be found in the etc/ folder on your JNIOR Model 410. This file is OS version dependent although it is likely not to change dramatically from release to release. You might note the date and before you update or finish an application for your JNIOR make sure that you are using the latest version that you have available. INTEG can also send you a copy of JanosClasses.jar on request.
The JANOS Runtime Library does not contain the full JVM that you might be used to programming against. It is close but to save code space we have omitted some classes and methods. Take a look at the JANOS Runtime Javadoc to see what classes and methods are available.
There could be a want for an application that performs different functionality, completing multiple operations at the same time. The JNIOR accomplishes this with threading. A thread is a sequence of instructions within a program that can be executed independently of other code. The JNIOR is able to handle threading via the default JAVA library. Below are two quick examples of threading, with one of them using synchronization.
Non-Synchronized Threading
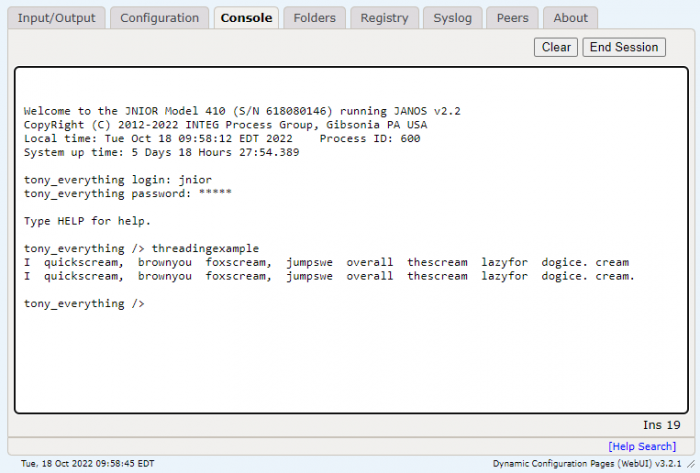
In this first example, there is a main method that creates two threads, each supplying it an array of words that will be used to create sentences and print them out. Each new thread calls a function called slowStringBuffer, taking the words in their string array’s they’ve been supplied and adding them to the string buffer in that function. Since the threads run at the same time, they add their words to the string buffer simultaneously. This results in nonsense being printed out for the sentences, showing that synchronization in our next example is useful in avoiding this issue.
I put the built jar file of this example application into the JNIOR’s flash folder and ran it from the Web UI’s console tab. As you can see it, the threads compete against each other to build their sentences, resulting in nonsense being printed out.
Synchronized Threading
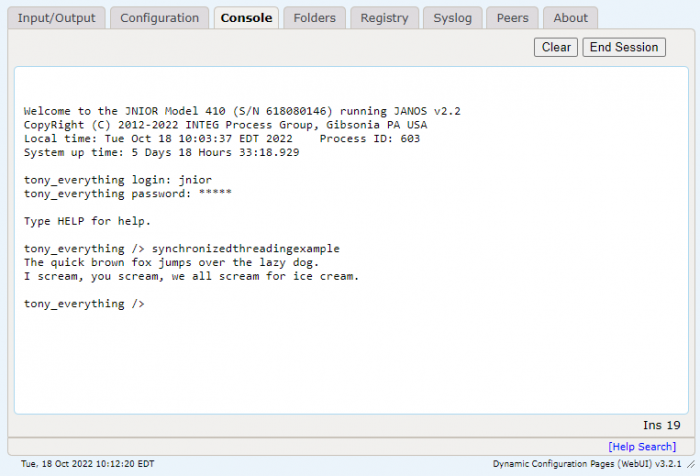
In this second example, the only change that is made is that the slowStringBuffer function is made synchronized. This results in one thread taking control first, making sure it prints out its sentence completely before the next thread can start its sentence. This results in two complete sentences being generated.
I put the built jar file of this example application into the JNIOR’s flash folder and ran it from the Web UI’s console tab. In this example two complete sentences are formed and printed.
On every JNIOR, there is a System Message Pump that is constantly circulating any message sent between applications. Each message sent around the system has a unique type that identifies the message. This is done so when an application receives a message, it can determine if the message was meant for it. If the message was for that application, it consumes the message and reacts accordingly for the what the application is doing. If its not meant for it, then it simply re-broadcasts the message so the next application can evaluate the message until the correct application receives it.
Message Types
As far as the different types of messages that can be sent, there are two groups. The first group is the system messages, which are predefined and reserved only for the OS to use when its performing checks and tasks. Message numbers below 1024 (0x400) are reserved for the system. The most common example of this is the SM_PROBE (0x02) message. This is a message that isn’t supposed to be consumed by other applications and is supposed to make its way back to the OS after its sent. If the message doesn’t come back, then it knows somethings wrong, and an application is consuming messages it shouldn’t be. It fixes this by restarting the OS. Here are other predefined system examples the JNIOR OS uses. The other group of messages are user defined messages. These messages can have any message number at or above 1024 (0x400), and can be given any message a user would wish to define for the message.
Message Example
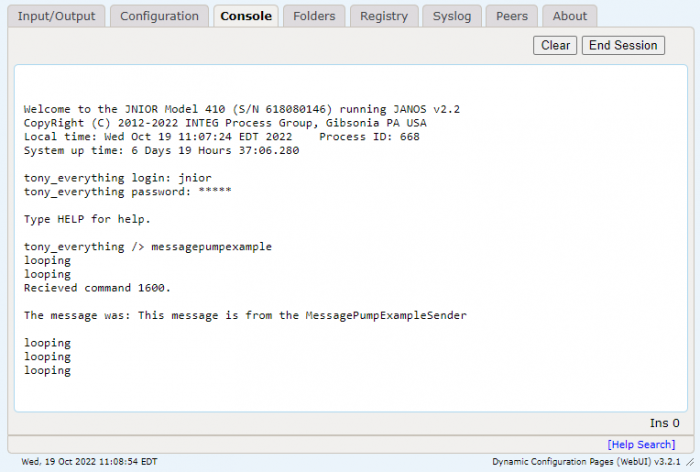
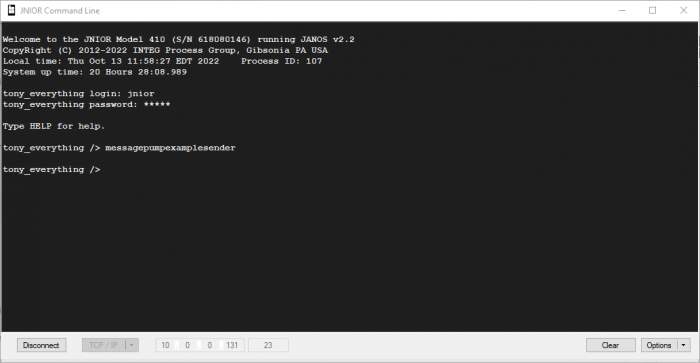
Below is an example of two applications communicating with one another using a user defined message. They use the System class to declare a MessagePump and SystemMsg objects. The first application has a separate class that declares a listener interface that will be used to grab messages when they enter the message pump. Inside the first application, it opens the message pump and permanently loops, only pausing the loop when its listening for a message. When it receives a message with type 1600 it prints the string in the message and continues the loop again.
I put the built jar files of these example applications into the JNIOR’s flash folder and ran one from from the Web UI’s console tab and the other from a command line connection. As shown below, one application constantly loops through itself, pausing when its trying to get a message from the message pump and then printing the message out when it does. The other sends the message the first one is listening for.
NOTE: In the picture above, the message only prints out once, while other times it just goes through the loop without printing the message. This is because we only handle one type of message, 1600. If it continues through the loop without printing a message, it means it got a message with a number type that wasn’t 1600. The other message its getting is most likely the SM_PROBE (0x02) message.
Many times we write an application that should be the only instance of that application running. That application may monitor inputs, control outputs, send email, or perform logic. Whatever that application is doing, it should be the only one doing that particular thing at any given time.
The ensure that this happens we use the JANOS.registerProcess(id) method. This method returns the number of processes that have been registered with that given id. That id can be any unique identifier given to that application. It can be a name or a random UUID.
If the registerProcess() method returns a value greater than one then we will exit our application. This will leave the first instance running. Here is an example.
        // make sure there is only 1 instance of this application running
        if (1 < JANOS.registerProcess(Application.getAppName())) {
            JANOS.syslog("Another instance of " + Application.getAppName() + " is running");
        }
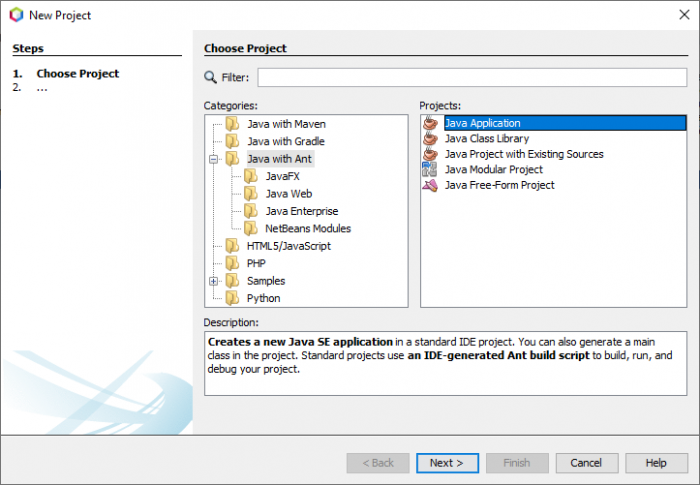
To create a new project go to the File | New Project… menu item. This will open the New Project dialog. In the New Project dialog box, you can select Java with Ant under Categories, and Java Application under Projects.
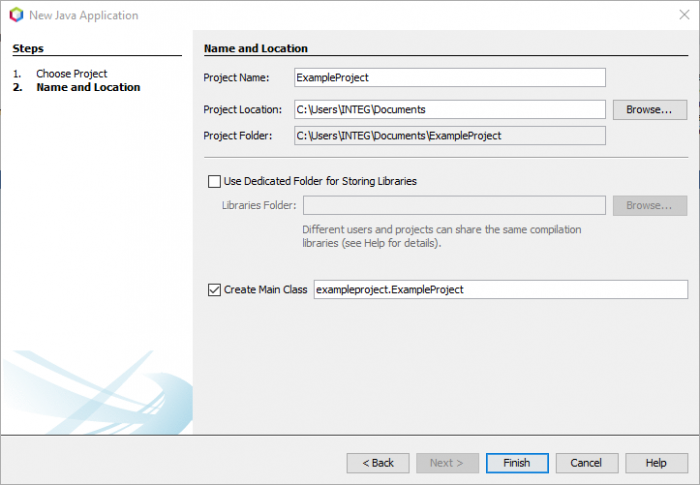
Hit next, and then give the Project a name. In this example the project is named ‘ExampleProject’. After naming it the application can set to where its saved to. This is useful as projects can all be saved in the same location, making them easy to find in one directory. Once a name and location are given to the project a name and a location on your computer, hit finish.
Add JANOS Runtime
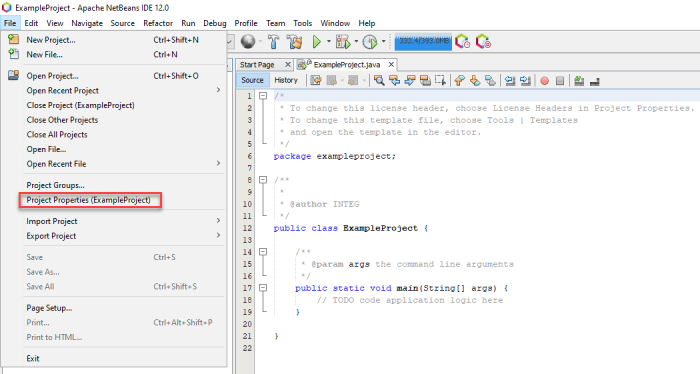
Now that the project is created, the JANOS Runtime library needs to be added to the project so its classes can be used in the application. To do this, go up to the file drop-down and select ‘Project Properties’.
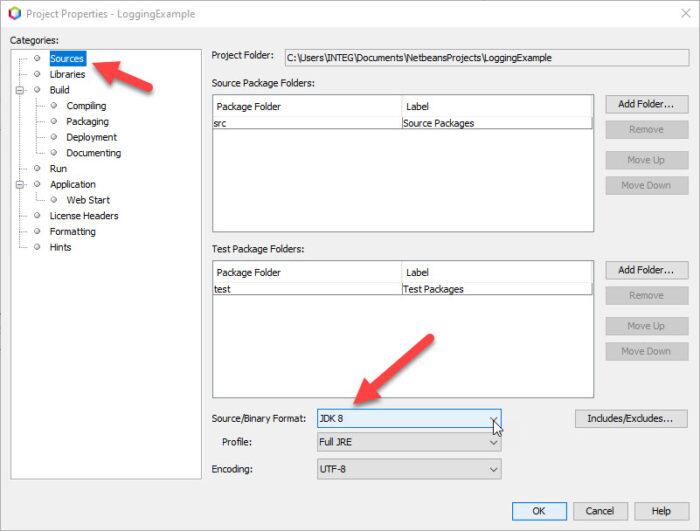
In the Project Properties dialog box, select the Sources option under the Category section. For the Java Platform, use a version of Java 8 as a default platform.
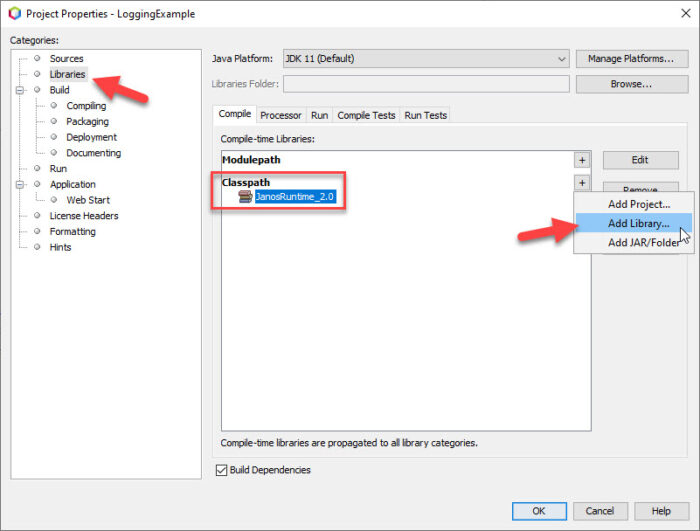
Next, select the Libraries option under the Category section. Under to the compile tab, select the plus icon next to Classpath and select ‘Add Library’. Then select the JANOS Runtime Library.
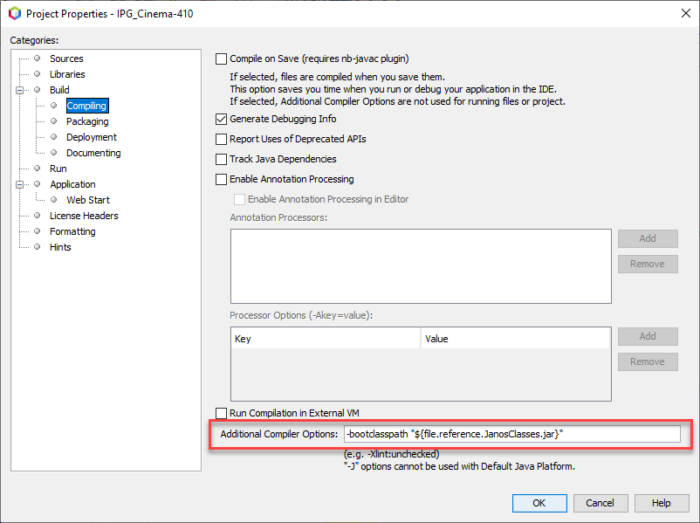
Give JANOS Runtime precedence
In order to ensure that the classes stored in the JANOS Class Library take precedence over any that might be also present in the JDK, you can do this by going to the compiling section of your projects properties and in the additional compiler options entering:
This will insure that the JanosClasses.jar file is searched before any other library. As of the time of this writing we do not know of a way to prevent the Java Compiler from referencing the installed platform libraries.
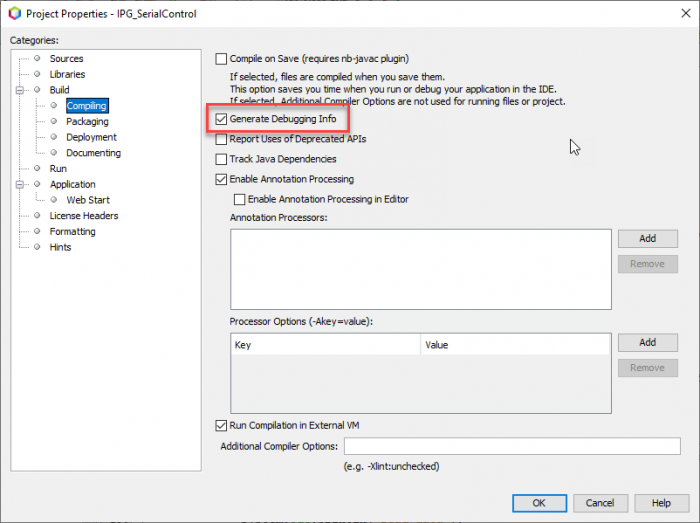
Debug Information
Debugging information is extremely useful if some error arises. The debug information in the Stack Trace will pinpoint exactly where the bug lies in your code. The stack trace will show you the call stack containing source file names along with line numbers. You can enable debug information in the Project Properties dialog.
JNIORs can connect with other devices via Ethernet connections. Defining a port and IP, the JNIOR can listen or send to a device with those Ethernet settings using the IO and Net classes of the JANOS Runtime library. Receiving data uses a DataInputStream and sending data uses a DataOutputStream.
TCP
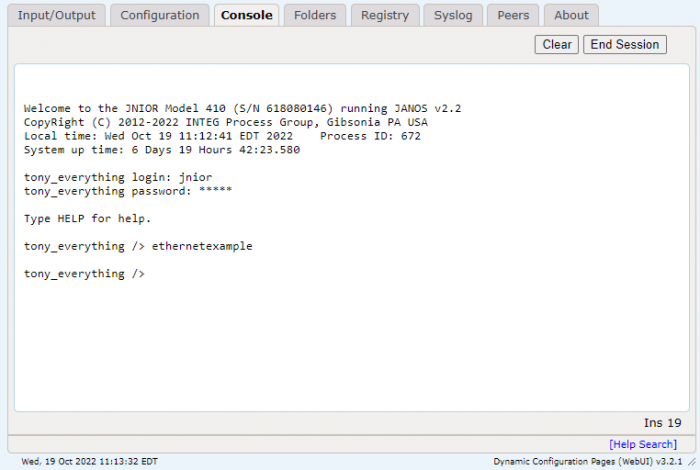
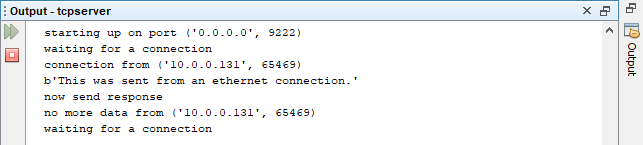
Below is a very short example, that shows a quick reference to the IO class to create a socket to open a DataOutputStream. Once that is open I can send a message to an external device. The socket only requires the IP address and the port number. In this example the IP is 10.0.0.17 and the port is 9222. Once the DataOutputStream is created using the socket, I send a string out it. I use a TCP server I created that listens on that IP and port number to see if it receives the data sent.
I put the built jar file of this example application into the JNIOR’s flash folder and ran it from the Web UI’s console tab. After it has successfully run, I check my TCP server and see that the information was successfully received.
UDP
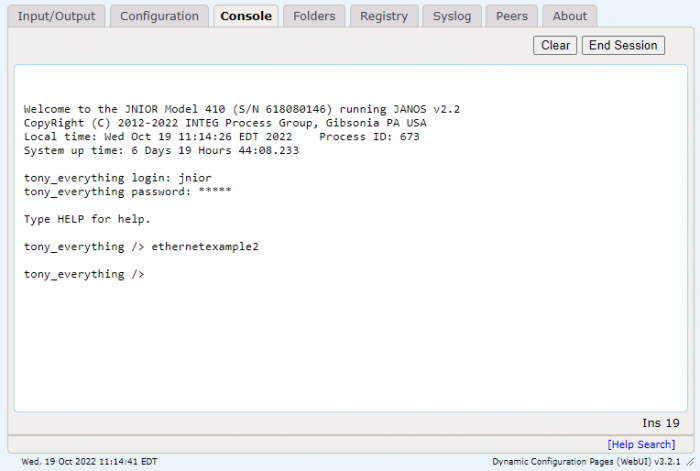
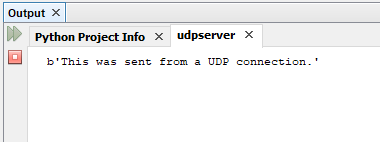
Another example of Ethernet control uses a UDP connection versus a TCP connection. Another example is below, using the Datagram Socket and Packet classes from the Java.net package. This creates a UDP connection from the JNIOR to any UDP server listening and sends it a string.
Just like before, I put the built jar file of this example application into the JNIOR’s flash folder and ran it from the Web UI’s console tab. After it has successfully run, I check a UDP server I created and see that the information was successfully received.
Applications can log information they are generating into a .log file to view. This feature can be crucial to some users, letting them be able to monitor data that constantly needs supervision. Log files can roll over as well, which happens when a log file runs out of space. When this occurs, a new empty file with the same name is created to log more data, while the old file that has no more space gets a .bat extension added to the end of the file name. This allows for data to be retained longer before being overwritten.
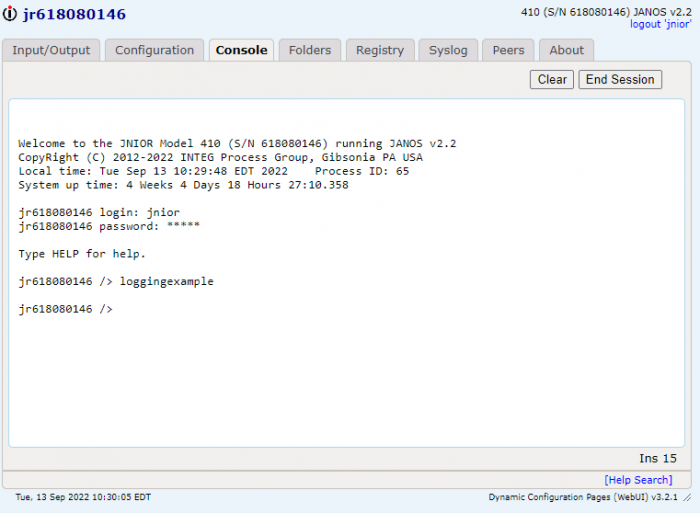
To use logging in a software application on the JNIOR, you will need to use the JANOS class of the JANOS runtime library. With it you can define a log file name and what you want to log to it. If the log file exists at the location you specify, it will add what enter to it. If the log file doesn’t exist, it will create the log file, and then log what you enter to it. Below is a short example of creating/adding to a log file that exists in the temp folder of the JNIOR.
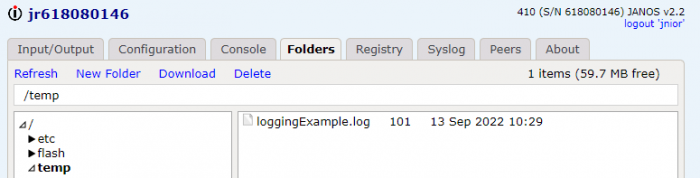
I put the built jar file of this example application into the JNIOR’s flash folder and ran it from the Web UI’s console tab. As you can see after running it, going to the temp directory of the JNIOR shows the loggingExample.log file.
Series 4 JNIORs have a varying amount of inputs and outputs depending on what model you have. The 410 has 8 inputs and 8 outputs, the 412 and 412DMX have 4 inputs and 12 outputs, and the 414 has 12 inputs and 4 outputs. Each relay contact rating is 1A @ 24VDC and the voltage source must be in the range of 5 – 30V AC or DC. The JNIOR uses a 2-piece terminal connector system for all power and I/O wiring connections allowing for easy installation and/or removal of the JNIOR.
Controlling Relay Outputs
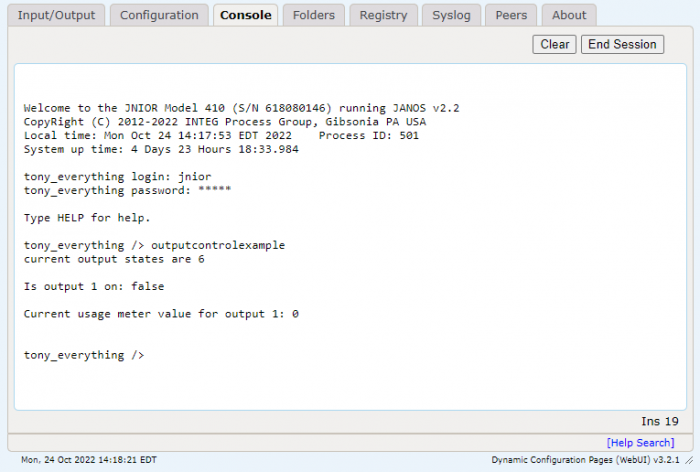
When controlling the JNIOR’s I/O, the JANOS class can be used to get/manipulate their statuses. In the following example the JANOS class is used to pulse outputs, get the output states mask, check the status of an output, and check an outputs usage meter.
I put the built jar file of this example application into the JNIOR’s flash folder and ran it from the Web UI’s console tab. As you can see it displays different data about the outputs at the time of the application running.
Getting Outputs from the IO Log
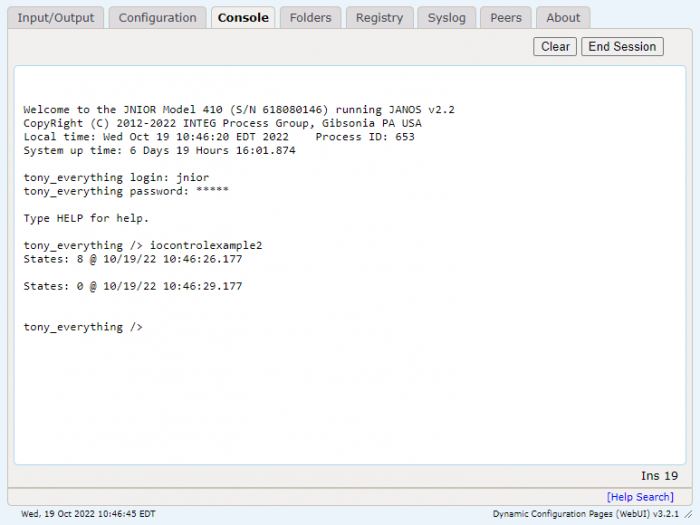
Another way to interact with the I/O on the JNIOR is via the Iolog Monitor. The Iolog Monitor is an object that can be checked for I/O events that have occurred on the JNIOR. There is the IoEvent class and Iolog class. An IoEvent is when an input or output state changed on the JNIOR, and the Iolog is an object that contains all the IoEvents from a certain timestamp. The example below pulses an output, and then shows how the Iolog has recorded that output pulse as an IoEvent.
I put the built jar file of this example application into the JNIOR’s flash folder and ran it from the Web UI’s console tab. As you can see it recorded the output change where output 8 turned on and again when it turned back off.
Excluding the 412DMX, each JNIOR model has a COM port (labelled RS-232) and an AUX port (labelled AUX Serial). Both are DB-9F Female 9-pin D-sub connectors. The AUX port has 4 active signals and the COM port 2. The pin assignments are as follows:
Each port provides at least a 3-wire RS-232 interface. A 3-wire connection contains only the Transmit (Tx), Receive (Rx) and Signal Ground (GND) circuits. The COM port is used for diagnostics, but the AUX port on the 410 is RS-485 capable. These ports can be taken over to send and receive messages from these ports.
Creating a Serial Connection
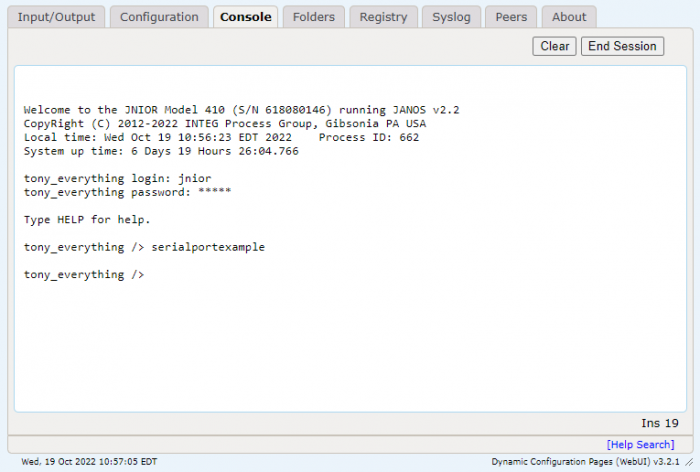
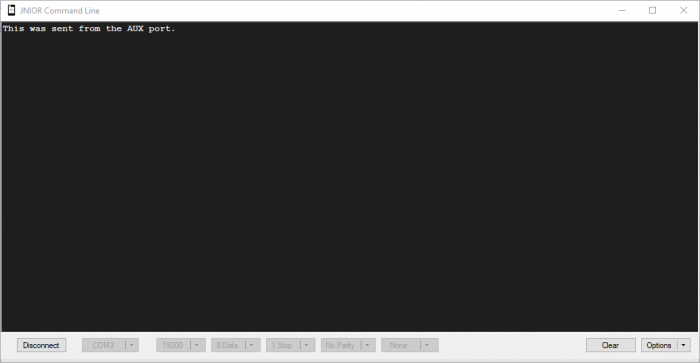
When creating applications to control a serial port, the Comm and IO classes are what can be used to control them from the JANOS runtime library. Using this class you can create Input and Output streams for either the AUX or COM ports to receive or send out data via the serial ports. Below is a very short example, that shows a quick reference to the Comm class to open the AUX serial port and after establishing an Output Stream sends out a string. I opened a serial connection from my computer using command line and connected to the AUX port of the JNIOR to see if the data went through successfully.
I put the built jar file of this example application into the JNIOR’s flash folder and ran it from the Web UI’s console tab. After it has successfully run, I checked my serial connection to the AUX port of that JNIOR and saw the message went through.
Serial Connection Output
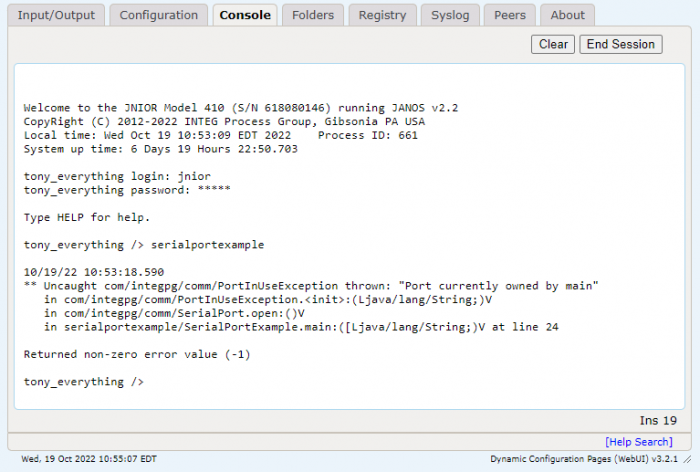
NOTE: AUX and COM ports can’t be opened more then one time, if they are then a PortInUseException error is thrown. An example of this happening is shown below where a serial port was opened twice.
The available expansion modules for the JNIOR are as follows: the Control Panel, Temperature Probe, Environmental Sensor, 4 Relay Output, 10volt, 4-20ma, and 3 Channel LED Dimmer. These expansion modules all have ways to be manipulated through the JANOS runtime library. Each Expansion Module works on any JNIOR logic controller model and contains the following key features:
On-board microprocessor for rapid, effective analog signal sampling
Automatic recognition of the module by the main JNIOR logic controller
Flexibility to utilize a mix of modules
Can be used in addition to the JNIOR temperature sensors
Web-based configuration via the main JNIOR web page
Easily integrated into all the JNIOR communication methods
No separate power supply necessary – all power received via the Sensor Port
2-year warranty
Controlling I/O and Reporting Data
When creating applications to control expansion modules, the SensorPort and JANOS classes are what can be used to control them from the JANOS runtime library. Using this class you can get an expansion modules type, check their inputs, check/set their outputs, get the temperature, set LEDs, and check the external device list of expansion modules. Below is an example, that gets each module connected to the JNIOR, and then reports on their data.
I put the built jar file of this example application into the JNIOR’s flash folder and ran it from the Web UI’s console tab. As you can see it prints the expansion modules connected along with info about the data they are reporting.
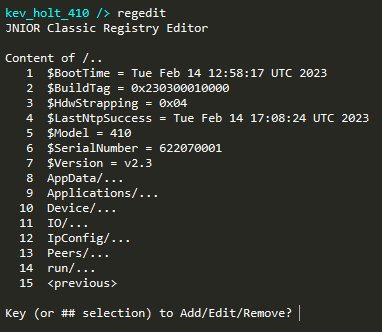
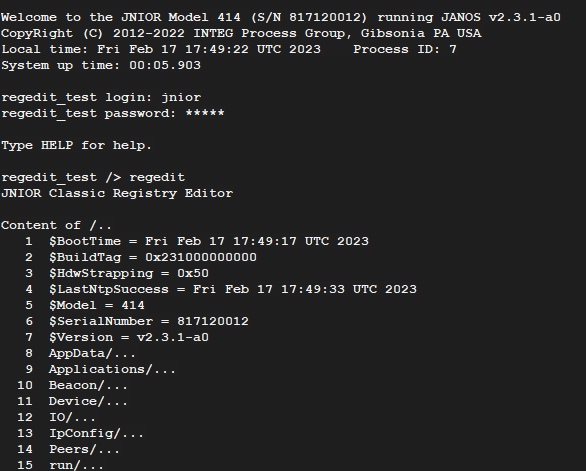
JANOS v2.0 removed the classic command line registry editor. The regedit utility brings back that command line functionality within an add-on application. regedit starts by displaying the root registry directory, which is where the registry starts for the JNIOR. Unlike how editing the registry currently works with Series 4 units, the regedit utility displays the full registry with a number value for each folder/key in the command line. regedit allows you to either display a folders contents, edit/delete a registry key, or add a new folder/key.
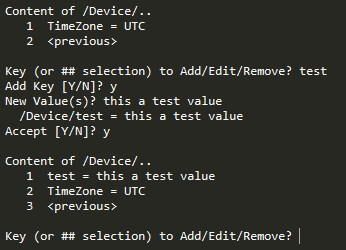
Adding a key
When inside a folder or in the root directory key, you can add a new key. Simply enter the name of the key you wish to create. You’ll then be prompted to add new values to this key. Because the JNIOR registry can’t contain empty keys in it, if you don’t enter a value for the key you are creating the key will instantly after being created. After entering value for the key, it will display what the key with its value. After hitting ‘y’ to accept the key. it will be created and redisplay your current folder’s registry keys.
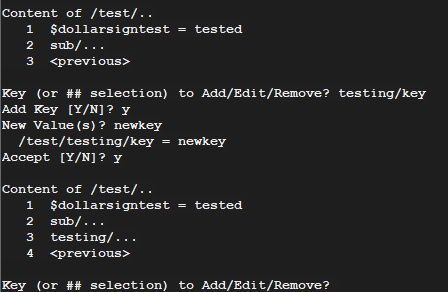
Adding a folder
Adding a new folder can be done when you add a new key. When adding a new key, you add the folder name beforehand to set the folder the key resides in. For example, if you wanted to create a folder with the name ‘testing’ that contains a key named ‘key’, you would type ‘testing/key’ and then enter a value for that key. A key must be created with a new folder, since folders can’t be empty in the JNIOR registry. Just like a key, if an empty folder is added it is instantly deleted.
Viewing a folders content
When a number entered is associated with a registry folder, regedit will ‘enter’ that folder by displaying the folders/keys inside of it and giving each one a number. You can then repeat the process of entering another registry folder or then edit a registry key, the only difference being that you can go back to the previous folder you were in by typing the number associated with the ‘<previous>’ value.
Editing/Deleting a key
When a number is entered that is associated with a registry key, regedit will display the key and its value and prompt you to either change, edit, or remove the key. To do one of these of options, you’ll just enter the first character for any of these options (‘c’ to change, ‘e’ to edit, ‘r’ to remove). The change option allows you to re-enter a brand new value for the key you are editing. The edit option is similar to the change option, but leaves the previous value the key had for you to edit. Lastly, the remove option simply removes the key from the registry. You’ll be prompted one additional time to confirm removing the key before the remove goes through.
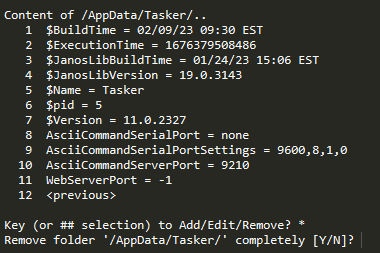
Deleting a whole folder
While inside a registry folder, typing the * key will allow you to delete the entire folder you are in. Be careful using this to make sure you don’t delete necessary folders on the JNIOR.
Were you a fan of the classic way you could the configure registry? With the RegEdit application, you can edit the registry the same way you would in the past. Simply download and update your JNIOR with the RegEdit update project and run the application from the command line by typing ‘regedit’. Click here for more information.
+ Allow you to query the temperature sensor via a HTTP Request. A JSON representation of the device will be returned.
As of now the only available devices are Type28 and Type7E...
Type28 is the temperature probe and Type7E is the environmental sensor.
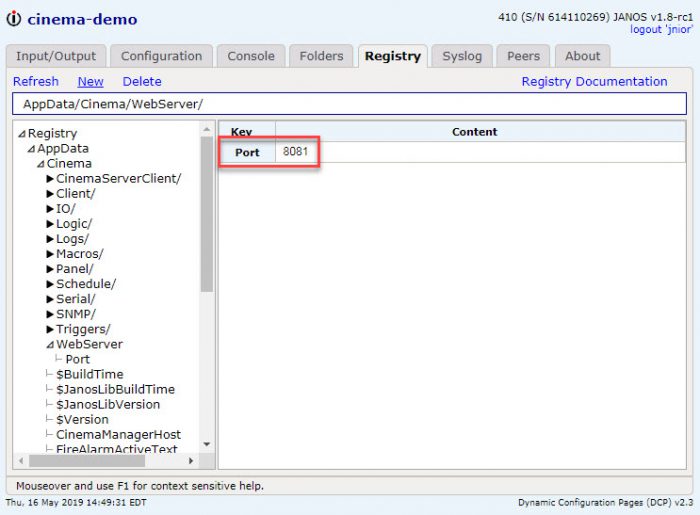
To enable this you will need to set the AppData/Cinema/WebServer/Port registry key. The JNIOR will need to be rebooted after this key has been changed. In this example I chose 8081. Port 80 or 443 is normally the default web server port. This web server port is an additional web server that cinema is hosting to handle these types of requests.