Beacon Tab
The Beacon Tab allows you to view the JNIORs connected to the local segment of your network. This uses UDP broadcasts to find JNIORs that may not have the same IP scheme as the host machine running the Supporter application. In this case, TCP connections do not work but the JNIOR Supporter will help you to set up the correct network configuration settings needed for your network.
Now, large screens will be able to see the first few columns of the Beacon tab all the time with the detached Beacon window. The Beacon window will stay on the left side of the Supporter window. If you want to place the Beacon window back in the stack as before, click the right arrow next to the title in the Beacon tab.
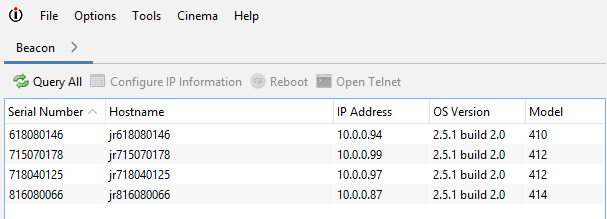
The Beacon tab shows you information about the JNIORs that were found. The Beacon technology uses UDP over port 4444. A UDP broadcast is used to discover JNIORs on the network. UDP broadcasts are usually blocked by routers therefore restricting the UDP broadcast to the local segment of the network.
Right-click for options⚓︎
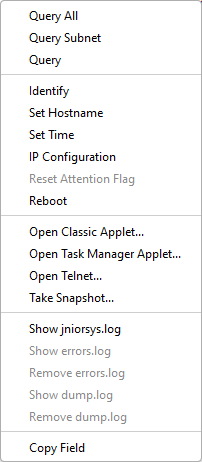
Right-clicking presents you with actions that can be taken for the selected JNIOR.
- Query All – Broadcasts the Query message to the Network to ask JNIORs to report back
- Query – Broadcasts a query message to only the selected JNIOR on the network.
- Identify – This will flash the amber status LED on the selected JNIOR for a few seconds.
- Set Hostname – A prompt will be presented asking for the new Hostname. The current Hostname will be pre-filled.
- Set Time – Synchronizes the JNIOR’s time to the PC’s time that the Supporter runs on.
- IP Configuration – The Network Configuration dialog will be displayed. You can choose between DHCP and static addressing. If a static IP Address is chosen you’ll need to enter an IP Address, Subnet Mask, Gateway Address, and DNS Servers information.
- Reset Attention Flag – Attention flags are messages displayed in Beacon’s Message column. Selecting this will clear all messages in the Message column of Beacon. (If errors are thrown the attention flags will re-populate until they are handled.)
- Reboot – This will reboot the JNIOR. Rebooting will make the JNIOR disappear from Beacon for a brief moment.
- Launch WebUI- This will launch the main web user interface for monitoring and controlling the I/O as well as general JNIOR configuration.
- Open Telnet – Opens a telnet session for console-level access. Here is a link to different telnet commands a JNIOR can be given.
- Take a Snapshot – Initiates the Snapshot process. A snapshot is a copy of a JNIOR configuration, downloaded as a Zip File. These can be used to move configuration from one JNIOR to another or to debug/troubleshoot JNIORs.
- Get Network Capture – Create a network capture file on the JNIOR, and if Wireshark is downloaded on your PC, the Supporter will open the network capture in Wireshark.
- Show jniorsys.log – Loads the jniorsys.log.bak and jniorsys.log files into a dialog for real-time viewing.
- Show/Remove errors.log – With these options, you can either load the errors.log.bak and errors.log files into a dialog for real-time viewing, or remove them from the JNIOR. This option is only enabled if the Attention flag indicates that there is an error file.
- Show/Remove dump.log – With these options, you can either load the dump.log.bak and dump.log files into a dialog for real-time viewing or remove them from the JNIOR. This option is only enabled if the Attention flag indicates that there is a dump file.
- Copy Field – Copies the data inside the field currently selected in Beacon. This is to easily grab values from the Beacon tab if needed.