Dry Contact Relays⚓︎
Probably the most basic function that the JNIOR can perform is to close and open one of its relays. This is one of the ways the JNIOR controls the world around it.
These are small signal relays. Early production JNIORs (with Omron relays) are limited to 1A. We currently use relays that can handle 2A. Voltages as high as 120VAC or more may be used. The limiting factor though is the current and the inductance of the load. If you use one of the relay outputs to drive something like a larger relay’s coil you should make sure there is a flywheel diode for Back EMF Suppression in the circuit. Otherwise the spark that would occur across the contains will seriously limit the life of the relay. A MOV device would be even better.
The Power 4ROUT external module that we have available uses 10A relays and has built-in MOV devices across each contact pair. The part is Panasonic ERZ-V07D431 VARISTOR 430V 1.75KA DISC 7MM. These can obtained from DigiKey among other places. If you are driving an inductive load you can purchase these or similar devices and place one across the relay outputs to extend the relay life.

There are a number of good pages on the Internet that address this concern. You can search on “Back EMF Suppression” for more information.
Each Series 4 has at least two relays that can be modified by internal jumper to function Normally Closed (NC). The Model 412 has 4 that can be so configured.
Right out of the box you can control the relays. Once you have connected the JNIOR to your network and set the IP addressing you can point your browser at the unit and open the DCP. Log in as the administrator. The default username is ‘jnior’ and the password is ‘jnior’.
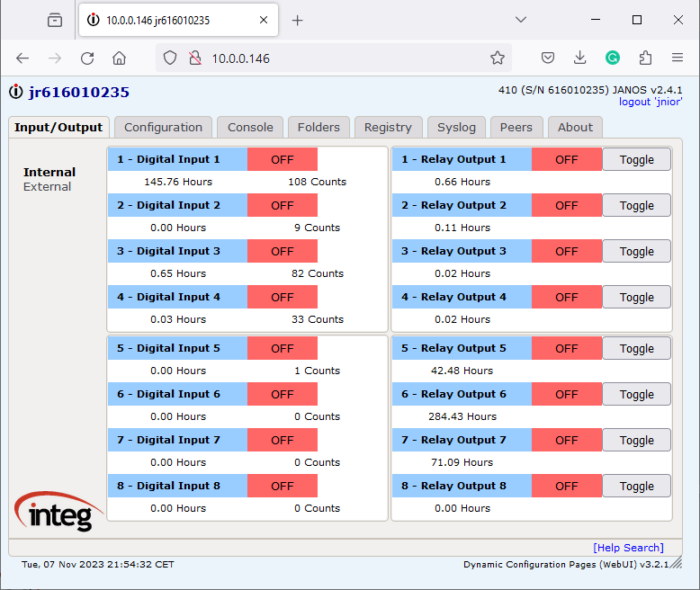
JNIOR Web Page⚓︎
Here you can click on a “Toggle” button to turn on (close) and off (open) each relay. In the configuration section you can change the control to “Pulse” as I have done here for Relay Output 8. You can define the pulse duration in milliseconds. In fact, through configuration settings you can alter many aspects of this screen including the labels. The display can then reflect your application.
A “guest” login will only be able to view the status. The control buttons are not displayed.
So if you allow access to the JNIOR through your router you can control relays from anywhere in the world. It is highly recommended of course that you change the administrator’s password. I would also disable the “admin”, “user” and “guest” accounts if you do not need them. Use the USERS command in the Command Line Console to see the status of accounts. If you open your JNIOR up to the world you need to make sure that it is secure.
Command Line Relay Control (JRMON Command)⚓︎
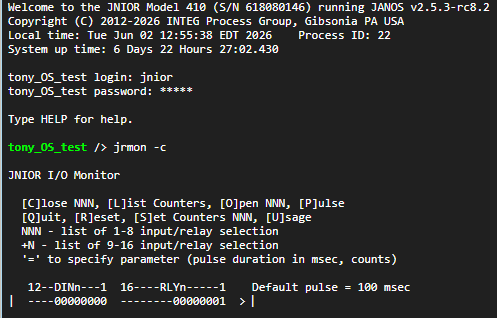
The JRMON command can start a listener that waits for you to give it commands to execute, or can be used to execute a one-off command. The JRMON is useful in debugging Digital I/O using the serial RS-232 (COM) port and through a Telnet connection. If you have network access though, perhaps the JNIOR Web Page is more convenient as the Graphical User Interface is nicer. You would likely not need to use the JRMON command through the JNIOR Web Page Console tab.
JNIOR Protocol⚓︎
The JNIOR Protocol is deprecated and not recommended for new development. It is still supported however. For the Series 3 this was the protocol to use for remotely controlling the JNIOR. It is a binary protocol and very efficient. Experienced programmers can develop drivers to handle the JNIOR Protocol. INTEG supplies an SDK and API allowing PC applications to utilize the JNIOR Protocol. The Series 4 provides a more modern approach through a built-in Websockets interface. It’s use is preferred.
I have attached the current JNIOR Protocol specification. Relays can be controlled through this protocol using the Command Message (Message Type 10). The status of the JNIOR is obtained through the Monitor Message (Message Type 1). The JNIOR Protocol is not strictly Master-Slave. While there are commands and responses, there are unsolicited messages. The Monitor Message is supplied by exception whenever I/O status changes. You do not need to poll for status as you would with MODBUS for instance. You would just wait and consume Monitor Messages when supplied. The Websockets interface is similar.
Websocket Interface⚓︎
With the Series 3 the configuration pages reached using the browser were required to execute Java Applets. The applet is the only way of making the JNIOR Protocol connection (Port 9200) for web use. Today both the applet and the JNIOR binary protocol are outdated.
The Series 4 Dynamic Configuration Pages (DCP) are also accessed through the browser. These use modern Dynamic HTML and JavaScript. This communicates with the JNIOR through a Websockets connection which is supported by all browsers over the same HTTP or HTTPS connections. The Series 4 built-in Websockets interface uses JSON messaging and provides for a wider set of capabilities. The DCP can manage files on the JNIOR, offer Command Line Console access, and monitor real-time Syslog status. There is much more. A PC Application can make a Websockets connection as well.
Both the Websockets Interface and the JNIOR Protocol can be used to remotely control relay outputs and maintain status of JNIOR I/O.
The current Websockets documentation is a Wiki in our Redmine system at INTEG. I have generated a PDF copy of that document and attached it here. We will help you make use of this protocol.
Application Control⚓︎
There is one more way to control relays. That is through an application program running on the JNIOR. Application programs are written in Java and can be generated by Netbeans or any Java IDE and compiler. The Series 4 operating system (JANOS) can execute Java JAR files directly. You write your program using the JNIOR runtime libraries, load it onto the JNIOR and execute it. Applications can be set to start at boot.
You can do just about anything with an application program on the JNIOR. Manipulating the JNIOR I/O is obviously one of the most important.
For example, the following program when executed closes Relay Output 1.
    import com.integpg.system.JANOS;

    public class Main {
        public static void main(String[] args) throws Exception {
            JANOS.setOutputRelay(0, true);
        }
    }
Other Control Methods⚓︎
There are still other ways to control JNIOR I/O. For one you can enable the MODBUS protocol. The JNIOR can be configured as either a MODBUS Server or MODBUS Client. Addressing is defined for the JNIOR I/O. There are a number of standard applications that INTEG supplies. The CINEMA application for instance allows you to define macros that are triggered by certain events and those can manipulate the I/O.