Logging Temperatures in Tasker
Tasker can perform many different things, one of which is the ability to log information. Tasker contains a Logger tab that can create Logger profiles to record data. These Loggers tell what needs to be logged and which file it should be stored in when used in a task. This post will show how to record temperature values from an environmental sensor using Tasker.
To set Tasker to record temperatures from an environmental sensor, there are a few steps we need to take:
- First, we need to create Signals in the Signal Tab. These will be used in the Logger tab to record their values.
- Next, we create a Logger in the Logger tab. Here we use the Signals to document their values in log files.
- After creating the Logger, we now go to the Task tab and create a task that includes the Logger that was just created.
- Finally, once the task is created, in the Schedule tab we create a Schedule that runs the task for however often we wish to record the environmental sensor values.
NOTE: In step 4 you can also use a Trigger, but this example will focus on using a Schedule.
Creating Signals
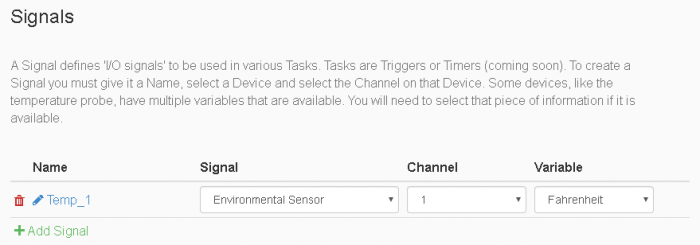
Signals are Input/Output values from the JNIOR or expansion modules compatible with the JNIOR. In this example, we are using an environmental sensor expansion module to record these values. First, we’ll create a new workspace using the File Drop-Down. Then in the Signals tab, After clicking the “Add Signal” button, we’ll create a new signal called Temp_1. After the Signal is created, it has three value fields to fill out. The first one is the Signal drop-down value, where you will pick where we are getting the Input/Output values from. As stated previously, we are grabbing these values from an environmental sensor, so we’ll select it from the drop-down options. Next is the channel for the environmental sensor. Each channel represents a different environmental sensor. Since we are only using one sensor, we’ll select channel 1. Lastly is the variable type, and while the values you can get are either Celsius, Fahrenheit, or humidity, we are going to be logging the info in Fahrenheit, so that’s what we’ll choose.

Creating a Logger
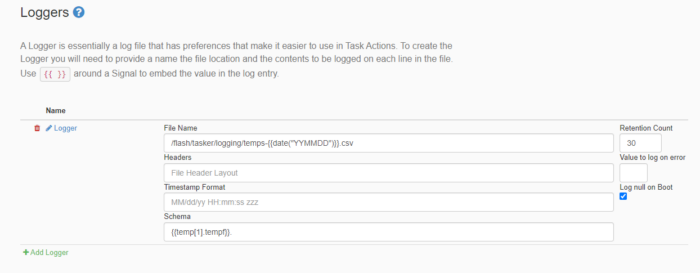
Now that the Signal is created, we can create a Logger to record those values in a file. We’ll go to the Logger tab and select “Add Logger”. The first value is the File Name, which is where you define what the name of the log will be when it is created, and the file path on the JNIOR where it will be saved. In our example, we used the file path /flash/tasker/logging/temps-{{date(“YYMMDD”)}}.log. If you run this logger and go to the directory on the JNIOR where you saved this log, you’ll see the date(“YYMMDD”) will be replaced with the date the log was created. After this is the Headers field which creates headers in the log right above where values will be added. We define a header in the example that will add Temperature to the top of the log. The next field is the Timestamp Format, which defines how the time is recorded next to the value being logged, leaving this blank will use the grayed-out default (MM/dd/yy HH:mm:ss zzz). After that is the Schema field, which lets you define what values should be logged when the logger activates, here we log the temperature from a Temp sensor connected to the JNIOR by entering {{temp[1].tempf}}. Lastly, is the file retention count. All this does is decide how many files of information the Logger will create before overwriting previous files, so if the number is set to 10, once the Logger has created 10 files of information, the next file it creates will overwrite the previous 1st Logger file. This example uses 30.

Here is the resulting log on the JNIOR created from the Logger.

Creating a Task
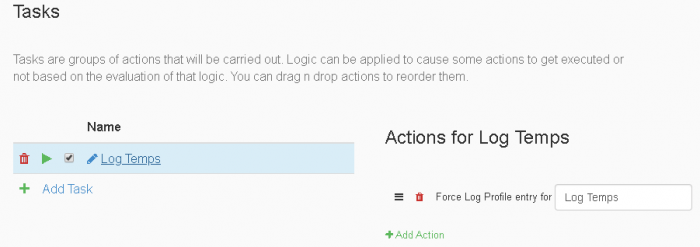
With the Logger being created, we now need a task that uses our Logger so it will activate and record the data we want. In the Task tab, we’ll select the button “Add Task”. Once the Task is named, click on its name and select “Add Action”. The Action Dialog box will appear with all the actions a task can perform. Here we’ll select the Log Profile action, which we can use to call the Logger we created in the Task. Once the action is added, the only value to enter is the name of the Logger we just created. This will now make the Task activate the Logger each time it runs.

Creating a Schedule
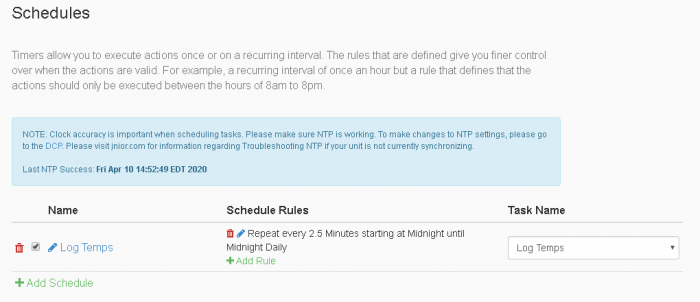
Lastly, having a task activate a Logger is good, but it will only record when you activate it. Adding the task to a schedule will allow us to record these values on a time interval. Going to the Schedule tab, you’ll click on the “Add Schedule” button. After naming the Schedule, there will be two options to fill out. The first one appears by selecting the “Add Rule” button, which will bring up the Rule Dialog box where you can configure when the schedule is timed. For this example we will set the Schedule type to schedule so we have more options and rules to pick from. The start date is the date for whenever you want the schedule to begin activating the task you set with it. Next are the Start Time, Repeat Every, and End Time options (End Time appears after you edit Repeat Every). We set both the Start and End Time to Midnight so that the interval is always running. Repeat Every is set to 2.5 minutes so that with the Start and End time set, the task will run every 2.5 minutes for an entire day. For the Date Selection type, we used daily in this example so we can set the Recur Every option to 1. This will make the task run every day. Lastly, after completing the Rules for the schedule, we add a task that we want the schedule to activate based off the rules we set for it, which will be the task we created in the Tasks tab.

Once the Schedule is completed, the Logger will now record the Signal values of the environmental sensor as values in a .csv file from a task that is scheduled to run every 2.5 minutes, every day.
