So you’re developing an application. It works, but you question if it is efficient or not. That is where the THD command comes in. The THD command will show all of the threads that are active in each Java application that is running.

This command will also show other useful JVM information. Information such as the number of unique classes that have been loaded, the amount of memory that has been allocated to hold that class information, process time, heap memory usage, stack usage and class object memory usage.

Then each thread is listed showing its processor usage time, thread name, the class that implements the thread, parent thread, state and whether or not the thread is a daemon thread.

Lastly any Watchdog that has been activated is listed with its name, the action that will be carried out should the watchdog be triggered and how long until the watchdog will be triggered should it not be fed.

Here is a quick application that tests the Watchdog. You can see that at the time the thd command was executed the Watchdog was about to expire, within 1 second.

kev-dev /> thd
   9 classes loaded.   44.7 KB
   1 JVM instances active.
Command/10.0.0.27:55691/flash/watchdogTest.jar         0.557   mem: 20.9K  pid: 36  stk: 0.3K  obj: 2.1K  cls: 12.4K
         0.150  1: main, java/lang/Thread, main, SLEEP
     Watchdog: 'Watchdog Test', WDT_REBOOT, remaining = 0.880s

Here is the code listing for the above test application.

package watchdogtest;
 
import com.integpg.system.JANOS;
import com.integpg.system.Watchdog;
 
/**
 * This application tests the watchdog. A watchdog will be registered with the operating system. It will be fed a few
 * times and then left to be triggered. When it gets triggered we should see the registered action get carried out.
 */
public class WatchdogTest {
 
    public static void main(String[] args) throws InterruptedException {
        // instantiate the watchdog and register it to reboot when it gets triggered
        Watchdog watchdog = new Watchdog("Watchdog Test");
        watchdog.setAction(Watchdog.WDT_REBOOT);
        watchdog.activate(60000);
        // log to the syslog so that we can see exactly when the operating system reboots
        JANOS.syslog("Watchdog Started");
 
        // sleep for 30 seconds and then feed the watchdog.
        Thread.sleep(30000);
        watchdog.refresh();
        JANOS.syslog("Watchdog fed");
 
        // sleep for longer than the watchdog duration.  This will allow the watchdog to get triggered.  We 
        // should see that the reboot occurs 60 seconds after the last time the watchdog was fed
        Thread.sleep(120000);
    }
 
}

And here is the associated log entries from the jniorsys.log. As expected the timing works out. The watchdog was started, 30 seconds later we log that it was fed and then 60 seconds later we get the Assertion indicating that the reboot sequence has been commenced. 15 seconds are given to applications and system processes for safe shutdown.

11/17/17 14:13:19.302, Watchdog Started
11/17/17 14:13:49.368, Watchdog fed
11/17/17 14:14:49.487, ** Assertion: Watchdog Test watchdog triggered reboot (Line 1139)
11/17/17 14:14:49.496, ** Terminating: System
11/17/17 14:15:05.937, ** Reboot on assertion: Watchdog Test watchdog triggered reboot (Line 1139)
11/17/17 14:15:05.945, -- JANOS 412 v1.6.3-rc2 initialized (POR: 58)

The JNIOR Connector Kit contains 5 connectors. Four (4) are the 8-position female screw terminal types for I/O connections and one (1) a 4-position connector of the same style for the power connection. The latter will also be found on power supplies that are obtained from INTEG. here are the part numbers.

They look like this. The others having 8 positions of course.

These are SINGLE ROW FEMALE TERMINAL BLOCK PLUG 0.200″ 5.08MM PITCH. Color is irrelevant although INTEG tries to supply BLACK for digital signals and power, and GREEN for analog (external modules).

There are alternatives to these connectors that you can source separately. INTEG does not stock an alternative although arrangements can be made upon request.

Connectors are generally an expensive part of the product. These two-part connectors add value to the JNIOR.

Some wiring hints…

If multi-strand cables are used it is recommended that either the stripped end of the wire be properly tinned or some form of crimp pin be employed. If neither is convenient then insure that the stripped wire is tightly and cleanly twisted and clamped securely by the connector. Cables should have sufficient slack so as to not stress the connection as connectors are inserted or removed. Ty-wrap cables for a single connector together within 3″ of the connector to provide strength in numbers.

If solid cable is used then it is important that cables have sufficient slack so as to not bend the cable at the connector when the connector is inserted or removed. Ty-wrap cables for a single connector together for added protection.

Screw terminals should be hand-tightened strongly. Periodically check screws and tighten as necessary. Repeated changes in temperature can over time loosen screws.

Clamping more than one cable at a connector position is not recommended. In this case the clamping mechanism will grab the largest diameter wire more strongly creating an intermittent and loose connection with the other. If you must chain wiring in this fashion either tin wires together or tightly and cleanly twist them before clamping. Carefully wiggle both wires separately to insure that both have been securely captured.

When stripping wire use the proper tool with the proper wire gauge setting. Be careful not to cut into the copper conductor. This is highly likely if using a knife to remove the insulator. This can completely cut outer strands of multi-stranded cables reducing their current carrying capacity and increasing the possibility of a poor connection when clamped. Over time as cables are flexed cables that are improperly stripped will tend to break where the insulator has been cut.

If your wiring reaches the JNIOR from above you may consider a connector style where the cables leave the connector at 90 degree angles. For example you can source connectors like this one.

This is Pheonix part nubmer 1836901 and these are available from other manufacturers.

There are screwless connectors. These use spring force to achieve clamping and have the advantage of not loosening over time. There are different approaches. Here is one example.

If strain relief is an issue it is best to secure the cabling to the connector. An arrangement like this can be helpful. This eliminates the flex at the cable end where wires may break or loosen.

Now if you are willing to carry another crimping tool you can take a different approach. This would be much more appropriate when the JNIOR is installed within another product or rack mounting. Here you by just the housing and crimp a pin on each wire which is then inserted.

Here there is no question of loosening and strain relief is built-in. That assumes you are proficient at crimping. This is Pheonix 1808832 and I will attach the data sheet as well.

1808832

If you are using the JNIOR PCB without the housing as part of your product and are will to purchase in quantities of say 100 and allow for a standard lead time we can accommodate any connector arrangement. The PCB holes are on 0.200″ (5.08mm) centers.

Depending on the commitment we can also create a custom PCB to meet your specific needs. This is not as expensive as you might think. Cost does depend on quantity. Call us. We are willing to work with you.

There is no cost in asking.

The JNIOR Web Page is the website served by the Series 4 JNIOR out of the box. Once you have powered your JNIOR, connected it to the network, and assigned it an IP Address you can access the JNIOR Web Page using your favorite browser. This website is contained in, and served from, the /flash/www.zip file on the JNIOR.

Input/Output Tab

You can use the JNIOR Web Page to monitor your JNIOR. Through the Input/Output tab you can see the status of each Digital Input and Output Relay. This tab offers two pages (listed down the left column). These are the Internal I/O and External I/O pages.

Internal I/O Section

If you log into an account with sufficient permissions you can control the relays. The appearance of this page can be configured through the Configuration tab. The labels can be redefined as might be appropriate for your application. You can remove unused inputs and outputs and even mask features such as usage metering if not of use.

External I/O Section

The External I/O refers to external modules that you may optionally use with your JNIOR. INTEG can supply a Power Relay module, analog modules for 10V or 4-20ma, and even temperature sensors. One or more of these may be daisy-chained on the Sensor Port. If you have any of those they can be monitored and controlled in the External section of the Input/Output tab.

Configuration Tab

The Configuration tab is available only to Administrator accounts. This provides a dozen and a half pages covering most every aspect of your JNIOR.

Display Section

The Display page configures settings that affect the appearance of the Input/Output Internal page. Here you may disable any channel which simply removes the channel from view on the Input/Output tab. This does not disable the function of the input or output. It merely allows you to hide unused or background channels. Similarly you can hide Counters, Usage Meters, Alarm indications and Controls. For relay outputs you can select the Pulse control instead of Toggle if appropriate. You may even alter the coloring used in showing the input or output state.

Note that each item of configuration is associated with a Registry Key. If you hold the mouse over a setting the related key is displayed in a Tooltip. Configuration settings that differ from default will appear in the Registry which can be viewed and edited directly using the Registry tab. More on that in a bit. While the mouse is hovering you may hit F1 to view the built-in Registry documentation.

Labels Section

The Labels page provides the ability to configure the text displayed on the Input/Output Internal page. In addition to Descriptions and I/O State labels you can change the units for the Counter.

This page is shown for the Model 410 which has 8 inputs and 8 outputs. The JNIOR Web Page will display different arrangements for the Model 412 and 414. The former having 12 relay outputs and only 4 inputs. The latter with 12 inputs and only 4 outputs.

Inputs Section

The Inputs page affects the function of each input. Here you can configure inversion, debounce and a number of other characteristics for each of the available inputs.

A Block Diagram is available through the provided link to help in visualizing input configuration. We can cover the details under another topic.

Counters Section

The Counters page sets counter configuration for each input. The JNIOR counts each activation of an input. Here you can configure how that is to happen and how it is displayed. You can scale a counter if each activation represented a number of items or a fractional amount of something. Here you can see the value of changing the displayed counter units which are configured on the Labels page.

Here you can also configure two different Alarm levels. Alarms are displayed on the Input/Output Internal page. They are also Events that can issue email notifications.

On this page you can also mouse over an input and click the displayed “X” to easily reset a counter to 0.

Outputs Section

The Outputs page provides state configuration for Usage Metering. The JNIOR tallies time for each activated input or output. This would potentially be useful for Preventative Maintenance. Here you can also set the default Pulse duration that would be used if you elected to configure a Pulse control (button) for the output on the Input/Output Internal page. If you want more information on this section, click here.

Metering Section

The Metering page displays the accumulated time for each Usage Meter. Like the Counters page you can mouse over a Channel and click the displayed “X” to reset the usage. Here you can also set the active usage state and configure alarms. This alarm can be set to send an email notification on the Events page.

Serial I/O Section

The JNIOR has two serial ports. The Serial I/O page can be used to set communications parameters for each port. The defaults are shown.

Generally an Application Program is used to perform communications over a serial port. The program itself may configure communications parameters. There are times where you may wish to set the parameters outside of an application. The IOLOG command provides access to a Transmission Log for the AUX port. You can set the Baud Rate and then check the IOLOG to see if data has been received properly.

Applications Section

The Applications page lists Registered Applications. Applications are automatically Registered during boot provided that a JAR file exists in the /flash folder containing a properly formatted appinfo.ini file. The content of the Applications page then may vary significantly from one JNIOR to another.

An application may be set to run at boot. When you check the box associated with the application the appropriate Registry Run Key is created. On reboot the application will automatically start. If available a link is displayed that can lead to additional configuration pages specific to the application.

Note that the checkbox only affects the status of the application after boot. The starting and stopping of applications at any other time is performed at the Command Line which can be accessed through the Console tab.

Mail-Account Section

Each JNIOR has the ability to send email notifications. Applications can be written to generate emails and potentially received them. Outgoing email requires a valid client account. The Mail-Account page is used to configure the outgoing email capability.

Here the Mail Server is something like smtp.comcast.net and the From Address would be the email address for a Comcast account. When you enter the SMTP Username you will be asked for a valid Password. The password is securely stored in the Registry. The remaining settings define the SMTP port, security and other characteristics for the communication. These are the credentials use in submitting outgoing emails.

Mail-Profiles Section

Email notifications can be generated for a number of Events if enabled. JANOS has default structures for those notifications. You can optionally define any number of custom email messages as Profiles using the Mail-Profiles page. When the default content is insufficient these profiles can be referenced by name to define custom email recipients and content.

Events Section

There is a small set of built-in events. The Events page is used to configure the actions associated with those events. For the most part this involves enabling an email notification and defining an optional email profile.

Beyond those listed here an unlimited number of events and actions can be accommodated through application programming or direct configuration of the Registry.

Note that the automatic starting of application programs can be disabled here without need for removing the Run keys.

Network Section

The JNIOR is shipped configured with an IP Address of 10.0.0.201. This likely will not work for you.

To configure the network addressing you can run the Support Tool. The Support Tool is a Windows application that you can download for free from the INTEG website https://integpg.com/jnior-support-tool/. You can also make a serial connection to the RS-232 (COM) port and use the IPCONFIG command at the command line.

Once you can access the JNIOR Web Page you can modify settings through the Network page.

Security Section

The Security page offers a couple of settings.

The Series 4 JNIOR can perform secure communications using Public Key encryption and SSL/TLSv1.2. By default a 1024-bit RSA key pair is used in concert with automatic self-signed certificates. This means that you can access the JNIOR Web Page using a HTTPS connection. You can also perform secure FTP transfers and Telnet connections. The latter is best done with a client program available from us. Of course, you do not need either FTP or Telnet as the JNIOR Web Page offers most of that functionality.

While it doesn’t seem prudent you can disable the SSL capability here by deselecting SSL Enabled. Perhaps more appropriate is enabling SSL Required. In this case FTP and Telnet connections must perform STARTTLS and proceed securely. The standard HTTP port (Port 80) is closed. You can continue to make the secure connection using HTTPS (Port 443). Email will only be transmitted securely.

IP Address filtering is available. The Allowed IP Addresses field can be set with a comma delimited list of IP addresses that can make connection to the unit. This field can also contain a sophisticated filter string. It is recommended that the documentation (use F1) be viewed before setting this field. You can block yourself. In that case you will need to make the serial Command Line connection and remove the filter through the REGISTRY command.

Telnet Section

The Telnet page simply lets you relocate the port. You may want to do that to hide it from casual connections. You can also disable the server entirely. You can do that since you can access the Command Line through the Console tab of the JNIOR Web Page.

WebServer Section

The WebServer page is used to configure the Web Server. Here you can relocate either the HTTP or HTTPS ports or both. You can disable the Web Server entirely. That also prevents use of the JNIOR Web Page but your application might demand the limited access.

By default web access requires a login. You can disable the login requirement and to do so you must also define a user account for anonymous access. If your JNIOR is physically secure and the network is isolated from the larger network you might disable the login. If otherwise you have some pages that you wish to share publicly you can place them in the /flash/public root. Pages are served from that area without the need for authentication.

FTP Section

You can relocate or disable FTP using the FTP page. You can disable FTP and still manage the JNIOR’s file system through the Folders tab of the JNIOR Web Page.

Anonymous FTP access is not recommended. You can allow that by defining a user account to be used for that.

Protocol Section

The JNIOR Protocol is deprecated and not recommended for new applications. The Series 4 offers a more modern Websockets interface which performs all of the same function and much more. It is also not binary. The JNIOR Protocol is still supported.

The Protocol page can be used to relocate the JNIOR Protocol port. The server can also be disabled.

We would recommend disabling the JNIOR Protocol unless you know that it is used. It is also highly recommended that the login requirement not be disabled. If you do so you must then define a user account for the anonymous access.

Modules Section

And finally for the Configuration tab is a page for the configuration of external modules. If you use an external module it will be listed here on the Modules page. If you have recently connected a module and don’t see that one you can select ‘rescan’ to update the list.

If the external module has configuration setting those can be seen by expanding the module. Click the triangle shape. For instance the 4ROUT labels can be altered for use on the Input/Output Externals page.

Console Tab

The Console tab provides access to the Command Line interface. This is similar to a Telnet connection but performed entirely through the web interface (Websockets). Note that an additional login is required here.

You can cut and paste here. That would be one advantage over a Telnet client. You can also drag a file to this window. That will place the file into the /temp folder convenient for further use from the command line. You might drag a UPD here and once it transfers use the JRUPDATE command to update the operating system as an example.

Folders Tab

The Folders tab provides a file explorer formatted view into the file system.

You can navigate through folders by clicking on the left tree or double-clicking folders on the right as you might expect. Files can be selected and downloaded. You can also delete files and create folders. Drag and Drop is supported both into and out of the folder. Although in that case there is some variation in availability depending on the browser you are using. I use Chrome extensively. That seems to provide all of the needed capability.

If you need to move entire folders including subfolders then FTP is a better bet. Here I recommend FileZilla. https://filezilla-project.org/

Registry Tab

The Registry tab provides an explorer view into the Registry. Here you can edit and remove keys as needed. Each setting found in the Configuration tab is associated with a Registry Key. You can make settings here if you know the proper key and format.

It is recommended that you become familiar with the Registry, There are some settings that are not accommodated by the JNIOR Web Page GUI. You will need to enter those here. The Registry can also be manipulated from the Command Line.

The JNIOR Web Page contains built-in and detailed Registry documentation.

Syslog Tab

The Syslog tab displays the System log detail in chronological order with the most recent event at the top. This is the content of the /jniorsys.log and /jniorsys.log.bak files concatenated. You can scroll then through all of the available log history in order from most recent to the oldest.

Here I’ll show a segment of the HoneyPot Syslog since my development unit sees a lot of crazy use and its log is full of confusing stuff. In fact you can see in this log where JANOS was recently updated. The infected.json file that keeps getting updated is the database for the http://honeypot.integpg.com/map.php application running on that unit. The HoneyPot JNIOR is connected directly to the Internet.

Peers Tab

The Peers tab provides quick link access to other JNIORs that you may have on the network. The Series 4 JNIOR is aware of nearby peer products. Here you can move to the JNIOR Web Page on these other units using the link provided. That can be convenient if you have many JNIORs. Okay, so here at INTEG the Peer list gets crazy.

For many this list will be short if there are any at all.

About Tab

And FINALLY! We have the About tab. This actually contains some text and potentially useful information.

Make sure that the Serial Input Buffer Size is adequate for your application. It is 128 bytes by default. If a greater number of bytes that the buffer size are sent and your application does not read them in time then the buffer can fill and data will be lost.

        // display the current buffer size
        System.out.println("auxSerialPort.getInputBufferSize(): " + auxSerialPort.getInputBufferSize());
 
        // set the new buffer size
        auxSerialPort.setInputBufferSize(256);
        // display the new buffer size
        System.out.println("auxSerialPort.getInputBufferSize(): " + auxSerialPort.getInputBufferSize());

The output should look as follows.

auxSerialPort.getInputBufferSize(): 128
auxSerialPort.getInputBufferSize(): 256

The PS Command displays the current processes. JANOS is a preemptive multi-tasking environment. It can execute up to 16 processes using a simple priority scheme. Each process is given an ID and each new process receives a unique ID. For example:

412dmx_r01 /> ps
      0: Idle Process
      1: Network Service
      2: System
      7: Command/Serial
4 total     2:19:16.988 uptime

412dmx_r01 />

The Idle Process (PID 0) collects time when the system has nothing to do; The Network Service (PID 1) handles all network activity on a high priority basis; And, the System Process (PID 2) performs all routine system activities. These 3 processes are created at boot and always appear in the process list. The PS -V command provides a more verbose output format that contains more information.

412dmx_r01 /> ps -v
      runtime       mem  hnd stk frm     id    desc
     2:24:35.303                          0: Idle Process
           3.991    2.7K   7  11          1: Network Service
          11.217    1.3K   7  13          2: System
          12.246   37.9K   7  20          7: Command/Serial
4 total     2:25:36.193 uptime

412dmx_r01 />

This displays the runtime accumulated by each process. The Idle Process should accumulate the most runtime. If that is not the case then perhaps there tight loops in an application that could benefit from a Thread.sleep().

This also displays the amount of memory assigned to the process (mem). If this number were to continually grow with subsequent PS -V commands, then the application may have a memory leak. You might be creating an array and never pruning old entries. Or, there could be a JANOS issue that we would very much appreciate you pointing out to us.

The Handle count is displayed (hnd). Handles represent I/O streams such as stdin, stdout, stderr, comin, comout, auxin, and auxout. These are the 7 default streams. If you open a file or a network stream a handle is assigned. An application can have a number of handles however these too should not increase with time. They also can leak if not properly closed.

Each process has its own stack. The percentage of stack usage is displayed (stk). If a stack overflows it s percentage would reach 100. This is not desirable.

JANOS can execute Java programs. A Java Virtual Machine is launched for each program. In those cases the number of stack frames in use is displayed (frm). This number is limited by the amount of memory. It should be fairly stable for any application.

Other processes may appear in the process list. For example:

412dmx_r01 /> ps -v
      runtime       mem  hnd stk frm     id    desc
     2:47:44.211                          0: Idle Process
           4.879    2.7K   7  11          1: Network Service
          12.895    1.3K   7  13          2: System
           2.939   73.9K   9  20         10: Web Server
          16.721   38.3K   7  20          7: Command/Serial
           0.057   33.8K   7  12         13: Console/10.0.0.20:13948
           0.499   33.8K   7  12         14: Command/10.0.0.20:13981
7 total     2:48:57.353 uptime

412dmx_r01 />

The Web Server is executed to handle connections from browsers. This process is started automatically and remains active for as long as there are valid and active web connections. If there are several minutes of inactivity the Web Server will terminate. It would be restarted should another connection request be received. A single Web Server process handles all web connections.

The Command/Serial process here indicates that I am connected via the RS-232 (COM) port and have an active command line session. Here I must be careful to use the EXIT or BYE command or the process will remain active. Simply disconnecting the cable will not remove this process. There can be only one active serial command line connection.

The Command/[IP Address:Port] process indicates that I have connected to a command line through Telnet (Port 23). This will terminate once that network connection is closed. Each Telnet connection is its own process.

And the Console/[IP Address:Port] process indicates that there is a Console Session open through the DCP (or other Websockets connection). There are multiple ways to access the command line. You can tell them apart by their process name. Each Console Session is its own process.

The Protocol Server may appear as a process. Like the Web Server the Protocol Server handles one or more JNIOR Protocol connections. The service is automatically started when a JNIOR Protocol (Port 9200) connection is requested. After a period of inactivity the Protocol Server will terminate.

The JNIOR Protocol is a deprecated binary protocol which can be used to configure, control and monitor the JNIOR. It is supported however we recommend that new applications use the Websockets Interface. The latter has the same functionality and much more. It is a modern interface.

Unlike the Web Server and Protocol Server each FTP (File Transfer Protocol) connection is its own process. These will appear as FTP/[IP Address:Port].

JANOS can make secure network connections using TLSv1.2. When secure communications are active the Secure Transport process will run. A single Secure Transport process handles all secure communications. It augments network streams belonging to other processes by imposing the TLS protocol and performing the associated encryption and decryption.

The Security Update process is related and is executed when new RSA Keys are being generated. The process of generating a new key pair is computationally intensive. The Security Update process performs that task at a low priority and in the background. JANOS can generate a new set of keys periodically. It then updates its own self-signed certificates. This represents a level of security unprecedented in an embedded controller. The Administrator can install externally generated keys and signed certificates.

Finally each application runs as its own process. Each is a JVM. These will be indicated by program name along with an indication as to how the program was executed. For example.

412dmx_r01 /> ps -v
      runtime       mem  hnd stk frm     id    desc
           1.956                          0: Idle Process
           1.335    1.2K   7   1          1: Network Service
           0.062    1.2K   7  15          2: System
           1.362   58.6K   7  24   7      3: Run/Dmx.jar
           0.020   34.3K   7  12          4: Command/Serial
5 total           4.760 uptime

412dmx_r01 />

here the DMX.jar program was started through a Registry Run key. Compare with the following where the same program has been started at the command line.

412dmx_r01 /> ps -v
      runtime       mem  hnd stk frm     id    desc
        1:51.124                          0: Idle Process
           1.406    2.7K   7   8          1: Network Service
           0.540    1.2K   7  15          2: System
           1.210   51.9K   7  24   7      5: Command/Serial/dmx
           0.081   34.7K   7  12          4: Command/Serial
5 total        2:24.376 uptime

412dmx_r01 />

Notice in the previous post how the application program has a number of stack frames (frm). These programs are executed by a JVM.

Ctrl-C (hole Ctrl and press ‘C’) interrupts an executing Java application when run from the current command line. If you need to stop an application that has been started from a different Console session or through a Registry Run key you will need to use the KILL command.

If an application is not running then Ctrl-C redisplays the Console Welcome banner. This is a quick way to see the current Model, Serial Number and JANOS version. It tells you the current time and uptime. Note that there are other ways to obtain all of that information but the banner is quick. Just hit Ctrl-C.

The display of the current “Uptime” in the banner is a recent addition. Normally this will display “System up time”. However, if the unit has been running uninterrupted for a record amount of time this will indicate the uptime as “Record up time”.

The banner is supplied when you make a Telnet connection before any login is required. The information in the banner is thereby made public.

The DEL key is used to delete characters as you would expect. It has one additional use. If entered as the first and only character on a command line it will toggle the use of the hostname in the prompt string.

The command line prompt displays both the hostname and the working directory/folder. Depending on the length of the hostname and what the current working directory may be the prompt can be lengthy. The DEL key can be used to shorten the prompt string by removing the hostname. The current working folder is always displayed.

If your application is set to start on boot then there is a chance that it will start executing before the network is ready. Add this simple check before you perform any critical network tasks.

            if (!Network.isActive()) {
                System.out.println("Waiting for network");
                while (!Network.isActive()) {
                    try {
                        Thread.sleep(1000);
                    } catch (InterruptedException ex) {
                        ex.printStackTrace(System.err);
                    }
                }
            }
            System.out.println("Network Ready");

The MANIFEST command is a utility that you can use to monitor the health of the file collection on the JNIOR.

If you copy a file from your PC to the JNIOR how do you know that the file has completely and accurately transferred?

Let’s look at the DCP file /flash/www.zip. Let’s see how we can tell if it is perfect.

bruce_dev /> manifest flash/www.zip
JNIOR Manifest      Tue Oct 31 15:49:01 EDT 2017
  Size                  MD5                  File Specification
 182900   2c6ce5c5d365ea53b437a3760d6f4dd0  [Modified] /flash/www.zip
End of Manifest (1 files listed)

bruce_dev />

MANIFEST tells me the size of the file and also the MD5. That is a unique (ugly) hexadecimal value calculated from the file content. If I calculate the MD5 for the file on the PC it should match. So lets see.

File Properties

2017-10-31_15-51-42.png

MD5 Matches

Wait! How do you get those Checksums in the File Properties?

There are many ways to get the MD5 of a file. I found this tool that you install and it adds this to the properties dialog. Here is the link http://code.kliu.org/hashcheck/. It’s sweet.

Don’t like the MD5 hash then use the -H option for the SHA-1 hash. It still matches!

bruce_dev /> manifest flash/www.zip -h
JNIOR Manifest      Tue Oct 31 15:59:14 EDT 2017
  Size                  SHA-1                        File Specification
 182900   34eda6ecf2cbd0f136ec4adef0cfb442a11f8254  [Modified] /flash/www.zip
End of Manifest (1 files listed)

bruce_dev />

Or the -C option for the simpler CRC32. It still matches!

bruce_dev /> manifest flash/www.zip -c
JNIOR Manifest      Tue Oct 31 16:00:41 EDT 2017
  Size     CRC32     File Specification
 182900   2a1f06bd  [Modified] /flash/www.zip
End of Manifest (1 files listed)

bruce_dev />

Pretty sure that file is accurately over on the JNIOR. What do you think?

It is not just about comparing checksums or hash values. You can use MANIFEST to monitor the ongoing status of your files. Here is the HELP for the command.

bruce_dev /> help manifest
MANIFEST [filespec]

Options:
 -S,-R          Include subfolders
 -U             Update reference point
 -C             Report CRC32
 -H             Report SHA-1
 -L             List differences only
 filespec       May contain wildcards

Produces a manifest of file system content including checksums.

bruce_dev />

Okay so we have experienced the -H and -C options. The -S (and -R alias) seems straight forward. If you use a wildcard this option will process subfolders as well.

The -U option creates a reference point. This is a manifest.json database containing file details. MANIFEST can use this database at a later time so you can detect changes, new files and missing files. In short, you will know what has changed and what has not on your JNIOR. That has some merit.

For example we will run MANIFEST -U to make sure that our reference point is set. I will then remove a file and let’s see if MANIFEST can detect it. The MANIFEST command without file specification processes ALL files on the JNIOR. The -L option lists differences.

bruce_dev /> manifest -ul
JNIOR Manifest      Tue Oct 31 16:10:52 EDT 2017
  Size                  MD5                  File Specification
End of Manifest (0 files listed)

bruce_dev /> dir help.txt -l
total 1
-rw-r--r--   1 jnior     root       17110 Oct 31 14:10 help.txt
  1920.7 KB available

bruce_dev /> rm help.txt

bruce_dev /> manifest -l
JNIOR Manifest      Tue Oct 31 16:11:37 EDT 2017
  Size                  MD5                  File Specification
                                            [Missing] /help.txt
End of Manifest (0 files listed)

bruce_dev />

Here we can see that the help.txt file is Missing.

MANIFEST will report missing, new and changed files. In fact if a file changes but its timestamp has not, then it is reported as corrupt. Use of this utility can really help develop confidence in your file system content. You just need to create that reference point.

By the way, there are 2 copies of manifest.json. One is /manifest.json and the other is /flash/manifest.json. One is backup for the other. They are the same. So if for some reason the SRAM is reformatted there is a copy still in the Flash. If Flash is reformatted there is a copy still in the SRAM which holds the root of the file system.

Probably the most basic function that the JNIOR can perform is to close and open one of its relays. This is one of the ways the JNIOR controls the world around it. The Model 410 has 8 relays; The Model 412 has 12 relays; And, the Model 414 has just 4 relays. The number of inputs varies as 8, 4 and 12 respectively.

These are small signal relays. Early production JNIORs (with Omron relays) are limited to 1A. We currently use relays that can handle 2A. Voltages as high as 120VAC or more may be used. The limiting factor though is the current and the inductance of the load. If you use one of the relay outputs to drive something like a larger relay’s coil you should make sure there is a flywheel diode for Back EMF Suppression in the circuit. Otherwise the spark that would occur across the contains will seriously limit the life of the relay. A MOV device would be even better.

The Power 4ROUT external module that we have available uses 10A relays and has built-in MOV devices across each contact pair. The part is Panasonic ERZ-V07D431 VARISTOR 430V 1.75KA DISC 7MM. These can obtained from DigiKey among other places. If you are driving an inductive load you can purchase these or similar devices and place one across the relay outputs to extend the relay life.

ERZ-V07D431 VARISTOR

There are a number of good pages on the Internet that address this concern. You can search on “Back EMF Suppression” for more information.

Each Series 4 has at least two relays that can be modified by internal jumper to function Normally Closed (NC). The Model 412 has 4 that can be so configured.

Right out of the box you can control the relays. Once you have connected the JNIOR to your network and set the IP addressing you can point your browser at the unit and open the DCP. Log in as the administrator. The default username is ‘jnior’ and the password is ‘jnior’.

WebUI Default Page

Here you can click on a “Toggle” button to turn on (close) and off (open) each relay. In the configuration section you can change the control to “Pulse” as I have done here for Relay Output 8. You can define the pulse duration in milliseconds. In fact, through configuration settings you can alter many aspects of this screen including the labels. The display can then reflect your application.

A “guest” login will only be able to view the status. The control buttons are not displayed.

So if you allow access to the JNIOR through your router you can control relays from anywhere in the world. It is highly recommended of course that you change the administrator’s password. I would also disable the “admin”, “user” and “guest” accounts if you do not need them. Use the USERS command in the Command Line Console to see the status of accounts. If you open your JNIOR up to the world you need to make sure that it is secure.

Command Line Relay Control

You can control the relays from the Command Line Console using the JRMON command. The Command Line Console is available as a tab in the DCP (see image in prior post), through a Telnet (Port 23) connection, or through connection to the Serial RS-232 (COM) port at the bottom next to the LAN port on the JNIOR.

The JRMON command will start an ASCII based real-time I/O status and command console. If you wish to control you need to use the JRMON -C option to enable command input. Here a “C1” closes Relay Output 1, “O1” opens that relay, and “Q” exits the mode.

JRMON Control

The 0’s and 1’s reflect the real-time status of inputs and outputs. In this case we have a Model 410 with 8 inputs (all off) and 8 relays (all off to start). Here additional relays will appear if you have a Model 412 or add 1 or more external 4ROUT modules. The number of inputs also follows with model with up to 12 inputs on a Model 414.

You can execute a JRMON -X command at the Command Line and not invoke the real-time display. The following command closes Relay Output 2 and opens Relay Output 1.

jrmon -x c2o1

The JRMON is useful in debugging Digital I/O using the serial RS-232 (COM) port and through a Telnet connection. If you have network access though perhaps the DCP is more convenient as the Graphical User Interface is nicer. You would likely not need to use the JRMON command through the DCP Console tab.

JNIOR Protocol

The JNIOR Protocol is deprecated and not recommended for new development. It is still supported however. For the Series 3 this was the protocol to use for remotely controlling the JNIOR. It is a binary protocol and very efficient. Experienced programmers can develop drivers to handle the JNIOR Protocol. INTEG supplies an SDK and API allowing PC applications to utilize the JNIOR Protocol. The Series 4 provides a more modern approach through a built-in Websockets interface. It’s use is preferred.

I have attached the current JNIOR Protocol specification. Relays can be controlled through this protocol using the Command Message (Message Type 10). The status of the JNIOR is obtained through the Monitor Message (Message Type 1). The JNIOR Protocol is not strictly Master-Slave. While there are commands and responses, there are unsolicited messages. The Monitor Message is supplied by exception whenever I/O status changes. You do not need to poll for status as you would with MODBUS for instance. You would just wait and consume Monitor Messages when supplied. The Websockets interface is similar.

JNIOR Protocol

Websockets Interface

With the Series 3 the configuration pages reached using the browser were required to execute Java Applets. The applet is the only way of making the JNIOR Protocol connection (Port 9200) for web use. Today both the applet and the JNIOR binary protocol are outdated.

The Series 4 Dynamic Configuration Pages (DCP) are also accessed through the browser. These use modern Dynamic HTML and JavaScript. This communicates with the JNIOR through a Websockets connection which is supported by all browsers over the same HTTP or HTTPS connections. The Series 4 built-in Websockets interface uses JSON messaging and provides for a wider set of capabilities. The DCP can manage files on the JNIOR, offer Command Line Console access, and monitor real-time Syslog status. There is much more. A PC Application can make a Websockets connection as well.

Both the Websockets Interface and the JNIOR Protocol can be used to remotely control relay outputs and maintain status of JNIOR I/O.

The current Websockets documentation is a Wiki in our Redmine system at INTEG. I have generated a PDF copy of that document and attached it here. We will help you make use of this protocol.

Builtin_Websocket_Access

Program Control

There is one more way to control relays. That is through an application program running on the JNIOR. Application programs are written in Java and can be generated by Netbeans or any Java IDE and compiler. The Series 4 operating system (JANOS) can execute Java JAR files directly. You write your program using the JNIOR runtime libraries, load it onto the JNIOR and execute it. Applications can be set to start at boot.

You can do just about anything with an application program on the JNIOR. Manipulating the JNIOR I/O is obviously one of the most important.

For example, the following program when executed closes Relay Output 1.

import com.integpg.system.JANOS;

public class Main {
  public static void main(String[] args) throws Exception {
    JANOS.setOutputRelay(0, true);
  }
}

Relay Test Program

In this case I created a Project in Netbeans. I referenced the JanosClasses.jar runtime libraries (available in the JNIOR’s /etc folder). The program must be built to run in the JNIOR environment. It’s close to but not the same as a standard Java Runtime environment for the PC. It has additional classes like the JANOS class that provide for JNIOR functionality.

The program is compiled and the JAR copied from the dist folder into the /flash folder on the JNIOR. I just drag and dropped it into the proper folder using the Folders tab of the DCP.

Then from the command line just type the program name “jtest” to execute. It takes a second for the JVM to load and start the program. The relay then closes.

By the way, I like to include the “throws Exception” or “throws Throwable” in my main method when I am first developing a program. Later I will remove it and then be forced by the compiler to place necessary try-catch clauses to get error handling as it needs to be. Uncaught exceptions are nicely reported by the JNIOR.

Other Control Methods

There are still other ways to control JNIOR I/O. For one you can enable the MODBUS protocol. The JNIOR can be configured as either a MODBUS Server or MODBUS Client. Addressing is defined for the JNIOR I/O. There are a number of standard applications that INTEG supplies. The CINEMA application for instance allows you to define macros that are triggered by certain events and those can manipulate the I/O.

Did I miss any? Maybe you know of another?

The CAT command outputs the content of a file to the display. It has an alias the TYPE command.

bruce_dev /> help cat
CAT filespec

Options:
 -H             Dump file in hex
 -J             Formats JSON
 -P             Displays last page

Displays the contents of a file.
Aliases: CAT, TYPE

bruce_dev />

This is obviously meant for text files such as the LOG files (jniorsys.log for instance). But there are a couple of options.

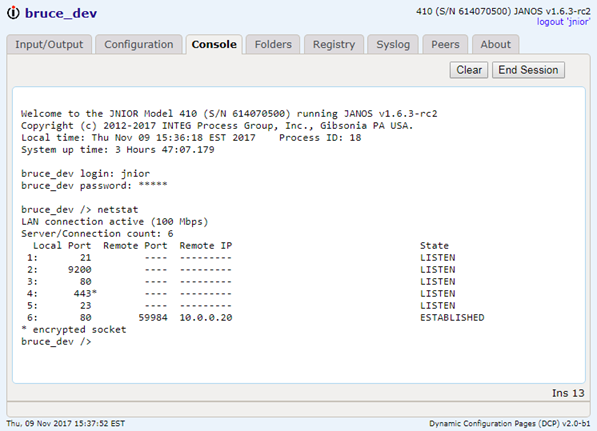
The CAT -P option displays the last 25 lines of a text file. The jniorsys.log file can get quite lengthy as it may contain up to 64KB in characters. Each new event is added to the end of the file (displayed in reverse order in the Syslog tab of the DCP). So if you are interested only in the most recent events, use the -P option to display just the end of the file.

Here’s an example of a text file.

bruce_dev /> cat jniorboot.log
10/31/17 10:15:08.636, -- Model 410 v1.6.3-rc0.4 - JANOS Series 4
10/31/17 10:15:08.655, Copyright (c) 2012-2017 INTEG Process Group, Inc., Gibsonia PA USA
10/31/17 10:15:08.675, JANOS written and developed by Bruce Cloutier
10/31/17 10:15:08.694, Serial Number: 614070500
10/31/17 10:15:08.713, File System mounted
10/31/17 10:15:08.733, Registry mounted
10/31/17 10:15:08.783, Network Initialized
10/31/17 10:15:08.803, Ethernet Address: 9c:8d:1a:00:07:ee
10/31/17 10:15:08.922, Sensor Port initialized
10/31/17 10:15:08.978, I/O services initialized
10/31/17 10:15:09.020, FTP server enabled for port 21
10/31/17 10:15:09.041, Protocol server enabled for port 9200
10/31/17 10:15:09.063, WebServer enabled for port 80
10/31/17 10:15:09.084, Secure WebServer enabled for port 443
10/31/17 10:15:09.105, Telnet server enabled for port 23
10/31/17 10:15:09.134, POR: 5749
10/31/17 10:15:09.155, Cumulative Runtime: 7 Weeks 4 Days 8 Hours 50:17.827
10/31/17 10:15:09.175, Boot Completed [2.2 seconds]

bruce_dev />

The CAT -H option dumps a file in hexadecimal. I’ll insert it in a CODE box so you can scroll it.

CODE: SELECT ALL

bruce_dev /> cat -h jniorboot.log
00000000  31 30 2f 33 31 2f 31 37  20 31 30 3a 31 35 3a 30  10/31/17 .10:15:0
00000010  38 2e 35 39 30 2c 20 2a  2a 20 4f 53 20 43 52 43  8.590,.* *.OS.CRC
00000020  20 64 65 74 61 69 6c 20  75 70 64 61 74 65 64 0d  .detail. updated.
00000030  0a 31 30 2f 33 31 2f 31  37 20 31 30 3a 31 35 3a  .10/31/1 7.10:15:
00000040  30 38 2e 36 33 36 2c 20  2d 2d 20 4d 6f 64 65 6c  08.636,. --.Model
00000050  20 34 31 30 20 76 31 2e  36 2e 33 2d 72 63 30 2e  .410.v1. 6.3-rc0.
00000060  34 20 2d 20 4a 41 4e 4f  53 20 53 65 72 69 65 73  4.-.JANO S.Series
00000070  20 34 0d 0a 31 30 2f 33  31 2f 31 37 20 31 30 3a  .4..10/3 1/17.10:
00000080  31 35 3a 30 38 2e 36 35  35 2c 20 43 6f 70 79 72  15:08.65 5,.Copyr
00000090  69 67 68 74 20 28 63 29  20 32 30 31 32 2d 32 30  ight.(c) .2012-20
000000A0  31 37 20 49 4e 54 45 47  20 50 72 6f 63 65 73 73  17.INTEG .Process
000000B0  20 47 72 6f 75 70 2c 20  49 6e 63 2e 2c 20 47 69  .Group,. Inc.,.Gi
000000C0  62 73 6f 6e 69 61 20 50  41 20 55 53 41 0d 0a 31  bsonia.P A.USA..1
000000D0  30 2f 33 31 2f 31 37 20  31 30 3a 31 35 3a 30 38  0/31/17. 10:15:08
000000E0  2e 36 37 35 2c 20 4a 41  4e 4f 53 20 77 72 69 74  .675,.JA NOS.writ
000000F0  74 65 6e 20 61 6e 64 20  64 65 76 65 6c 6f 70 65  ten.and. develope
00000100  64 20 62 79 20 42 72 75  63 65 20 43 6c 6f 75 74  d.by.Bru ce.Clout
00000110  69 65 72 0d 0a 31 30 2f  33 31 2f 31 37 20 31 30  ier..10/ 31/17.10
00000120  3a 31 35 3a 30 38 2e 36  39 34 2c 20 53 65 72 69  :15:08.6 94,.Seri
00000130  61 6c 20 4e 75 6d 62 65  72 3a 20 36 31 34 30 37  al.Numbe r:.61407
00000140  30 35 30 30 0d 0a 31 30  2f 33 31 2f 31 37 20 31  0500..10 /31/17.1
00000150  30 3a 31 35 3a 30 38 2e  37 31 33 2c 20 46 69 6c  0:15:08. 713,.Fil
00000160  65 20 53 79 73 74 65 6d  20 6d 6f 75 6e 74 65 64  e.System .mounted
00000170  0d 0a 31 30 2f 33 31 2f  31 37 20 31 30 3a 31 35  ..10/31/ 17.10:15
00000180  3a 30 38 2e 37 33 33 2c  20 52 65 67 69 73 74 72  :08.733, .Registr
00000190  79 20 6d 6f 75 6e 74 65  64 0d 0a 31 30 2f 33 31  y.mounte d..10/31
000001A0  2f 31 37 20 31 30 3a 31  35 3a 30 38 2e 37 38 33  /17.10:1 5:08.783
000001B0  2c 20 4e 65 74 77 6f 72  6b 20 49 6e 69 74 69 61  ,.Networ k.Initia
000001C0  6c 69 7a 65 64 0d 0a 31  30 2f 33 31 2f 31 37 20  lized..1 0/31/17.
000001D0  31 30 3a 31 35 3a 30 38  2e 38 30 33 2c 20 45 74  10:15:08 .803,.Et
000001E0  68 65 72 6e 65 74 20 41  64 64 72 65 73 73 3a 20  hernet.A ddress:.
000001F0  39 63 3a 38 64 3a 31 61  3a 30 30 3a 30 37 3a 65  9c:8d:1a :00:07:e
00000200  65 0d 0a 31 30 2f 33 31  2f 31 37 20 31 30 3a 31  e..10/31 /17.10:1
00000210  35 3a 30 38 2e 39 32 32  2c 20 53 65 6e 73 6f 72  5:08.922 ,.Sensor
00000220  20 50 6f 72 74 20 69 6e  69 74 69 61 6c 69 7a 65  .Port.in itialize
00000230  64 0d 0a 31 30 2f 33 31  2f 31 37 20 31 30 3a 31  d..10/31 /17.10:1
00000240  35 3a 30 38 2e 39 37 38  2c 20 49 2f 4f 20 73 65  5:08.978 ,.I/O.se
00000250  72 76 69 63 65 73 20 69  6e 69 74 69 61 6c 69 7a  rvices.i nitializ
00000260  65 64 0d 0a 31 30 2f 33  31 2f 31 37 20 31 30 3a  ed..10/3 1/17.10:
00000270  31 35 3a 30 39 2e 30 32  30 2c 20 46 54 50 20 73  15:09.02 0,.FTP.s
00000280  65 72 76 65 72 20 65 6e  61 62 6c 65 64 20 66 6f  erver.en abled.fo
00000290  72 20 70 6f 72 74 20 32  31 0d 0a 31 30 2f 33 31  r.port.2 1..10/31
000002A0  2f 31 37 20 31 30 3a 31  35 3a 30 39 2e 30 34 31  /17.10:1 5:09.041
000002B0  2c 20 50 72 6f 74 6f 63  6f 6c 20 73 65 72 76 65  ,.Protoc ol.serve
000002C0  72 20 65 6e 61 62 6c 65  64 20 66 6f 72 20 70 6f  r.enable d.for.po
000002D0  72 74 20 39 32 30 30 0d  0a 31 30 2f 33 31 2f 31  rt.9200. .10/31/1
000002E0  37 20 31 30 3a 31 35 3a  30 39 2e 30 36 33 2c 20  7.10:15: 09.063,.
000002F0  57 65 62 53 65 72 76 65  72 20 65 6e 61 62 6c 65  WebServe r.enable
00000300  64 20 66 6f 72 20 70 6f  72 74 20 38 30 0d 0a 31  d.for.po rt.80..1
00000310  30 2f 33 31 2f 31 37 20  31 30 3a 31 35 3a 30 39  0/31/17. 10:15:09
00000320  2e 30 38 34 2c 20 53 65  63 75 72 65 20 57 65 62  .084,.Se cure.Web
00000330  53 65 72 76 65 72 20 65  6e 61 62 6c 65 64 20 66  Server.e nabled.f
00000340  6f 72 20 70 6f 72 74 20  34 34 33 0d 0a 31 30 2f  or.port. 443..10/
00000350  33 31 2f 31 37 20 31 30  3a 31 35 3a 30 39 2e 31  31/17.10 :15:09.1
00000360  30 35 2c 20 54 65 6c 6e  65 74 20 73 65 72 76 65  05,.Teln et.serve
00000370  72 20 65 6e 61 62 6c 65  64 20 66 6f 72 20 70 6f  r.enable d.for.po
00000380  72 74 20 32 33 0d 0a 31  30 2f 33 31 2f 31 37 20  rt.23..1 0/31/17.
00000390  31 30 3a 31 35 3a 30 39  2e 31 33 34 2c 20 50 4f  10:15:09 .134,.PO
000003A0  52 3a 20 35 37 34 39 0d  0a 31 30 2f 33 31 2f 31  R:.5749. .10/31/1
000003B0  37 20 31 30 3a 31 35 3a  30 39 2e 31 35 35 2c 20  7.10:15: 09.155,.
000003C0  43 75 6d 75 6c 61 74 69  76 65 20 52 75 6e 74 69  Cumulati ve.Runti
000003D0  6d 65 3a 20 37 20 57 65  65 6b 73 20 34 20 44 61  me:.7.We eks.4.Da
000003E0  79 73 20 38 20 48 6f 75  72 73 20 35 30 3a 31 37  ys.8.Hou rs.50:17
000003F0  2e 38 32 37 0d 0a 31 30  2f 33 31 2f 31 37 20 31  .827..10 /31/17.1
00000400  30 3a 31 35 3a 30 39 2e  31 37 35 2c 20 42 6f 6f  0:15:09. 175,.Boo
00000410  74 20 43 6f 6d 70 6c 65  74 65 64 20 5b 32 2e 32  t.Comple ted.[2.2
00000420  20 73 65 63 6f 6e 64 73  5d 0d 0a                 .seconds ]..

bruce_dev />

This can be useful at times.

And finally one interesting option. The CAT -J command will format a JSON file. JANOS can work with JSON (http://www.json.org/) and you may create files in that format for configuration or database operations. The MANIFEST command keeps its database in JSON format. I’ll dump it and add it here in a CODE block so you can scroll through it.

CODE: Select All


bruce_dev /> cat -j manifest.json
{
  "model":"410",
  "serno":614070500,
  "vers":"v1.6.3-b3",
  "date":"10/26/17 14:07:19",
  "files":{
    "/etc/janosclasses.jar":{
      "length":243492,
      "date":1507823966,
      "md5":"9b428bdd71054cb88c7e46851dba7307",
      "crc":"d81734ca",
      "sha":"ca80fd476f2ac6fc2d2b39b65faad72a9570a1ca"
    },
    "/flash/serialcontrol.jar":{
      "length":31344,
      "date":1450364184,
      "md5":"b349e02b7efc64c0dfe5eb74292a5ee6",
      "crc":"3a005104"
    },
    "/flash/serialethernet.jar":{
      "length":25266,
      "date":1433505362,
      "md5":"ee5e266bb8418b4223a666bd046a8c56",
      "crc":"c3961df2"
    },
    "/flash/modbusserver.jar":{
      "length":51907,
      "date":1502219129,
      "md5":"77c16d6134dbd7ec93313fbad2b00d93",
      "crc":"b7456b42",
      "sha":"fad4ecc3d1607aafe0a385a10fb5ee90eff521bd"
    },
    "/flash/snmp.jar":{
      "length":239949,
      "date":1493062048,
      "md5":"b77d35c322ef6645f1eca9d22b29400b",
      "crc":"a4073dcb",
      "sha":"44a3c2b41a2375ef603063cc9b04642903dad973"
    },
    "/flash/www/base64.js":{
      "length":3493,
      "date":1433505378,
      "md5":"1138db1b5a6e165beae3ed81739dd2ec",
      "crc":"baceb6f6"
    },
    "/flash/www/configure/index.html":{
      "length":1349,
      "date":1433505382,
      "md5":"0454014aecfd0b7d9e4ce1efe0979139",
      "crc":"11ba5486"
    },
    "/flash/www/jr310applet.jar":{
      "length":287159,
      "date":1441207703,
      "md5":"f9c4840e7244824b75858a1a40dfb163",
      "crc":"3d1d0c72"
    },
    "/flash/www/jniorprotocol.jar":{
      "length":115148,
      "date":1441207710,
      "md5":"404b40c4293bf3c334e3b88e2fe0dd10",
      "crc":"5143ec4f"
    },
    "/flash/www/jniorprotocolhelpers.jar":{
      "length":34991,
      "date":1433505394,
      "md5":"b08e33e0c21e6c075b9b242bf092b68e",
      "crc":"48990308"
    },
    "/flash/www/task/index.html":{
      "length":1415,
      "date":1433505397,
      "md5":"bbdc32dce371881b3eebd15f5b3fce96",
      "crc":"cdbe02e4"
    },
    "/flash/www/taskmanagerinterface.jar":{
      "length":123052,
      "date":1433505400,
      "md5":"077cddccee476fab552d52a5eefd26a7",
      "crc":"647bb4b3"
    },
    "/flash/www/jquery/jquery-1.9.0.min.js":{
      "length":93071,
      "date":1433505404,
      "md5":"2b869ea9c8edd4c2243c5d44f665f632",
      "crc":"6a2a8434"
    },
    "/flash/www/jquery/jquery-ui.css":{
      "length":33441,
      "date":1433505405,
      "md5":"c6bd2971b8e625f2ae43ede9f655a27b",
      "crc":"0497b7a6"
    },
    "/flash/www/jquery/jquery-ui.min.js":{
      "length":96395,
      "date":1433505409,
      "md5":"8f636d4c90ea0abfcbb25528c635bf7d",
      "crc":"820662f5"
    },
    "/flash/www/vendor/bowser/bowser_0.7.2.min.js":{
      "length":3359,
      "date":1433505412,
      "md5":"61a36d48aad1298b17284b53f6ce3fd1",
      "crc":"22deb9e6"
    },
    "/flash/www/text":{
      "length":1336,
      "date":1434044220,
      "md5":"bab65804218b18b9e1a79f2d8e873259",
      "crc":"dda17d61"
    },
    "/flash/www/cycle":{
      "length":419,
      "date":1434044214,
      "md5":"9eb9bbdae70c1f994ebb7f51b18783b8",
      "crc":"9e496eb9"
    },
    "/flash/slaveservice.jar":{
      "length":73323,
      "date":1465435094,
      "md5":"cd6f5e177d75675607e9523d52e133f7",
      "crc":"9a871cd7"
    },
    "/flash/ftp.jar":{
      "length":9563,
      "date":1475783634,
      "md5":"793e460054f07867685e87f98fd402e6",
      "crc":"36fd641e"
    },
    "/flash/task.ini":{
      "length":4311,
      "date":1433782061,
      "md5":"b1f877ac198306b266311eab557ed1dd",
      "crc":"36a57579"
    },
    "/flash/task.jar":{
      "length":102655,
      "date":1434645611,
      "md5":"1979b16970127f2c38912777cb105133",
      "crc":"ed4d6ad7"
    },
    "/flash/jnior.ini":{
      "length":4874,
      "date":1509041097,
      "md5":"7d723f1d36f2f743d2cb6b9b3ba456a6",
      "crc":"ae5d2732",
      "sha":"e798e12e57bedaacb9bdfd9ef11c2ad863e6691e"
    },
    "/jniorsys.log":{
      "length":32844,
      "date":1509041111,
      "md5":"6fa593ed95db856d0825bae724dce983",
      "crc":"d4d89669",
      "sha":"8ba4e9a6563b0a5dc2c0c5726446427d648ac727"
    },
    "/jniorboot.log.bak":{
      "length":1041,
      "date":946684814,
      "md5":"dfe9684a2933723a8cb54c30e4ee910e",
      "crc":"b0dcd002",
      "sha":"5f32c14164cf2ae3570ac0e06ec486c70ffe77e6"
    },
    "/jniorboot.log":{
      "length":995,
      "date":1509041097,
      "md5":"1a3f2d4e7d92774c72b4b1a05465a09b",
      "crc":"c5855a0b",
      "sha":"29ca5cf807094c8212d7fd467fd506e043c2582c"
    },
    "/flash/benchmark.jar":{
      "length":24351,
      "date":1464873509,
      "md5":"987f4044786771f31e0656cf91ed73f3",
      "crc":"1eed095a"
    },
    "/flash/threadtest.jar":{
      "length":3601,
      "date":1434645124,
      "md5":"902ce61cbd2524ca9b83dea335c395d3",
      "crc":"cd2479ff"
    },
    "/flash/test4to20.jar":{
      "length":3862,
      "date":1434659455,
      "md5":"a2e309c9d6dd112e5303aa76d2470740",
      "crc":"976f8208"
    },
    "/flash/dirs.bat":{
      "length":87,
      "date":1435691869,
      "md5":"531d655733ee668d829f9b3bdad96038",
      "crc":"6a11f77a"
    },
    "/flash/www/console/index.php":{
      "length":4347,
      "date":1438974987,
      "md5":"8728680bbc36d369429f7ca2c73cce7d",
      "crc":"c939c423"
    },
    "/flash/clean.bat":{
      "length":56,
      "date":1436532855,
      "md5":"ac9ce6553e1629412fb426b342440493",
      "crc":"3b661614"
    },
    "/flash/jnior1024.key":{
      "length":887,
      "date":1437746752,
      "md5":"b76b5351a92fdcc8d9b6b38ca62d8d71",
      "crc":"7983e14c"
    },
    "/flash/www/config/md5.js":{
      "length":5693,
      "date":1433505379,
      "md5":"a60fec5a81f207ff99ec1b97e3ccad0e",
      "crc":"e2a43d16"
    },
    "/flash/www/config/node.png":{
      "length":253,
      "date":1440435886,
      "md5":"1a8dbfaf1771a06e48dea0e3dc604392",
      "crc":"799c6dfc"
    },
    "/flash/www/config/tabs-styles.css":{
      "length":970,
      "date":1477590404,
      "md5":"68bca7015f51e26ab42199b5eb17a356",
      "crc":"f8870a33"
    },
    "/flash/www/config/tabs.js":{
      "length":3662,
      "date":1449678641,
      "md5":"ff728c86018341548ee70028062c89e0",
      "crc":"1a813112"
    },
    "/flash/www/config/styles.css":{
      "length":4450,
      "date":1504814044,
      "md5":"9ad78cca1b794dbcf9db3c55f1be5f1b",
      "crc":"acbd2e14",
      "sha":"3cf0bbc864840994a49f62d0ae00df6d8eb47ef3"
    },
    "/flash/www/config/comm.js":{
      "length":3541,
      "date":1507912287,
      "md5":"e7d2e56a443176d6150bbcc8b56e1911",
      "crc":"0ac0ed26",
      "sha":"5e66b96227779c5ef3736a7ca891a43cacffbbf1"
    },
    "/flash/www/config/console.js":{
      "length":5137,
      "date":1504815652,
      "md5":"33289e4b09f462efdb50e8d30d22d791",
      "crc":"b89fe380",
      "sha":"c2f3ea4fc0344d43b0c30b7f60b2b6c79c1f4817"
    },
    "/flash/www/config/config.js":{
      "length":12639,
      "date":1507912576,
      "md5":"75bf22a88d8a23b17de267607b88a14c",
      "crc":"d693e2f4",
      "sha":"cf9e9bcf7cc7d79ae648b241af16ee194199d7b3"
    },
    "/flash/www/config/index.php":{
      "length":22103,
      "date":1508861011,
      "md5":"12541c75de413fa0a33fc83313a1302e",
      "crc":"9c9d30a2",
      "sha":"f1f264aa446f2e02f106f56c87997ed305b335a7"
    },
    "/flash/www/jnior.ico":{
      "length":3262,
      "date":1439548680,
      "md5":"1c3b3dda6b10c6259fcf7c068b760f09",
      "crc":"051803eb"
    },
    "/flash/www/favicon.ico":{
      "length":156790,
      "date":1486410493,
      "md5":"07cb90c7f3573eff80222269625ed1dd",
      "crc":"7e367afa",
      "sha":"284add71fe3d3ba48fba059b88ff5143d3964b1d"
    },
    "/flash/analogpresets.jar":{
      "length":163902,
      "date":1441372806,
      "md5":"25eacc647412535e320302d3680ce327",
      "crc":"e6b656fc"
    },
    "/flash/www/config/config.css.php":{
      "length":1045,
      "date":1475072901,
      "md5":"1692861e9abd7f8d81f5b7cf8a176046",
      "crc":"4c386a21"
    },
    "/flash/www/config/inputs.png":{
      "length":18047,
      "date":1443116143,
      "md5":"e2151c93b6cdeaa154d15fab486ae61b",
      "crc":"16290877"
    },
    "/flash/www/config/loading.gif":{
      "length":3236,
      "date":1264096270,
      "md5":"d96f6517e00399c37a9765e045eaaf22",
      "crc":"16f442ed"
    },
    "/flash/jtest.jar":{
      "length":1832,
      "date":1508935076,
      "md5":"acbcb808b9db8e4ffc5a3d7ab873c411",
      "crc":"a2062204",
      "sha":"d6adbbebc98f9922fe73e5f23c98ff892045377e"
    },
    "/flash/www/vendor/angular_1.3.15/angular.min.js":{
      "length":125909,
      "date":1449498838,
      "md5":"ca1a58818682c3e858a585f283ab9beb",
      "crc":"9d8147d7"
    },
    "/flash/www/vendor/bootstrap_3.3.0/css/bootstrap-theme.css":{
      "length":21740,
      "date":1449498835,
      "md5":"c64043a3388612233d7eb947918a9bfc",
      "crc":"638f58a3"
    },
    "/flash/www/vendor/bootstrap_3.3.0/css/bootstrap-theme.css.map":{
      "length":41933,
      "date":1449498838,
      "md5":"c5da8241305bfe7e19919e6e943739eb",
      "crc":"11260772"
    },
    "/flash/www/vendor/bootstrap_3.3.0/css/bootstrap-theme.min.css":{
      "length":19199,
      "date":1449498840,
      "md5":"374df0ad5809a5314b0577802430a272",
      "crc":"8b3c47b7"
    },
    "/flash/www/vendor/bootstrap_3.3.0/css/bootstrap.css":{
      "length":137590,
      "date":1449498845,
      "md5":"ad6381ebfa541b55b0152349c6cabf76",
      "crc":"371e67da"
    },
    "/flash/www/vendor/bootstrap_3.3.0/css/bootstrap.css.map":{
      "length":366866,
      "date":1449498854,
      "md5":"4ba278e0c420d166e5a0eb71545f9509",
      "crc":"b7c9868d"
    },
    "/flash/www/vendor/bootstrap_3.3.0/css/bootstrap.min.css":{
      "length":114011,
      "date":1449498852,
      "md5":"78e7f91c0c4cca415e0683626aa23925",
      "crc":"34387388"
    },
    "/flash/www/vendor/bootstrap_3.3.0/fonts/glyphicons-halflings-regular.eot":{
      "length":20335,
      "date":1449498855,
      "md5":"7ad17c6085dee9a33787bac28fb23d46",
      "crc":"f171b590"
    },
    "/flash/www/vendor/bootstrap_3.3.0/fonts/glyphicons-halflings-regular.svg":{
      "length":62926,
      "date":1449498857,
      "md5":"ff423a4251cf2986555523dfe315c42b",
      "crc":"385cd4ad"
    },
    "/flash/www/vendor/bootstrap_3.3.0/fonts/glyphicons-halflings-regular.ttf":{
      "length":41280,
      "date":1449498858,
      "md5":"e49d52e74b7689a0727def99da31f3eb",
      "crc":"0617f1ff"
    },
    "/flash/www/vendor/bootstrap_3.3.0/fonts/glyphicons-halflings-regular.woff":{
      "length":23320,
      "date":1449498858,
      "md5":"68ed1dac06bf0409c18ae7bc62889170",
      "crc":"cec1a35c"
    },
    "/flash/www/vendor/bootstrap_3.3.0/js/bootstrap.min.js":{
      "length":34653,
      "date":1449498862,
      "md5":"281cd50dd9f58c5550620fc148a7bc39",
      "crc":"32d6c689"
    },
    "/flash/www/vendor/bootstrap_3.3.0/js/bootstrap.js":{
      "length":65813,
      "date":1449498862,
      "md5":"d5a03d9cca57637f008124916b86b585",
      "crc":"f504a7b3"
    },
    "/flash/www/vendor/bootstrap_3.3.0/js/npm.js":{
      "length":484,
      "date":1449498863,
      "md5":"ccb7f3909e30b1eb8f65a24393c6e12b",
      "crc":"cc50e34d"
    },
    "/flash/www/vendor/jquery_1.11.1/jquery-1.11.1.min.map":{
      "length":141680,
      "date":1449498870,
      "md5":"ffbeb16578d8cdf58104889baacbbef2",
      "crc":"e4e92bfd"
    },
    "/flash/www/vendor/jquery_1.11.1/jquery-1.11.1.min.js":{
      "length":95786,
      "date":1449498869,
      "md5":"8101d596b2b8fa35fe3a634ea342d7c3",
      "crc":"804ff984"
    },
    "/flash/www/config/integlogo.png":{
      "length":5773,
      "date":1449163436,
      "md5":"9111308273dadea73f5d09a5e02c7311",
      "crc":"60c4e184"
    },
    "/flash/utility.jar":{
      "length":106794,
      "date":1449773066,
      "md5":"ac559b91b537dfa70720a416f32f2960",
      "crc":"888936f1"
    },
    "/flash/generators/json/colour.js":{
      "length":4327,
      "date":1449774238,
      "md5":"c67e10d0e0e698fcdbbbadcaa55600d4",
      "crc":"19e8a38f"
    },
    "/flash/generators/json/ethernet.js":{
      "length":1409,
      "date":1449774238,
      "md5":"1b6bae08feb93f6bd345a3780c3acb69",
      "crc":"848097a7"
    },
    "/flash/generators/json/inputs.js":{
      "length":2825,
      "date":1449774239,
      "md5":"6959db5a769ff3ceea45bf606bda940a",
      "crc":"c544d780"
    },
    "/flash/generators/json/lists.js":{
      "length":12006,
      "date":1449774239,
      "md5":"5cc489ac77db7a3369b2ffc30cbd3a86",
      "crc":"ba761254"
    },
    "/flash/generators/json/logic.js":{
      "length":4404,
      "date":1449774239,
      "md5":"9cd1cf854976ebb69a6c20a7ac88d2f9",
      "crc":"6c2189f9"
    },
    "/flash/generators/json/loops.js":{
      "length":6040,
      "date":1449774239,
      "md5":"e8e9021b5d4eb2e0cc43f11ad5b3bfd7",
      "crc":"b30a758a"
    },
    "/flash/generators/json/math.js":{
      "length":14673,
      "date":1449774240,
      "md5":"fa22c29efc362e02d8f35838fcca46e5",
      "crc":"8fc62e67"
    },
    "/flash/generators/json/other.js":{
      "length":983,
      "date":1449774240,
      "md5":"dd77f555bc9b50ed17a215d7935f10ab",
      "crc":"3e07810d"
    },
    "/flash/generators/json/outputs.js":{
      "length":3861,
      "date":1449774240,
      "md5":"72a118cd7829b5a510e5a901d8863d6e",
      "crc":"bdd5e320"
    },
    "/flash/generators/json/procedures.js":{
      "length":3945,
      "date":1449774240,
      "md5":"cb9fb880bebb3375273353fafc12dc9c",
      "crc":"20d43aad"
    },
    "/flash/generators/json/text.js":{
      "length":1363,
      "date":1449774241,
      "md5":"a0bd39f638202a0800c100b4eac3cbc3",
      "crc":"b17b24d6"
    },
    "/flash/generators/json/timing.js":{
      "length":2638,
      "date":1449774241,
      "md5":"b1ee803dd8e6e00de74e0a3269f0a2ff",
      "crc":"489061b8"
    },
    "/flash/generators/json/variables.js":{
      "length":1500,
      "date":1449774241,
      "md5":"fecce79a400d5e4e1edbe521699fa604",
      "crc":"cb724c91"
    },
    "/flash/generators/json.js":{
      "length":4115,
      "date":1449774238,
      "md5":"cc72f2468eb970110f3f6f0278f43467",
      "crc":"25a98f30"
    },
    "/flash/www/config/link_to.png":{
      "length":259,
      "date":1450466976,
      "md5":"b1ed68183be4f97ce1793139496dbbb4",
      "crc":"a067876a"
    },
    "/flash/www/config/collapsed.png":{
      "length":232,
      "date":1452087215,
      "md5":"ef7dd392142824ec54b7b7188717411c",
      "crc":"c7bd8428"
    },
    "/flash/www/config/linked.png":{
      "length":174,
      "date":1452088114,
      "md5":"56d2755d08a0857ff6e7750c4b2822dd",
      "crc":"ff59187e"
    },
    "/flash/www/config/expanded.png":{
      "length":238,
      "date":1452097812,
      "md5":"905b26e96849524dd6c37e1878f66779",
      "crc":"68686921"
    },
    "/flash/www/config/registry.js":{
      "length":8276,
      "date":1452271284,
      "md5":"fc35855793b2bbfe577e420f34cb0dda",
      "crc":"6c73e25a"
    },
    "/flash/www/config/deletex.png":{
      "length":240,
      "date":1452284181,
      "md5":"2750f1e60d0222d7f3c0752207fb41e7",
      "crc":"386b823b"
    },
    "/flash/www/config/modules.js":{
      "length":13520,
      "date":1484149578,
      "md5":"5d79964a8ca70cc7dc0504c343be3e3c",
      "crc":"3c09b9e2",
      "sha":"d6f0b3ec60796662acd105694ef39543e3dc50a2"
    },
    "/flash/www/logging.php":{
      "length":4853,
      "date":1463582298,
      "md5":"170c17bd0962f434eebe699129491912",
      "crc":"dce15f4e"
    },
    "/flash/www/slaving.zip":{
      "length":113815,
      "date":1465493787,
      "md5":"b3e85080154b5a7dc10078a6c6fe75c7",
      "crc":"975c987e"
    },
    "/flash/0-10vtest.jar":{
      "length":5053,
      "date":1438104444,
      "md5":"3a7be82077e29c598bdd8694d47805f4",
      "crc":"05e27897"
    },
    "/flash/4routtest.jar":{
      "length":2993,
      "date":1373644405,
      "md5":"14381605ec8f2f0d0dbe34843b7178b8",
      "crc":"8240fc03"
    },
    "/flash/environ.jar":{
      "length":3881,
      "date":1476102546,
      "md5":"8d738f0145516d287174a00dda32dabc",
      "crc":"ff1ecc8b"
    },
    "/flash/current.key":{
      "length":898,
      "date":1455116261,
      "md5":"035a0d79bd6c8258c12111479fe7353e",
      "crc":"cbdd8ffe"
    },
    "/flash/serialtest.jar":{
      "length":4532,
      "date":1457448880,
      "md5":"48fc4bd9421a5cf275b42235d2f4e2cb",
      "crc":"6d86943b"
    },
    "/flash/intellij.jar":{
      "length":969,
      "date":1464918560,
      "md5":"aea445862e32190fa61abc5d97e5b25f",
      "crc":"959a1596"
    },
    "/flash/jmodule.jar":{
      "length":5580,
      "date":1465240063,
      "md5":"af7d42f427d0e711c4a79c8e1c1d341d",
      "crc":"40058988"
    },
    "/flash/udptest.jar":{
      "length":5811,
      "date":1465328251,
      "md5":"5bbc399b4eb1f5ec427ccbf93c8b135d",
      "crc":"3d976325"
    },
    "/flash/buffer.jar":{
      "length":95325,
      "date":1467321013,
      "md5":"0c66b2a130de483b64b91d87471eb952",
      "crc":"5d0819e2"
    },
    "/flash/display.jar":{
      "length":2992,
      "date":1468953410,
      "md5":"efcfc78470e98842f52579c81c088a2d",
      "crc":"5ec67fd0"
    },
    "/flash/rz.jar":{
      "length":13079,
      "date":1469638127,
      "md5":"c4b7e9f4072d64e3dde9fe5a62406a1e",
      "crc":"20367148"
    },
    "/flash/www/config/folder.png":{
      "length":329,
      "date":1454662486,
      "md5":"316b7810fa502618b4e85788a82617a8",
      "crc":"55f20187"
    },
    "/flash/www/config/file.png":{
      "length":286,
      "date":1454662486,
      "md5":"1b75c23448e9c6eed675404f6130491d",
      "crc":"d327c449"
    },
    "/flash/www/config/warning.png":{
      "length":3068,
      "date":1332275646,
      "md5":"9c96d831cfc50fdedfdc980bc2abb2cf",
      "crc":"e90bb05a"
    },
    "/flash/www/config/folders.js":{
      "length":19270,
      "date":1504815735,
      "md5":"c7a59ef1aea3aad95d3315627d3a3b29",
      "crc":"6b1adf25",
      "sha":"93d7e851c9a1a65ed45b7c1bbe4368d3d941b32f"
    },
    "/flash/clktest.jar":{
      "length":2616,
      "date":1470249535,
      "md5":"345b4a9a22ec05bc89bb291b7b047e0e",
      "crc":"270f1d8b"
    },
    "/flash/timesearch.jar":{
      "length":4180,
      "date":1471371624,
      "md5":"bf719e65d8f4be9d7348a621ac69bc2b",
      "crc":"25075aa7"
    },
    "/flash/janosruntime_1.5.1.jar":{
      "length":1621696,
      "date":1472744987,
      "md5":"b8beb71b94b36129534ef4d6ec13f5ab",
      "crc":"abc7b327"
    },
    "/flash/www/config/relays.js":{
      "length":4189,
      "date":1484587793,
      "md5":"803af5c2431b8f58c110260b3f317838",
      "crc":"ee9ab3af",
      "sha":"21ec766fe220bd0618b43050851f9cd67dd1bf54"
    },
    "/flash/www/config/temperature.js":{
      "length":2870,
      "date":1475245816,
      "md5":"262c339513007cd746ee01da9a4a843f",
      "crc":"d062a444"
    },
    "/flash/www/config/dimmer.js":{
      "length":8255,
      "date":1475265861,
      "md5":"e7213c6fb8c263ac71acb766e62dc4ce",
      "crc":"b9edf051"
    },
    "/flash/www/config/range.css":{
      "length":2212,
      "date":1475499110,
      "md5":"6932c76ab79879ea4c5d826d9cb60db9",
      "crc":"3334dfd1"
    },
    "/flash/www/config/analog.js":{
      "length":7267,
      "date":1484587793,
      "md5":"87abcaf68dea5e2e203326a55bc2bca5",
      "crc":"9766b532",
      "sha":"dd788111904d41826164ea151f78dd4b3e3b84e6"
    },
    "/flash/www/config/ledon.png":{
      "length":626,
      "date":1475506220,
      "md5":"6018d69896fcba49da54c39d8ee19803",
      "crc":"32a65f15"
    },
    "/flash/www/config/panel.js":{
      "length":2038,
      "date":1475509052,
      "md5":"e0631cb06777f63f0a071f7aa5d198d0",
      "crc":"a38a7db3"
    },
    "/flash/www/config/ledoff.png":{
      "length":757,
      "date":1475509575,
      "md5":"4bb71e412a20ae6f098a29b195b10e13",
      "crc":"3fd16f7a"
    },
    "/flash/jpanel.jar":{
      "length":3142,
      "date":1358430294,
      "md5":"39825ccddf7b61c1ad41d261d84f4950",
      "crc":"446bee7f"
    },
    "/flash/www/config/syslog.js":{
      "length":1929,
      "date":1496773328,
      "md5":"4e8ecca50284c2aeae8e8b90db27ded8",
      "crc":"ac2a2541",
      "sha":"e413d70cc2bb6717448bc84c2980abc764bc3dd6"
    },
    "/flash/www/config/peers.js":{
      "length":5885,
      "date":1505835290,
      "md5":"2536fc521f916341b98183f6ce0b2453",
      "crc":"f2a44392",
      "sha":"5d949b8daa8e5081f19c88e42af968b24955e02c"
    },
    "/flash/www/index.php":{
      "length":356,
      "date":1477657721,
      "md5":"3ba20cf61f44f9ace09104261acf2711",
      "crc":"7f8eaed3"
    },
    "/flash/www/www.zip":{
      "length":85751,
      "date":1477663620,
      "md5":"296baa71d70bf40c1ad6ee0c71066c49",
      "crc":"69922bd1"
    },
    "/flash/www/download1.php":{
      "length":465,
      "date":1480616431,
      "md5":"1f69c84031dbdbe9aeecd634c0ab9607",
      "sha":"9770a8f6534f17f86eeb332309b7cbe07441022e",
      "crc":"c7b59619"
    },
    "/flash/www/short.php":{
      "length":273,
      "date":1481120537,
      "md5":"2fb318c42bd07c0ec34551502bc20c73",
      "sha":"9b9831ca6abda2a14a922e058430fe114b8b34e0",
      "crc":"fbca8ae2"
    },
    "/flash/peerbot.jar":{
      "length":2488,
      "date":1482355836,
      "md5":"b09d3118cefb7e9b3db6a16fc68954a3",
      "sha":"b4cacde3347d8c4e2b4dd464aef26da441db4eaf",
      "crc":"7973e5cf"
    },
    "/flash/ctrlc.jar":{
      "length":1510,
      "date":1482421756,
      "md5":"b7ce2da5b761674e626ae62c4b9edbcc",
      "sha":"51a17a3f092333a0a48aa8e6dcebe0ce99cef3de",
      "crc":"bd2a0810"
    },
    "/flash/www.zip":{
      "length":87642,
      "date":1505216713,
      "md5":"0d0cc1e611d77f48a9e7a48a5c5007b5",
      "sha":"27371cf36e32d70e2460510d233737a5f01a4ed1",
      "crc":"bebf23bf"
    },
    "/flash/www/config/favicon.ico":{
      "length":766,
      "date":1486410493,
      "md5":"07cb90c7f3573eff80222269625ed1dd",
      "sha":"284add71fe3d3ba48fba059b88ff5143d3964b1d",
      "crc":"7e367afa"
    },
    "/flash/www/map.html":{
      "length":1170,
      "date":1485380108,
      "md5":"901c9971c3c591b3d736cd91516960de",
      "sha":"5ded94156ca71884af1afae0fcaf1e78d3bac23d",
      "crc":"71f8c837"
    },
    "/flash/jmanifest.jar":{
      "length":5651,
      "date":1485192866,
      "md5":"dfb84226c647a42295d9f671cfb99fa5",
      "sha":"a7331cca377c1f96e400ddd5044c01a175ee230f",
      "crc":"1a64c6d6"
    },
    "/flash/jping.jar":{
      "length":2174,
      "date":1485201152,
      "md5":"0d533008847888e0dfcf497c0cff1a96",
      "sha":"75fbff5a973b8dac3408fdda46e47e708b585e58",
      "crc":"f1203f43"
    },
    "/flash/jaccess.jar":{
      "length":4820,
      "date":1485805203,
      "md5":"29ce866873686dd133a724e4db29c690",
      "sha":"239bf75c1597a25fdbbbb78798fe72971ca15f63",
      "crc":"e5ae0d1c"
    },
    "/flash/somepath/path2/testx.php":{
      "length":5282,
      "date":1486397961,
      "md5":"ce1a071b258c936c65679d6bb67db198",
      "sha":"30342828ebaeb69cd8ecefd75f2dd01e80c6388b",
      "crc":"ecd9251a"
    },
    "/flash/bruce_dev.cer":{
      "length":902,
      "date":1487172768,
      "md5":"e9917f27384ddee36817c04c8cde9199",
      "sha":"4b2b82a042a0019679c1b071956278f6ddd1f27b",
      "crc":"115ed2ae"
    },
    "/flash/www/config/registrydoc.css":{
      "length":21460,
      "date":1504201641,
      "md5":"15423ca727b03e6b1581910c6ca2eab5",
      "sha":"f521b53a4518e7490768d2a8ae0e707c1dfb943b",
      "crc":"0d5fd8c9"
    },
    "/flash/www/config/registrydoc.html":{
      "length":169108,
      "date":1508861014,
      "md5":"c34c31da746778b07448512e982af5b0",
      "sha":"f10f92e1a065faacbb557208fa1e4578dfde64e6",
      "crc":"c6979f37"
    },
    "/flash/www/panel/comm.js":{
      "length":4715,
      "date":1498074333,
      "md5":"44aa80868230fbfeee0a3c48c390896d",
      "sha":"37b479f65e7e8221d6fd9349439a8193cc645ba7",
      "crc":"0d5e92bd"
    },
    "/flash/www/panel/index.php":{
      "length":2648,
      "date":1501526934,
      "md5":"923ce6739971521191f9000662f38323",
      "sha":"a35d1d5f24da487be376595b46598e162e0f5310",
      "crc":"ffd86d7b"
    },
    "/flash/www/panel/panel.js":{
      "length":993,
      "date":1501527049,
      "md5":"9d9a2cbb435ffe8af5bd9d8c0598dccd",
      "sha":"2ef881dc8d90b4b0fb80a59d717c7125ca23fb04",
      "crc":"4fcd0f37"
    },
    "/flash/www/panel/panel.css":{
      "length":2586,
      "date":1501527291,
      "md5":"2a3a66d14d7bc6d4b01dfbd745205c7d",
      "sha":"886770297a07a594b88430d5db4ae9e23738d118",
      "crc":"2dd8a81d"
    },
    "/flash/www/graphr.zip":{
      "length":556637,
      "date":1506536442,
      "md5":"891b1dfa8d774b85aefcbd8791abe11f",
      "sha":"e5d204333658bd5c2f7c5b5ff682911124a10766",
      "crc":"62d153fb"
    },
    "/flash/public/dcp.zip":{
      "length":181914,
      "date":1504795829,
      "md5":"655e8587293f35f11c5c24fc38201d2f",
      "sha":"5fcfd8e38826e648f98f8d50f3613deb0d6312b6",
      "crc":"da99b7d0"
    },
    "/flash/test.txt":{
      "length":304,
      "date":1495131459,
      "md5":"fc9f1f5e67928ccb9be3aeaa66cd9e52",
      "sha":"6100d999f484f98ab476408c801dd000e579a62c",
      "crc":"765047c5"
    },
    "/flash/dmx.jar":{
      "length":4476,
      "date":1500567859,
      "md5":"3fd35bbe6bbf53a32aecf273275d1839",
      "sha":"4f702a87adb060294b553e6bd212672727d5d25f",
      "crc":"e81db9aa"
    },
    "/flash/juptime.jar":{
      "length":3201,
      "date":1506713589,
      "md5":"d4c2482fae18482727c1b2afabcf94b4",
      "sha":"86268b720b99760a4ebdb803db53f3f7fd18fd18",
      "crc":"44b0878c"
    },
    "/flash/jscan.jar":{
      "length":2189,
      "date":1507141493,
      "md5":"a0a42e17f003cedcac9c8e662ada6b36",
      "sha":"f1cafb56fdae33b66fff9b20cd2ff2705d96da9e",
      "crc":"60f00fe2"
    }
  }
}
bruce_dev /> 

The HELP command provides basic information about syntax and options for each and every command. If issued without parameters it lists all of the commands available to you at the JANOS Command Line.

bruce_dev /> help
Available Commands:
  arp             bye             cat             cd              
  certmgr         chdir           chgrp           chmod           
  chown           copy            cp              date            
  del             dir             echo            egrep           
  exit            extern          find            gc              
  grep            groupadd        groupdel        groups          
  help            history         hostname        iolog           
  ipconfig        jar             java            jrflash         
  jrmon           jrupdate        kill            logger          
  ls              man             manifest        md              
  mkdir           mode            move            mv              
  netstat         nslookup        nv              passwd          
  ping            ps              rd              reboot          
  reg             registry        ren             rename          
  rm              rmdir           sendmail        set             
  setenv          stats           thd             touch           
  type            useradd         userdel         usermod         
  users           whoami          zip             

bruce_dev />

Note that this list depends on the user’s permission level. The list above covers all commands. It is displayed for Administrator accounts.

The list is reduced when not an Administrator. These are the command available to a user with the Control permissions flag.

bruce_dev /> help
Available Commands:
  bye             cat             cd              chdir           
  chmod           copy            cp              del             
  dir             echo            egrep           exit            
  extern          find            grep            help            
  history         java            jrmon           ls              
  man             md              mkdir           move            
  mv              passwd          ping            rd              
  ren             rename          rm              rmdir           
  stats           type            whoami          

bruce_dev />

And if you are logged in as a guest with an account that neither has the Administrator flag or the Control Flag then this is all you can use.

bruce_dev /> help
Available Commands:
  bye             cat             cd              chdir           
  dir             echo            egrep           exit            
  find            grep            help            history         
  jrmon           ls              man             passwd          
  ping            stats           type            whoami          

bruce_dev />

The HELP command has an alias MAN. JANOS wants to seem familiar to new users and so tries to be a bit flexible. For this reason both DIR and LS perform the same function.

If you provide the name of a command as a parameter details for that command are displayed.

bruce_dev /> help dir
DIR [filespec]

Options:
 -A             List all including hidden files
 -F             List only files
 -D             List only folders
 -L,-V          Verbose format
 -W             Wide format
 -S,-R          Include subfolders
 -X             Expanded includes path permissions
 filespec       May contain wildcards

Lists a file, group of files or the contents of an entire folder.
Aliases: LS, DIR

bruce_dev />

That includes itself.

bruce_dev /> help help
HELP [cmdspec]

cmdspec May include wildcards

Lists available detail for matching commands

The following special characters define the command-line syntax:

 [ ]    Identifies an optional argument. Arguments that are not enclosed in brackets
        are required.

 ...    Indicates possible multiple values for the previous argument.

 |      Indicates mutually exclusive information. You can use the argument to the left
        of the separator or the argument to the right of the separator. You cannot 
        use both arguments in a single use of the command.

 { }    Delimits a set of mutually exclusive arguments when one of the arguments is
        required. If the arguments are optional, they are enclosed in brackets ([ ]).

Enclose argument values that have embedded spaces with double quotation marks.
Aliases: HELP, MAN

bruce_dev />

The command string supplied to HELP may include simple wildcards. For example:

bruce_dev /> help j*

----------
JAR filespec [pattern]

Options:
 -C             Check integrity
 -T             Lists library contents
 -X             Extracts library contents
 -V             Verbose

List/Extract files from a ZIP/JAR library.
Aliases: JAR, ZIP

----------
JAVA filespec [&]

Options:
 &              Executes in background ('&' must be last on the line)
 filespec       Either a .class file or .jar library containing classes to execute

Executes the given Java program.

----------
JRFLASH

Options:
 -C             Display cache status
 -F             Format (all data will be lost)
 -R             Perform reclamation pass

Displays Flash File System status.

----------
JRMON

options:
 -C             Enable control commands
 -D             Enable control including diagnostics functions
 -M             Monitors processor load
 -X cmd         Execute commands and return

I/O monitoring utility

----------
JRUPDATE

Options:
 -U file        Perform Field Firmware Update
 -F             Skip confirmation prompt
 -P             Reboot if successful
 -R             Rollback OS
 -C             Cancel pending update

Manage firmware updates.

bruce_dev />

Along these lines you can create your own HELP manual. Here we will send the HELP output to a file which I will attach.

bruce_dev /> help * > help.txt

bruce_dev />

help.txt

Welcome to my world…

JANOS Core:

Pictured is the core processing section of the first 412DMX hand-assembled prototype. This is typical of a core for the Series 4 JNIOR.

So there is hardware but it ain’t worth the FR4 it sits upon without Firmware.

No one today would argue that statement unless, of course, they just like to argue. But 50 years ago (yes its about 50 years!) few would understand.

That Renesas RX63NE micro-controller’s internal high speed Flash initially is blank. This board would do nothing until we put something in there. I will tell what we put in there and how it came to be in this forum section.

So we see here that the micro-controller has a basic RS-232 serial port (COM Diagnostic Port); It has access to the Ethernet LAN through an external PHY chip; And, there is a variety of external memory components.

One of the key aspects or the hardware that the Operating System must determine is the configuration. The 412DMX pictured above supports 128MB of NAND Flash. The JNIORs in production at this point use 32MB Serial Flash. So this NAND is being introduced here. It provides for lower cost, larger storage capacity, faster access, and more flexibility. It may find its way back into the entire series 4 line when revisions come up.

Every JNIOR has that battery backed-up low power SRAM. In production today we supply the 2MB chip. Some early JNIORs were built with 4MB chips. This is non-volatile memory. It contains the root of the file system (everything outside of the /flash and /temp folders). It maintains the Registry as the Series 4 does not reload from the /flash/jnior.ini file on boot. And, it holds other immutable memory blocks as might be needed for the system and its applications. All of that being the choice of the Operating System and we will discuss it a bit later.

The 64MB DRAM is high-speed volatile memory that serves as the memory heap for the system. memory here is allocated, managed, freed, cleaned-up and formatted at the pleasure of the Operating System. JANOS has mastered the art of garbage collection making Java applications almost real-time. We will get in to all of that as well.

Early JNIOR Series 4 and the Series 3 versions did not utilize DRAM. These depended entirely on the SRAM for non-volatile storage and memory heap. Life back then was limited. The DRAM offered much greater capacity and lower cost. It also provided for faster access.

So that is the lay of the land where JANOS lives. Shortly we will get to know JANOS at an unprecedented level.

By the way, and as an aside, JANOS is only available in the Series 4 JNIOR at the moment. It will appear in other INTEG products as time goes on. It will also make itself at home in other other processors (ARM for instance). In fact, it may even be available to anchor the operation of products developed by other companies. It was conceived of and born just a short 5 years ago. Only time will tell. Now, at least, it has us spoiled.

With hardware just waiting to be programmed we encountered the first hurdle.

Project Name?

The first thing the IDE wanted was a name for the project. This gave me pause since it would be the code base for the new operating system. So what do we call this OS?

Knowing that we could change the name at any point we decided to get creative. I came up with JANOS which is an acronym standing for (J)nior (A)utomation (N)etwork (O)perating (S)ystem. The ‘J’ being a bit questionable as it could stand for (J)ava like that in JNIOR. Or it could just be because we like starting names with ‘J’.

But JANOS started to make sense when we learned that Janus was an ancient Roman figure, spirit or god that guarded doorways and archways. Depicted with his face pointing in both directions he was the god that dealt with all things coming and going, past and future, beginning and ending. This could loosely be considered to be the controller or god of I/O, right? Bingo!

So unless something better were to come up everyone seemed cool with the name and we quickly made it over our first real hurdle. A quick scan of the Internet led us to believe that “JANOS” would be relatively unencumbered for this use. The first C files were cast with a Copyright header referring to the code as JANOS. The earliest inception date seems to be the 15th of December 2011. That would be for main.c.

Processor Selection

I suppose that I could get into the reasoning behind the selection of the Renesas RX600 processor. Initially we developed using the RX62N and then moved to the RX63N when that became available.

To start I would have to say that there certainly wasn’t an exhaustive search and very few processors were considered for JNIOR. Basically it was between some flavor of ARM and one or two micro-controllers that we had briefly looked into some years earlier. Luckily the local sales support for Renesas stepped in to tell us about the RX600 series. We had been inquiring about an earlier product. I had just wanted to pick something with the proper I/O mix that can handle the job and to pick it quickly.

Processors these days are quite complex. Most of the techniques employed in their design are now common place but 50 years ago things were somewhat simpler. Pipelining is an example. We want code to execute efficiently and quickly. Speed being somewhat of concern as we were growing tired of the performance (or lack of) in the Series 3 JNIORs. Most all processors these days employ a form of pipelining wherein multiple instructions at various stages are being processed simultaneously. This manages memory access and calculations making optimum use of each and every clock cycle.

I had been figuring on around a 100MHz system clock. That by itself isn’t fast given that PCs and smart phones all run an order of magnitude faster. But the JNIOR is just a controller and cost is a consideration. I also had wanted to avoid some of the concerns that come with high frequency circuit design.

At the same time I was concerned about code size. The operating system would surely be quite large and the ARM appeared to have a fixed 32-bit instruction size. That means that to simply increment a register that instruction would consume 4 bytes of program memory. I will have to admit that I have no experience with ARM at this point. I figure that migrating JANOS to it is inevitable. But I was attracted to the RX line as it boasted both fast execution and compact code size. Having variable length instructions and instructions that combine operations makes the pipeline design difficult if not nearly impossible. But the RX has apparently gotten it done.

Beyond the I/O pin count of the micro-controller and the included set of peripherals, I had also wanted a good amount of high-speed internal Flash for program storage. The processor also needed a good amount of high speed internal RAM for stacks. There also needed to be some form of internal EEPROM or erasable Data Flash for critical configuration settings. I had hoped to be less dependent upon the external memory devices which necessitate longer access timing. The RX62N seemed to cover my needs.

So a quick decision was made and I proceeded to pick up an RX62N evaluation kit. That was the sum and total of our (not so) elaborate processor selection process.

Considerations for Coding

Of concern is the IDE supplied for the RX line. Looking back I can’t give Renesas good grades on this front. Their home grown IDE was full of rookie GUI bugs among other things. They quickly moved to an Eclipse based IDE which caused a bit of a headache at one point. The IDE gets the job done but there are soooo many configuration settings that even creating a branch in code for development is a challenge. It works though.

But for operating system development you absolutely need good access to assembly code. Unlike 50 years ago the IDE now has you developing directly in C and hides any assembly aspect by supplying hidden initialization files and built-in libraries. That is all good if you are writing a simple single-threaded program but I was not. So to start I took the usual “Hello World” sample and had to dig into it to find all of the hidden code. We were not going to develop JANOS dependent on any one IDE or processor. So I needed access to each and every byte generated and incorporated in the resulting object files.

Once the startup code was located and I proved that I could pull that out of hiding, I had to deal with libraries. The IDE supplies its own “Standard C Libraries”. Again that is great for simple program development. But here again taking JANOS to another platform would mean different library code and therefore uncertainty in result. I would also be developing a preemptive multi-tasking environment and C libraries that are not guaranteed to be reentrant or that use even a single static variable spell disaster.

So JANOS required its own C Library code. Trying to prevent the IDE from supplying its own library code proved to be an issue. I managed to find the right balance that kept the built-in libraries out of the way. Even today it remains a concern. I’ve had to utilize uniquely named headers supplying standard named functions (i.e. pintf, etc.). It has been a challenge where the IDE should just have let me tell it that I did not want any libraries.

Even at the instruction level there are macros that need to be considered. If you add two 64-bit variables on a 32-bit processor there is no single instruction available. The IDE inserts a block of code that performs the operation. So that sum becomes several instructions the code for which is IDE or manufacturer specific. This you cannot prevent and it is a necessity but I needed the source code for those macros. Again this is to insure proper operation of the preemptive tasking system and to increase confidence in moving to other platforms. None of these seemingly personal requirements of mine seemed to be received by Renesas with any evidence of understanding. Simply put, reverse engineering is also a necessity.

I also needed to understand the approach the Renesas compiler uses for function calls. What processor registers are used and how stack space allocated and released. In addition I needed to understand the precise response to interrupts. This is key in creating a pure multi-tasking environment. Fortunately those topics are covered (briefly) in the Renesas compiler documentation. This does present a hurdle say if I want to use the IAR RX compiler at any point.

Obviously JANOS exists and I managed to find some level of comfort and control over the development environment.

If you are setting out to write an Operating System on par with Linux or JANOS you don’t want to do this. This is akin to standing at the edge of a cliff and looking straight down. If you realize how much work you have ahead of you, you will likely lose confidence in yourself. Then again, if you are staffing up to get the job done then understanding what needs to be done is critical.

Here I am going to list the sections of code that had to be developed to get JANOS to where it is. I would bet that this list will be missing some of it but here goes. This will also be in rough chronological order. At least as to when coding for the section was started.

Startup – Basically the main.c for the OS program. It is responsible for configuring hardware and each subsystem. Eventually this terminates and becomes the “Idle Process” executing an infinite wait look and collecting unused process time.

Diagnostic Serial Port – The RS-232 (COM) port code so boot messages can be output and the command line interface developed.

Process Management – The ability to execute more than one process through preemptive multitasking. Requires a 1 millisecond tick interrupt and the ability to swap process context with minimum overhead. This also allows processes to terminate or be terminated. This subsytem maintains the uptime and realtime clocks.

Ethernet Interface – Configures the Ethernet peripherals and external PHY. This handles the delivery of outgoing packets and the reception of packets. This establishes the high-priority Network process needed to insure that network traffic can be received and processed quickly and efficiently. The Network Process was the first process created for JANOS and the first to run outside of the Startup/Idle Process.

Command Process – The Command Line executes as its own process. This process is awakened by a keystroke on the RS-232 (COM) port and will handle all Command Line access. You will also be able to access this through a Telnet connection and via the Websockets Interface as well.

Command Line – Prompts for command entry and allows for convenient entry of textual commands. Includes a set of built-in commands and facilitates the execution of application programs. Maintains command history allowing commands to be easily repeated.

Memory Manager – Maintains Heap memory. This gives processes the ability to allocate memory for different purposes and then to return it for reuse. Efficiently manages the free memory block pool. Strives to minimize fragmentation and improve the availability.

Date & Time – Provides the ability to set and read the hardware RTC. Maintains the time of day in milliseconds since some epoch. Provides the ability to convert the millisecond count into year-month-day formats. Handles time zones and Daylight Saving Time.

System Process – The operating system itself has a number of background tasks it must attend to while other processes are busy with their own tasks. These are performed by the System Process.

Network Protocol Stack – To exist on the network the JNIOR must handle standard protocols at a low level such as ARP, ICMP, DHCP and DNS. Then once IP addressing is established the higher level protocols like IP, UDP/IP and TCP/IP are required.

Digital I/O – Subsytem handles the Digital Inputs and Relay Outputs. Handles counters and usage metering.

File System – Provides that ability to store and retrieve data as files. This handles file storage as it distributed across memory technologies. The JNIOR stores files in the non-volatile SRAM, in Flash (/flash), and in volatile Heap (/temp). This includes static content from the Program ROM (/etc). Provides for file access controls using permissions modeled after Unix.

C Libraries – JANOS is written in C and requires the standard C library. In order to insure the re-entrant and thread-safe aspect of the C Library you have to have the source code and therefore have written a custom library.

AUX Serial Port – While very similar to the Diagnostics port, the AUX port includes handshaking capabilities and can support RS-485 communications.

FTP Server – Required to get files on to and off of the JNIOR.

WebServer – Used to serve files and create web sites.

Websockets – WebServer HTTP/HTTPS connections can be upgraded to handle the Websockets Protocol. This provides for the ability to remotely monitor and control the JNIOR.

JNIOR Protocol Sever – Provides for legacy support of the JNIOR protocol which allows for remote monitoring and control of the JNIOR.

Registry System – Subsystem to manage name-value pairs for system configuration.

JVM – Java Virtual Machine permitting programs written in Java to be executed. This includes a complete stand-alone Java Runtime Environment for the JNIOR. Uses a Native interface with the operating system.

Library File Handling – The ability to access and decompress files stored in ZIP and JAR files. Necessary for the execution of externally compiled Java programs. Also expands the File System allowing the WebServer to serve files directly out of a ZIP library.

External Module Support – Configures and utilizes the Sensor Port to manage external expansion modules.

Network Time Protocol – NTP synchronizes the JNIOR clock with the rest of the world.

Beacon Protocol – Required to facilitate initial network configuration. Used by the Support Tool in managing collections of JNIORs.

Field Update – The ability to update JANOS in the field. Allows a UPD file to be loaded and the operating system updated on reboot. This must be a fault tolerant procedure.

Sockets – The means by which Java application programs integrate with the network stack.

Users – The ability to create users, maintain credentials and require login. Users can be created, disabled and removed. There are different user permissions/capabilities.

Email – JANOS has the ability to send email notifications.

Inter-process Messaging – JANOS supports a Message Pump which is a system by which messages can be circulated between processes. JANOS can notify applications of certain events.

I/O Logging – The ability to log and display DIgitial I/O events and serial communications.

Network Capture – The ability to capture network traffic for use in debugging. JANOS creates files compatible with WireShark.

Security – Implements SSL/TLSv1.2 secure communications. This includes multi-precision math libraries, message digest calculations, encryption and decryption. Supports RSA, RC4, DES and others. Automatically generates self-signed certificates.

Server-side Scripting – Handle PHP-like server side scripting to support the development of sophisticated dynamic websites.

Regex Engine – Support the ability to perform search and replacement operations using Regular Expressions.

Watchdogs – The ability to detect when program operation has failed and then to take action to restore operation.

User Groups – Create user groups and assign users for use in handling file permissions.

If I am missing anything feel free to ask about it. Some of these items are extremely complex in and by themselves while others were not all that complicated. It has taken some 5 years in development. The OS consists of over 400 individual source files and countless lines of code. Does anyone really know how to count code lines? Anyway, slowly I will proceed to describe the implementation details.


In 2011 it became apparent that we needed to redesign the JNIOR. This was not because its features and functions were lacking in any serious way. It was more due to the fact that product performance was limited and starting to fall behind that expected by the market. We also could tell that certain devices we used were approaching some kind of End of Life. Specifically the Dallas/Maxim-IC DS400 processor.

We needed to develop hardware around a new processor. While that was certainly doable from a hardware perspective, it meant that none of the existing JNIOR operating system code and its applications would be usable. Regardless of processor selection we would be faced with a new real-time operating system (RTOS) and have to develop a new approach to applications. This would mean as well that the user would see a totally different user interface and would have to learn new procedures for the JNIOR.

Would the result actually be a JNIOR? Certainly we would not be creating a drop-in product revision. This was not going to be an acceptable approach. The main point in the specification of the next series of JNIOR demanded that it remain consistent and familiar to the customer base. If this was not the case then we would never be able to stop producing the Series 3 and move to the Series 4 in any seamless fashion.

So in order to develop a revised series of the JNIOR without disrupting product use we had to both redesign the hardware and the firmware. We needed an RTOS were we would have complete control over the user interface and product capabilities. Given that existing operating system offerings were bloated with generic code, burdened with licensing issues, and expensive the decision was made to write our own.

Series 4 Product Specification

So the first step in any engineering project is to write the Specification document, right? It shouldn’t be any different here. But we never did create a specification document for this. Actually in this case there was no need. The Series 3 JNIOR in and by itself was our design specification.

The intent of the effort was to create a 100% drop-in revision to the Series 3 that utilized a new processor. That meant that it couldn’t look different form a Series 3. All of the external hardware connections had to remain consistent. The external expansion modules needed to continue to be usable. And, it still needed to execute the existing application programs. Basically, once the Series 3 were no longer in production we needed to be able to ship a customer a replacement JNIOR that didn’t involve re-engineering the application and modifying the installation.

That said, the intent also was for the new version of JNIOR to demonstrate “improved performance”. This mostly referred to processing speed. The Series 3 JNIORs were taking upwards of a minute just to boot and load applications. We had to improve on that. But by just how much? It was left unstated.

There were also (naturally) software issues with the existing Series 3 line. Many were rooted in 3rd party code for which we had no access and no ability to rectify. Some of those bugs we indeed started to consider as features. It would make no sense to replicate any of those. The revised JNIOR would be able to address those issues even if it meant some slight change in user interface or procedure. This was to be minimized however.

We had to consider licensing and copyrights. We could not directly convert the Dallas/Maxim-IC TINI operating system for our own use. We absolutely needed to develop our own new and improved code to avoid any legalities or added licensing expense.

Further we wanted to insure that we would not encounter any deficiency or issue caused by 3rd party code. These tended to be costly in our experience as a solution generally was not forthcoming and we would spend a large effort in creating our own work-around. So the new operating system would not utilize 3rd party code if possible. We were to have 100% control of, and knowledge of, the source code. This allowing us to guarantee bug fixes in an unprecedented short turnaround.

Finally, the door had to remain open for the introduction of new functionality that would improve the value of the product.

So, I believe that this conveys the (previously unwritten) set of specifications behind the creation of the Series 4 JNIOR and the JANOS operating system. Now that the product revision is reaching its own maturity I’ll let you create the report card.

Processor Selection
(Fall 2011)

With our goals set we obviously first and foremost had to select a new processor to sit at the core of the new JNIOR series. This would be a good topic for the Hardware section as there were a number of considerations involved. We decided to try the Renesas RX600 line and specifically the 144-pin version of the RX62N.

We obtained an RX evaluation kit, installed the Renesas IDE and wrote some simple “Hello World” type programs. I then jumped into the assembly code and looked carefully at the register handling in C subroutine calls, the complexity of startup code, and the handling of interrupts. It also mattered how the program stack was handled. And there needed to be some atomic instructions (for mutex implementation). I could experiment with these things with the evaluation kit. It also mattered how code was optimized. Was code compact and yet still execute efficiently?

The micro-controller’s complement of I/O pins and their flexibility were of interest. There had to be a good set of peripherals available. Enough to handle at least 3 serial streams. There needed to be flexibility in an external memory bus. Much had to be considered.

Once the decision was made new schematics were created and a board laid out for the first Model 410. The first prototype was hand assembled and made to execute a simple “Hello World” program through the RS-232 (COM ) port. That was (to the best of my recollection) December of 2011.

The Registry Key Assignments document is now distributed as part of the Dynamic Configuration Pages (DCP) package. You access that built-in documentation using the F1 key in the DCP or the link displayed at the bottom of the DCP. This is distributed with every JNIOR.

If you do not have access to the DCP then your JNIOR needs to be updated.

I will try to maintain the current Registry document on our HoneyPot JNIOR which is located on the open network. Yes, this JNIOR is not behind a firewall or NAT router. I have placed the Registry documentation in the public file area on that unit. Here is the link:

http://honeypot.integpg.com/RegistryDoc.html

(Hint: Hold the Ctrl key when you click a link if you want it to open in a new tab.)

By the way, this Registry document is indexed and if you want to refer to a specific Key you can add it to the URL. For example if you want to see the documentation for the Device/Timezone Regsitry Key use the following custom link.

honeypot.integpg.com/RegistryDoc.html#device.timezone

Try it!
http://honeypot.integpg.com/RegistryDoc … e.timezone

And since this documentation is built into the DCP you can retrieve it from you own JNIOR. Just reference your JNIOR instead. Note that in this case since the DCP is not public you will have to log into your JNIOR.

http://[IP Address]/RegsitryDoc.html

I will try to keep the most current version of the document on the HoneyPot though. That since most JNIORs probably need to be updated (which is highly recommended).

As we approach the moment when we adjust the clocks as we head into winter it seems appropriate to point out the date and time tools that JANOS has to offer.

bruce_dev /> date -v
 utc: 1509109889
 Fri Oct 27 09:11:29 EDT 2017
 Current Timezone is EST for the America/New_York area.
 Abbreviated EDT when Daylight Savings is in effect.
 DST begins at 02:00 on Sun on or after Mar 8th.
 DST ends at 02:00 on Sun on or after Nov 1st.
 When in effect DST sets clocks ahead by 1 hour.
 DST is currently in effect.

bruce_dev />

The DATE -V command (V for verbose) offers a description of the current time status. Here we see that I have incorrectly referred to DST as “Daylight Savings Time” when in fact it is Daylight Saving Time. So, before posting this I’ll just update the JANOS code to correct that. My bad.

It is in fact Daylight Saving Time and it is designed to capture an hour of sunshine that we would otherwise be sleeping through in the morning. To do this we set our clocks ahead an hour in the Spring at a point when the Sun insists on rising an hour before we want to get up. Remember “Spring ahead. Fall back.” DST is in effect during the Summer. So instead of it being 6:00 AM when the Sun blares into the room and pisses you off by waking you early, it will be 7:00 AM and maybe you should get up. That hour of daylight then is shifted to the end of the day. So it could be almost 10:00 PM before you have to put that lawnmower away.

Seems like a reasonable thing to do. Well of course it causes all kinds of issues. Making matters worse not all timezones observe DST and some do but use a different set of rules. And although the rules haven’t been changed recently governments have been known to make adjustments. Sometimes DST usage is temporarily altered say for when we may be in an energy crisis. Then there are the cities or areas of a timezone that decide to not follow DST like the rest of their timezone. All of this makes it difficult for a device to cope.

By the way, I’ve fixed my problem. You’ll have to wait for JANOS v1.6.3 for this. Sorry.

bruce_dev /> date -v
 utc: 1509110646
 Fri Oct 27 09:24:06 EDT 2017
 Current Timezone is EST for the America/New_York area.
 Abbreviated EDT when Daylight Saving Time is in effect.
 DST begins at 02:00 on Sun on or after Mar 8th.
 DST ends at 02:00 on Sun on or after Nov 1st.
 When in effect DST sets clocks ahead by 1 hour.
 DST is currently in effect.

bruce_dev />

Did you ever notice in windows that your file last modification times all change when you enable or disable DST?

Windows apparently applies timezone and current DST status to any time it displays. So if DST is in effect every time you see is adjusted even if DST wasn’t in effect at that point in the past. So if I save a file today (October) it will show the file was created today at such and such a hour. But if I check that file date next month (November) after we leave DST it would have been created an hour earlier that I did it. Perhaps even before I got into work. Show your boss that and tell him that all summer long you consistently made it in early and deserve a bonus.

Well the times will be off by an hour but trying to figure whether the times would be an hour earlier or later makes my head hurt.

JANOS has been programmed differently and perhaps correctly at least in my opinion. When a time is displayed JANOS uses DST if and only if DST was in effect at that past moment. So when DST is enabled or disabled the file times remain consistent. You know, if you have written a Windows application that uses a file’s last modification time to check if the file were changed, you’ll go nuts. Twice a year you would think that batches of files suddenly have changed. Yeah I know Windows keeps a changed flag that you can and maybe need to use. But in general the file times seem like a reasonable indication of a change (or different version). You should use UTC anyway.

Of course if you change the DST rules or your timezone for that matter the reported file times will naturally all change. It’s all no big deal anyway.

We’ve also somehow moved from selecting your timezone to specifying a nearby city for getting your clock to display correctly. Well there are hundreds of major cities and that database becomes quite large given there is a lot of repetition (there a multiple major cities in a single timezone). Meanwhile the JNIOR is just a small device and doesn’t have the luxury of wasting storage space that you’ve spent your hard earned dollars on.

In JANOS you select the timezone using its abbreviation and there is a short list of timezones included by default.

bruce_dev /> date -t
Available timezones:
  IDLW (-1200) Date_Line                  WST  (-1100) Pacific/Midway
  HST  (-1000) Pacific/Honolulu           AKST (-0900) America/Anchorage(1)
  PST  (-0800) America/Los_Angeles(1)     MST  (-0700) America/Denver(1)
  CST  (-0600) America/Chicago(1)         IET  (-0500) America/Indianapolis
  EST  (-0500) America/New_York(1)        PRT  (-0400) America/Caracas
  CNT  (-0330) America/St_Johns(1)        AGT  (-0300) Argentina/Buenos_Aires
  BET  (-0300) Brazil/Brasilia            MAT  (-0200) Atlantic/Mid
  CAT  (-0100) Atlantic/Cape_Verde        GMT  (+0000) Greenwich_Mean
  UTC  (+0000) Universal_Coordinated      WET  (+0000) Western European(5)
  CET  (+0100) Central European(4)        EET  (+0200) Eastern European(3)
  EAT  (+0300) Asia/Riyadh                MET  (+0330) Iran/Tehran
  NET  (+0400) Russia/Moscow              AFT  (+0430) Afghanistan/Kabul
  PLT  (+0500) Russia/Ural_Mountains      IST  (+0530) India
  ALMT (+0600) Asia/Alma-Ata              CIT  (+0630) Burma
  VST  (+0700) Mongolia/West              AWST (+0800) Australia/Perth
  JST  (+0900) Japan                      ACST (+0930) Australia/Adelaide(2)
  AEST (+1000) Australia/Sydney(2)        LHT  (+1030) Lord Howe Island
  SST  (+1100) Russia/East                NIT  (+1130) Norfolk Island
  NST  (+1200) Pacific/Fiji             

Note 1:
 DST begins at 02:00 on Sun on or after Mar 8th. Clocks move forward by 60 minutes.
 DST ends at 02:00 on Sun on or after Nov 1st.
Note 2:
 DST begins at 02:00 on Sun on or after Oct 1st. Clocks move forward by 60 minutes.
 DST ends at 03:00 on Sun on or after Apr 1st.
Note 3:
 DST begins at 03:00 on Sun on or before Mar 31st. Clocks move forward by 60 minutes.
 DST ends at 04:00 on Sun on or before Oct 31st.
Note 4:
 DST begins at 02:00 on Sun on or before Mar 31st. Clocks move forward by 60 minutes.
 DST ends at 03:00 on Sun on or before Oct 31st.
Note 5:
 DST begins at 01:00 on Sun on or before Mar 31st. Clocks move forward by 60 minutes.
 DST ends at 02:00 on Sun on or before Oct 31st.

bruce_dev />

We’ve recently adjusted this list having learned of some additional DST rules. If you find that none of these standard timezones work for your location, tell me about it. I can add a new timezone (or fix an error) as easily as I changed “Daylight Savings Time” above.

If this doesn’t do it for you, you can define a custom timezone. This is all described in the Registry Key Assignments document the current version of which is built into the DCP and distributed with every JNIOR.

You can open the DCP by pointing your browser to your JNIOR and use the F1 key to bring up the documentation. A whole section on Custom Timezones and Timezone Corrections can be found in the Table of Contents.

In fact I can put the current version of RegistryDoc.html and RegistryDoc.css (and also inputs.png) in the public web area on the HoneyPot unit. The HoneyPot is a JNIOR Model 410 that we have connected directly to the Internet for security testing. That means that you can also retrieve pages from it. I’ll try to remember to keep that copy current.

Here’s a link to the Timezone section.

http://honeypot.integpg.com/RegistryDoc … e.timezone

So now on the HoneyPot we have the Registry Key Assignments document: http://honeypot.integpg.com/RegistryDoc.html and an application that maps all of the illegal login attempts that mostly result from malicious bots like that Mirai Botnet: http://honeypot.integpg.com/map.php

The JNIOR captures network traffic continuously. A large queue is established at boot and a record of network packets is kept. Once the queue fills the oldest packets are dropped. Depending on your network usage that queue might contain the past hour of traffic or much more.

The NETSTAT -C command generates a network capture file /temp/network.pcapng on demand containing the content of the capture queue. For example:

HoneyPot /> netstat -c
LAN connection active (100 Mbps)
 generating capture file...
 /temp/network.pcapng created
 collected 4791 packets from the previous 16 minutes
HoneyPot />

You can download this file to your personal computer. If you have Wireshark installed you will likely be able to double-click this PCAPNG file and it will open right up for viewing and analysis.

By the way you can download Wireshark for free from https://www.wireshark.org/.

Notice that in my example only the past 16 minutes were captured. First of all the capture begins at boot. So if your JNIOR has only been up for 16 minutes that is all that you will get. This, I think, was the case here.

It is important also to note that when you access the DCP you are also using the network. That means that all of the packets involved with your browser access will also be captured. If you leave the DCP up to monitor the status of your JNIOR all of that traffic takes up space in the capture buffer. If you are interested in analyzing the JNIOR interaction with another device that DCP traffic will limit the amount of information you can capture relative to that other device.

One solution is to not use the network to monitor the JNIOR by using the RS-232 (COM) port. But for that you have to be physically at the JNIOR and have the ability to use a serial connection. A better solution is to use capture filtering.

With the JNIOR you can both filter the packets that are to be retained in the capture buffer and filter the packets that you extract into the /temp/network.pcapng file. For example I will set this JNIOR up to ignore HTTP (Port 80) traffic and capture everything else. I can then use the DCP without loading the capture buffer with packets that we are not interested in.

HoneyPot /> netstat -f !80
LAN connection active (100 Mbps)
 capture filter set
HoneyPot />

This tells JANOS to only accept packets into the capture buffer that DO NOT reference port 80. This takes effect immediately (provided there isn’t a syntax error). The next /temp/network.pcapng file that I generate will no longer contain HTTP communications and therefore nothing to do with the DCP. There will be many more packets from a longer period of time all pertaining to other communications that might help with my debugging.

The NETSTAT -F command basically sets the IpConfig/CaptureFilter Registry key. If you mouseover that key in the Registry tab of the DCP and hit F1 you will see the documentation for filtering and the syntax for these filters. These details are in the Registry Key Assignmentsdocumentation. The current version of that documented is distributed as part of the DCP. It will be present on every Series 4 JNIOR that is up to date.

Network Filtering

The content of a network capture or the network clients allowed to interact with the JNIOR can be controlled through dynamic filtering. These filters can be quite simple or, if needed, much more sophisticated.

The IpConfig/CaptureFilter Registry key may optionally define a filter which is applied to incoming packet data prior to capture. There is limited storage for captured information and by filtering you can extend the capture period and the amount of pertinent information collected.

A filter may also be used in generating the network.pcap capture file from the capture buffer. Here the filter allows you to extract only pertinent information and otherwise keep file sizes at a manageable level.

The IpConfig/Allow Registry key may optionally define a filter which is applied to incoming connections. In this case the referenced IP addresses refer to the incoming source IP addresses, those of clients. Referenced port numbers refer only to destination ports, those available on the JNIOR.

IP Address Filters

To filter packets referencing a specific IP address you need only include the IP address in the format “nnn.nnn.nnn.nnn” in the filter string. Any packet that references this IP address either as the source or the destination address will be selected for inclusion. All other packets will be excluded unless covered by some other part of the filter.

To exclude packets referencing a certain IP address you can prefix a ‘!’ exclamation point to the address like this “!nnn.nnn.nnn.nnn”. All packets that do reference the IP address as either a source or destination address will NOT be selected for inclusion. This can also be written as “NOT nnn.nnn.nnn.nnn”.

Note that an IP address is identified by its format, four decimal values between 0 and 255 separated by the ‘.’ period.

The domain syntax allows a range of IP addresses associated with a netmask to be specified. The format is “nnn.nnn.nnn.nnn/mm” where ‘mm’ specifies the number of high order bits in the netmask. For example, “10.0.0.0/24” specifies any IP address in the domain that contains IP addresses 10.0.0.1 through 10.0.0.255 and uses a netmask of “255.255.255.0”. This would be useful in selecting only local traffic for instance.

MAC Address Filters

Although less often required you can filter on a specific MAC address. The MAC address is included in the filter string in the format “hh:hh:hh:hh:hh:hh”. The format is six hexadecimal values (0-9a-f or 0-9A-F) separated by the ‘:’ colon. For instance most INTEG Series 4 JNIORs have MAC address formatted as “9C:8D:1A:hh:hh:hh” where the lower three bytes are assigned in some sequence.

As with IP addressing, packets with MAC addresses may be excluded by writing the filter as “!hh:hh:hh:hh:hh:hh” or “NOT hh:hh:hh:hh:hh:hh”. Again a MAC address is identified by its format.

TCP/UDP Port Filters

A port is specified in the filter string as a decimal value between 1 and 65535 inclusive. No punctuation is used. The capture filter does not distinguish between a TCP or UDP port number. A port may be excluded using the negation “!nnn” or “NOT nnn”.

There are standard ports assigned for various functions. The capture filter knows some of them by name. Some may be reconfigured through the Registry. As a convenience the port may be specified using its protocol name. The capture will be filtered on the port as configured at the time the filter is compiled (at boot or upon NETSTAT command). JANOS recognizes these port names where the default values are shown in parentheses: SMTP (25), NTP (123), JNIOR (9200), FTP (21), HTTP (80), HTTPS (443), TELNET (23), and BEACON (4444). These ports may be excluded using the same negation syntax as previously shown

Boolean Constants

The capture filter will also recognize the terms TRUE and FALSE. True indicates that the packet is to be included and False otherwise.

Logical Operations

To filter on a single IP address, MAC address or port (or to exclude a single item) the filter need only specify the address or port in the associated format. The following would select the communications involved in an email transfer. If this is used as an incoming filter, only email transactions would be captured. If this is used with NETSTAT –C in generating the PCAPNG file, the file would only include email communications.

            NETSTAT –C SMTP
            netstat –c 25

Note that filters (and also commands) are not case-sensitive. Either form above will create a PCAPNG file with just email communications. This assumes that you have not reconfigured the SMTP port. If you have set Email/Port to another port (587 for instance) then the first line will extract your email communications and the second will not. Although the second filter might show an application trying to use the incorrect port.

Filters often need to be slightly more complex in order to include the collection of communications needed. The syntax allows you to specify any number of addresses or ports in any combination using AND, OR and XOR logic. As an alternative you may use the notation ‘&&” and ‘||’ for AND or OR respectively.

As an example perhaps you want to filter only email communications with the SERVER.

            netstat –c 10.0.0.4 && smtp

If you want to also include BEACON communications you might write the filter as:

            netstat –c 10.0.0.4 AND smtp OR beacon

But here you might question the order of precedence of the logical operations. The capture filters do not support an order of precedence but perform the operations from left to right. So this would be calculated as follows:

            netstat –c (10.0.0.4 && SMTP) || BEACON

And this would have done what we had said. If there is some question you can use the parentheses in the filter as shown. The following will create the same subset of packets but would not if we were to exclude the parentheses:

            netstat –c BEACON || (10.0.0.4 && SMTP)

A parentheses grouping can be negated as you would expect. The following will create a capture of all activity EXCEPT email communications with the SERVER.

            netstat –c !(10.0.0.4 && smtp)

Finally if we had wanted to mask these email communications from the overall capture buffer we can install this filter using the command:

           netstat –f !(10.0.0.4 && smtp)

This would result in the following Registry setting and would filter out matching communications until such time as the filter is removed.

            IpConfig/CaptureFilter = !(10.0.0.4 && smtp)

The JNIOR will only capture packets that are addressed to it. That would include broadcasts.

Ok. Well perhaps it is undocumented (and you didn’t hear it from me) but you can set the IpConfig/Promiscuous Registry Key to true. The JNIOR then will capture (subject to any filtering) all traffic including packets not addressed to the JNIOR. But for this to be of any use you will need to be using a Network Hub instead of a Network Switch. There is a difference. The latter “switch” will only pass packets to the JNIOR that are addressed to it in addition to any broadcasts. If you are interested in other traffic you need to use the “hub” which passes all traffic to all connected devices.

The Series 4 JNIOR with a hub then can be a valuable network debugging tool useful in sniffing traffic between two other devices (connected via hubs). It would allow you to remotely use the features of Wireshark.

If it ain't broke... Don't fix it!

I fully understand this mentality. Believe me. I am still using the Summer 9 version of Altium to lay out PCBs here at INTEG. It’s like a half dozen years old. Meanwhile, that company continues to generate updates and new versions. They are also painfully charging for them. How many times have you paid for an update and except for the version number you don’t see any difference or don’t need what happens to be new? Meanwhile, Microsoft updates your PC overnight and the next day something isn’t working. And now you need to pay monthly for something that you had bought years before. I could rant on. But there is no reason to be phobic and roll back your JNIORs to older versions of JANOS just because you have not had the time to test.

But the Series 4 JNIOR updates are a different matter. In addition to the hardware, JANOS and its updates are my responsibility. Trust me there is a good reason we recommend that you update. Every new version of JANOS corrects a handful of critical bugs. There are often performance enhancements. New features augment what you already have. Everything that ran before will run now as legacy compatibility is paramount. And we DO NOT charge a dime for updates.

Just this morning I corrected a memory leak. A memory leak is when a piece of memory is allocated to store some information and once that information is no longer needed the memory is left to collect dust. Meanwhile the process repeats using up another block of memory. Eventually your JNIOR would run out of available memory and ultimately crash. In the short term everything tests out 100%. Your controller runs perfectly. But there is a ticking time bomb. Luckily, not everyone uses the function at fault in this latest leak. We discovered it in testing here. But if you believe that your JNIORs should be setting records for up time, you need to pick up these corrections. You need to update.

I wrote JANOS. I even coined the name. In fact there is no third party code in the entire OS. I did not even use the standard C Libraries supplied with the Renesas IDE. JANOS has its own C Libraries. There is a good reason for that. It puts us 100% in control. If there is a bug we absolutely can correct it. That’s a significant up side. The down side is that while I have decades of experience I can still create bugs as well as the next guy.

Fortunately as time passes the number of software issues decreases. Their complexity and obscurity increases. But eventually we exponentially approach a stable and reliable product. We are well along that curve now. Each JANOS update is critical in getting those improvements out to you.

As of this writing we have released JANOS v1.6.2 and v1.6.3 is in Beta test. Should you encounter an issue in v1.6.2 we can supply you with Beta or Release Candidate code. If the problem persists and we can replicate it then we will fix it immediately.

If you are concerned about running an update project because it may change all kinds of stuff and you don’t know what. I also understand that. But it is safe to manually update JANOS. Certainly you shouldn’t panic when you get new units with later versions of JANOS. They’ll work just as the older ones.

What Are Update Projects?

An Update Project is a procedure that can be executed using the Support Tool. The Support Tool is a Windows application that can be freely downloaded from the INTEG website Software Downloads Center (https://integpg.com/jnior-support-tool). The Support Tool lets you manage all of your JNIORs and allows you to update them singly or in groups. You would open the Update Project under the Update tab in the Support Tool.

The Update Project is actually a set of files including instructions for the update. These are contained in a ZIP library. While the update project has a ZIP file extension there is no need to extract files from the project or expand it anywhere. The Support Tool takes care of that for you.

Generally we use an Update Project when we are updating an application for you. Usually in that case we both need to update JANOS and perhaps its components like the DCP, and your application. So there are several steps involved. An Update Project is designed to handle all of that for you. You can open the Update Project and see the steps. That may help you to visualize what you are changing/updating.

It is possible to update JNIORs manually if you are not managing a large number of them and want to know what is going on. You can even disable parts of the Update Project and apply only the steps that you need.

The Series 4 JNIOR can be configured to send email. The approach is slightly different than what existed in the prior controller series. The differences are driven by the heightened concern for security and an increase in restrictions on email server use.

First of all, we now we require valid user credentials (username and password) for authentication at the defined MailHost. You can only submit email to a Comcast SMTP server if you have a valid Comcast email account for example. Just having a valid Comcast email address or originating on a Comcast subnet is no longer sufficient identification. A login is typically required.

Secondly, the Series 4 can establish SSL/TLS secure connections. That means that your email content and credentials are protected by encryption. This was not possible in the prior series where such communications had to be in the clear and readable by anyone clever enough to sniff the network.

The attached document was written prior to the introduction of the JNIOR Web Page which is accessed using your browser. At that time one had to use the IPCONFIG command to enter email user credentials in order to encrypt and protect the account password. Most configuration can be also achieved through Registry key modifications. But the password entry requires the active step of encryption which is handled by IPCONFIG.

I will detail recent changes here.

Configuring JANOS for Email

Up to and including the release of JANOS v1.6.2 email can be delivered through an SMTP port (default 25) or MSA port (default 587). JANOS handles both of these ports in the same manner. The JNIOR will authenticate and then if the STARTTLS option is supported JANOS will establish an encrypted connection. The latter requires that SSL be enabled on the JNIOR which it is by default.

You will not get an indication as whether or not an SSL/TLS connection is in use. You could enable SSL Required but that may have other ramifications (such as requiring the use of HTTPS protocols for web connections).

Beginning with JANOS v1.6.3 you will be able to use the SMTPS port (default 465) for guaranteed secure email delivery. The SMTPS port requires a SSL/TLS secure connection right from the start. The email submission procedure will not proceed until the connection is secure. So in this case you can be certain that content and credentials are fully protected. A new Registry key Email/SMTPS must be set TRUE or enabled so JANOS knows to immediately secure the connection.

By the way, JANOS uses this same STARTTLS option to secure FTP. The JANOS Telnet Server which can be used to access the Command Line interface also supports STARTTLS. In this case the option had be proposed but not adopted. So, to our knowledge, the INTEG Telent tools are the only ones that provide the secure Telnet channel. All of this becomes simple when the JNIOR Web Page is used over a secure connection (HTTPS).

Series 4 Email Setup

So to setup email on the Series 4:

  1. Make sure that your IP configuration (IP address, Subnet, Gateway and DNS servers) is correct. If you are using the default NTP server for synchronizing the clock and you see that NTP is doing just that by the entry in the system log, then your IP configuration is most likely correct.
  2. Set the MailHost or Mail Server. This would be something along the lines of smtp.comcast.net.
  3. Enter you own email address as the From address. Emails will look like they come from you.
  4. Enter your Username. Depending on the system that may be your email address or just the prefix. Note that IPCONFIG and also the JNIOR Web Page will prompt for a password. Once that is confirmed it will be encrypted and stored securely.
  5. By default the email port is 25. That should work for you. Depending on your service they may ask you to use a different port. Set the port as needed. If it is port 465 (or other SMTPS port) you will need JANOS v1.6.3 and Email/SMTPS enabled.

A good test is to enable the Email On Boot and reboot the JNIOR. That setting is on the events page in the JNIOR Web Page. The document attached above tells you how to use the SENDMAIL command form the Command Line which is also useful for testing.

Since today you really need to keep the Login requirement enabled on your JNIORs, what if you want to serve some Web data publicly? You know, without having everyone use a password?

Well, you probably aren’t aware that in addition to the default WebServer root of /flash/www there is another called /flash/public. Yep. You can probably guess now that anything you put in /flash/public will be served by the WebServer without requiring that the client login/authenticate. Everything else remains secure and requires your login for access.

In fact that is how our HoneyPot unit that is sitting out directly on the Internet lets you access the following page:

http://honeypot.integpg.com/map.php

There you didn’t need to login and yet that JNIOR is secure and nothing else can be accessed or modified without securely logging in.

Pretty sweet, eh?

Oh and you could rename /flash/www.zip as /flash/public.zip and serve the DCP publicly. Wait! wouldn’t that be dangerous?

Well, not really. The DCP makes a secure Websockets connection back to the JNIOR. That Websockets interface requires a login (assuming you haven’t also disabled that). So when you open the public DCP you are again asked to login. You have to properly authenticate before you can really do anything.