Sending HTTP Requests in Cinema
Some devices in a cinema’s ecosystem use HTTP Requests for communication. The JNIOR’s Cinema application can send GET and POST Requests to these devices by defining them in the Macro and Device files. This post will go over how to declare an HTTP Device in Cinema and send commands to it. If this is your first time creating Macro and Device files for the Cinema application, please check out this post first which goes over creating Macro and Device files in general.
Create a Device
To start, you’ll want to open the JNIOR Support Tool and navigate to the Device Tab. You’ll start by going to the bottom left of the Support Tool and selecting ‘Add’. This will add a new device configuration to the Device Tab. Here you are then going to declare an HTTP Request device that will represent the device you are going to send HTTP Requests to. For this example, I’m going to name it HTTP_Example (The name can’t have any spaces). The device type should be HTTP Request, the IP should be whatever your device’s IP is set to (I used IP 10.0.0.201 for this example), and the port number should be 80. Once all this is set you should have the following device configuration:
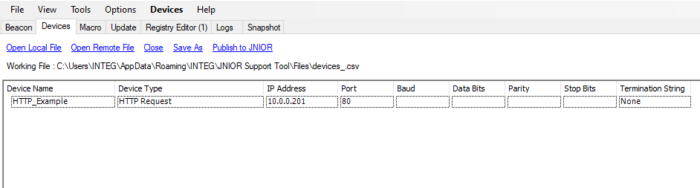
Once you have this, you’ll save this device configuration on your computer (it should automatically open to a directory for you to save it in, but if you change the location make sure you remember where you save it), and then you’ll publish it to the JNIOR you want your HTTP device to receive commands from. Once you do that, you’ll then navigate to the Macro Tab.
Create a Macro
On the Macro Tab, the first thing you must do is link your Device file with the Macro file you are going to create, so you can reference the Device you just declared in your Macros. This can be done by selecting the ‘Link Devices’ button at the top of the Macro Tab, and then selecting the Device file wherever you saved it on your computer. You’ll then need to create macros that will execute our actions. Macros can be added to the Macro View by clicking the ‘Add’ button at the bottom left of the Macro Tab. In this example, I create two, one for doing a GET called HTTP Get and one for doing a POST called HTTP Post. Once you have your macros, you’ll then need to create the actions the macros will execute to send to your HTTP device. You’ll add actions using the ‘Add’ button at the bottom of the Macro Tab under the Action View. In this example I name them after the HTTP Requests they are going to perform, one being GET, and one being POST. For these actions, you then set the Device for the actions to the HTTP_Example device you created from your Device file. For the GET action, it should be GET, and for the POST action, it should be POST. Lastly, for the actions, you enter the commands you need to send to your HTTP device in the Data field. Now that you have your macros and the actions you need them to perform, you just need to add the actions to your macros. To do this, select one of your macros so that it is highlighted, then do the same for the action you want to add to it. Once they both are highlighted, hit the arrow in between the Macro View and Action View, and it should add the action to the macro. Do this for the other macro and your configuration should look like this:
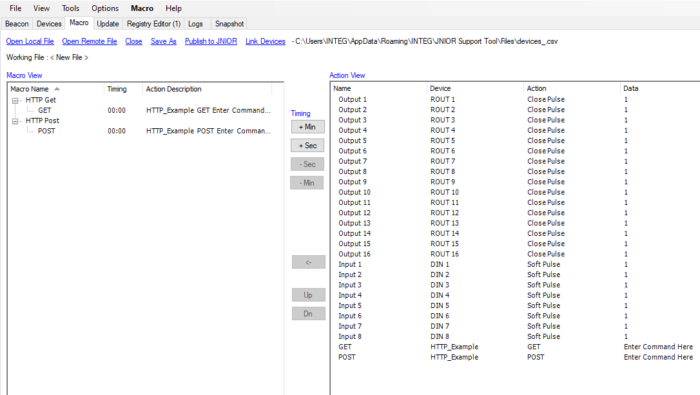
Now save and publish this Macro file to the JNIOR that should be sent to your HTTP Device. Now when these macros are executed on your JNIOR, they should send the commands you defined to your HTTP device!