Sending Commands from a JNIOR to a Device with Cinema
As long as the device you are sending to can create TCP or serial connections, the JNIOR should be able to send commands to it. If you are starting from scratch with a JNIOR, you’ll need to download the JNIOR Support Tool and the Cinema update project. The JNIOR Support Tool allows you to install update projects on JNIORs, and the Cinema update project installs the Cinema application, which is what listens for commands to activate JNIOR macros.
| Name | Version | Release Date | Size | MD5 |
|---|---|---|---|---|
| JNIOR Support Tool | v7.18 | Jul 08 2025 | 6.2 MB | |
| Cinema.jar - Update Project | v7.2 | Mar 10 2025 | 535.1 KB | f296631e1dca3fcd5d89f39d2de0387e |
To update your JNIOR with an update project, here is a link to a post on our site that shows how to install Cinema.
Once the Cinema update project has been published to your JNIOR, we’ll now need to create a device in the support tool to send to. In the support tool, you’ll go to the device tab and select add. You can select the device and rename it. After that you’ll now configure the settings of the device so we can send macros to it. To start you’ll select your device type, and if you see the device you want to send to there you’ll select it. If not you’ll select Raw Ethernet for a TCP connection or Raw Serial for a serial connection. You’ll then set the rest of the device configuration according to the device’s TCP or serial settings.
Once you finish setting the device information, you’ll then want to save the device file by clicking the Save As button. After that you’ll then publish the file to the JNIOR you are using by clicking the Publish to JNIOR button.
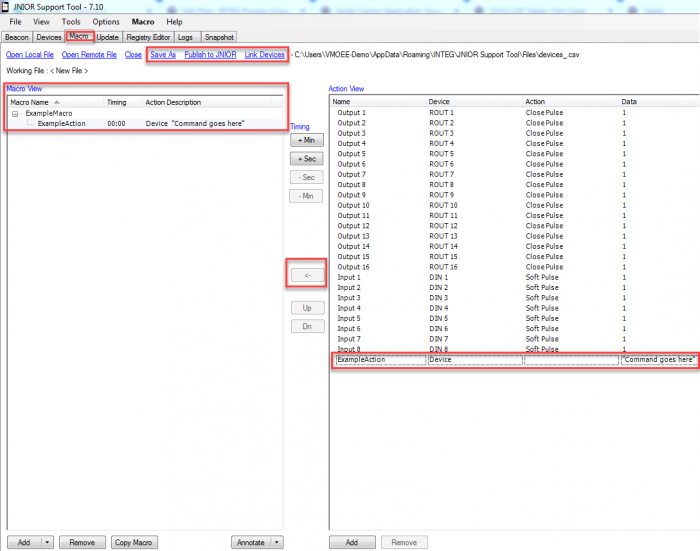
After you’ve done that, we’ll now create the macro that will be sent to the device that will contain the text command. Going back to the support tool, you’ll go to the macro tab.
The first thing we’ll want to do here is click the “Link Devices” button at the top. Here we’ll select the device file we just created, so we can reference it in our action for the macro we are going to create.
After completing that, at the bottom left corner of the macro view and you’ll select add/macro. A new macro should populate the macro view, and you can then click on it and rename it. I’m going to name it ExampleMacro.
Once you’ve done that you’ll now go to the action view and select the add button there. A new action should appear in the action view. You can rename this if you’d like, and then we’ll want to select the device we previously created in the Support Tool to send to. Lastly, in the data field you’ll want to enter the text command you wish to send to the device. If you are using a Raw Serial/Raw Ethernet device, make sure you include the termination string at the end of your text command for the device you are sending to.
Once that is finished, make sure you add the action we created to the macro we created. You do this by selecting the macro, then the action, followed by the arrow between the macro and action view.
Lastly, like we did with the device file, we’ll save this using the Save As button, followed by publishing it to the correct JNIOR using the Publish to JNIOR button.

Now the JNIOR has a macro created that will send the text command to your specified device!