JNIOR as a DMX Fixture
NOTE: Before creating the setup described in this post on your JNIOR 410, please download the update project below and install it on your 410 using the JNIOR Support Tool. This is required to get the JNIOR to create a DMX connection.
| Name | Version | Release Date | Size | MD5 |
|---|---|---|---|---|
| DmxPort for enabling DMX on 410 | v1 | Mar 17 2021 | 3.5 KB | 299c66717c03a9c9b702716d9d56d095 |
This article is the first of two addressing the issues encountered in, and a means to simplify, the processing of the DMX Universe data stream using a standard UART serial receiver. The follow-up article is entitled JNIOR as a DMX Fixture Revisited.
The Model 412DMX generates a DMX512 Universe and allows the JNIOR to control DMX fixtures like those used in stage lighting. What if you needed a fixture with relays that can be controlled by DMX? Perhaps you need to output channels over a 4-20ma loops. Maybe you need a 10 VDC output signal to control LED house lighting. Can the JNIOR receive DMX? Can the JNIOR be a DMX Fixture?
We showed you how you could control DMX fixtures with a standard Model 410 in a White Paper available here:
AN01 DMX512 Implementation [ Jul 20 2017, 101.27 KB, MD5: e1b0203f177d1866e56cfbfdd0e221d4 ]
Now we have the 412DMX JNIOR designed for that purpose. Can the Model 410 also serve as a DMX fixture? Yes, it can. I’ll show you how here and we’ll see how we manage to accommodate some of the unique aspects of the DMX512 format with the JNIOR.
Cabling
We can use the JNIOR Model 410 because the AUX port is compatible with RS-485. In the white paper explaining how the 410 can be used to control DMX fixtures we described an adapter cable taking the DB9 output from the JNIOR and presenting the proper female XLR connector for DMX. Now since a DMX fixture always has both a male and female 5-pin XLR connectors, our cabling has to be slightly different. Note that you can do this with the 3-pin XLR (as I have) if that is appropriate for your situation.
Here is an example of one that we put together.
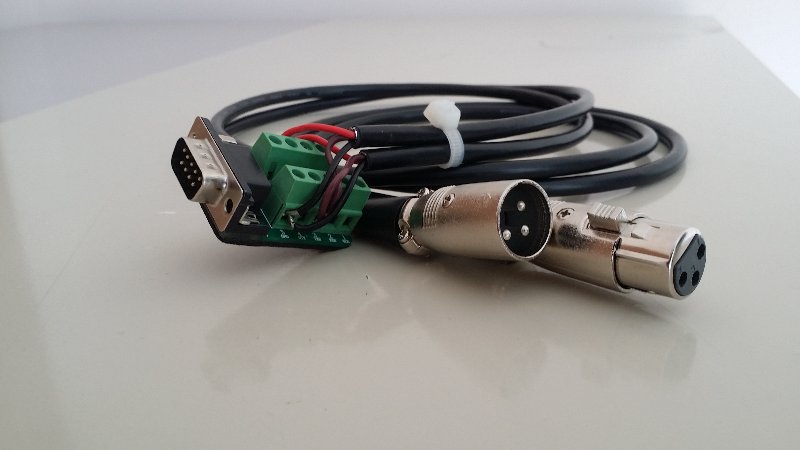
This can be constructed by splicing into a standard DMX extension cable. A number of DB9 adapters with screw terminals like the one pictured can be found on Amazon. Note that you will want one with large screws compatible with larger wire sizes. DMX wiring is typically of a larger diameter and you will need to successfully clamp two wires in each of three positions on the adapter.
Here is the pin numbering. Note that wire colors vary.
        Signal           XLR      DB-9 Male
--------------------  ---------  -----------
Signal Ground (GND)       1          5
Data (D-)                 2          2
Data (D+)                 3          8
Not Used (NC)            4,5     1,3,4,6,7,9
This cable allows the JNIOR to be a DMX FIXTURE.
THE RESULTING DMX CONNECTION IS NOT ISOLATED. We recommend using an isolated power supply for the JNIOR and not sharing that voltage with other circuits. Take great care in making ground connections. Note that the JNIOR relay outputs are naturally isolated.
Serial Connection
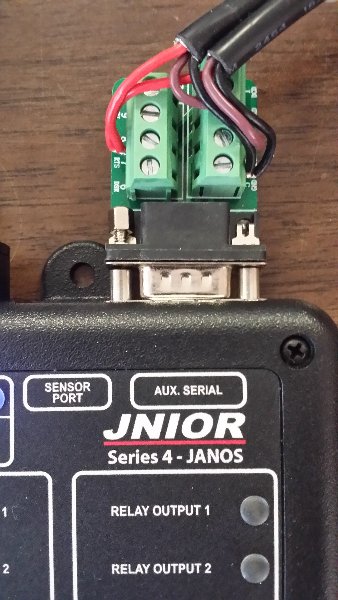
Connect the adapter to the Model 410 AUX serial port as I have in this photo and connect this to the DMX network. Note that the 412 and 414 are not RS-485 compatible and cannot be used for this purpose.
The serial port parameters should be set as follows. This is done through the Dynamic Configuration Pages (DCP) that should come up when accessing the JNIOR using your browser. You enable the RS-485 mode here so the AUX port output doesn’t disrupt the DMX communications before you have a chance to run the DMXFIXTURE application that I will describe. That application will also configure the AUX port just to make sure that all is well.
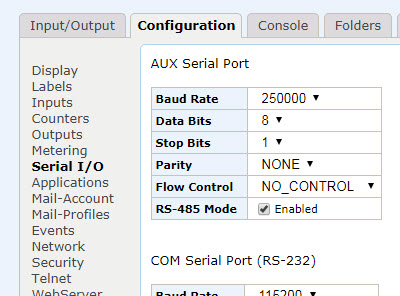
If you encounter “Applets” instead of the DCP then your Series 4 needs to be updated or you have a Series 3. The latter also cannot be used for this application. You will need to update your JNIOR to JANOS v1.6.6 or later for the functionality to be described here.
Data
With the JNIOR Model 410 wired to the DMX network and the AUX serial port properly configured the unit should be receiving data. There is a simple way to check that. You can see data without any application running just by using the IOLOG command. Here we enter the Console (or Command Line Interface) and use this command.
InfoComm_LED /> help iolog
IOLOG

Options:
 -T             Indicate transitions
 -R             Reset logs
 -A             AUX Serial log
 -S             Sensor Port log
 -O             Output to stdout

Generates jniorio.log file from available logs.

InfoComm_LED /> iolog -ao
--  07/02/18 15:42:46.098
-00--00--00--00--00--00--00--00--00--00--00--00--00--00--00--00-    ................
-00--00--00--00--00--00--00--00--00--00--00--00--00--00--00--00-    ................
-00--00--00--00--00--00--00--00--00--00--00--00--00--00--00--00-    ................
-00--00--00--00--00--00--00--00--00--00--00--00--00--00--00--00-    ................
-00--00--00--00--00--00--00--00--00--00--00--00--00--00--00--00-    ................
-00--00--00--00--00--00--00--00--00--00--00--00--00--00--00--00-    ................
-00--00--00--00--00--00--00--00--00--00--00--00--00--00--00--00-    ................
-00--00--00--00--00--00--00--00--00--00--00--00--00--00--00--00-    ................
-00--00--00--00--00--00--00--00--00--00--00--00--00--00--00--00-    ................
-00--00--00--00--00--00--00--00--00--00--00--00--00--00--00--00-    ................
-00--00--00--00--00--00--00--00--00--00--00--00--00--00--00--00-    ................
-00--00--00--00--00--00--00--00--00--00--00--00--00--00--00--00-    ................
-00--00--00--00--00--00--00--00--00--00--00--00--00--00--00--00-    ................
-00--00--00--00--00--00--00--00--00--00--00--00--00--00--00--00-    ................
-00--00--00--00--00--00--00--00--00--00--00--00--00--00--00--00-    ................
-00--00--00--00--00--00--00--00--00--00--00--00--00--00--00--00-    ................
-00--00--00--00--00--00--00--00--00--00--00--00--00--00--00--00-    ................
-00--00--00--00--00--00--00--00--00--00--00--00--00--80--00--00-    ................
-00--00--00--00--00--00--00--00--00--00--00--00--00--00--00--00-    ................
-00--00--00--00--00--00--00--00--00--00--00--00--00--00--00--00-    ................
-00--00--00--00--00--00--00--00--00--00--00--00--00--00--00--00-    ................
-00--00--00--00--00--00--00--00--00--00--00--00--00--00--00--00-    ................
-00--00--00--00--00--00--00--00--00--00--00--00--00--00--00--00-    ................
-00--00--00--00--00--00--00--00--00--00--FF--00--FF--80--00--00-    ................
-00--00--00--00--00--00--00--00--00--00--00--00--00--00--00--00-    ................
-00--00--00--00--00--00--83--00--00--00--00--00--00--00--00--00-    ................
-00--00--00--00--00--00--00--00--00--00--00--00--00--00--00--00-    ................
-00--00--00--00--00--00--00--00--00--00--00--00--00--00--00--00-    ................
-00--00--00--00--00--00--00--00--00--00--00--00--00--00--00--00-    ................
-00--00--00--00--00--00--00--00--00--00--00--00--00--00--00--00-    ................
-00--00--00--00--00--00--00--00--00--00--00--00--00--00--00--00-    ................
-00--00--00--00--00--00--00--00--00--00--00--00--00--00--00--00-    ................
-00--00--00--00--00--00--00--00--00--00--00--00--00--00--00--00-    ................
-00--00--00--00--00--00--00--00--00--00--00--00--00--00--00--00-    ................
-00--00--00--00--00--00--00--00--00--00--00--00--00--00--00--00-    ................
-00--00--00--00--00--00--00--00--00--00--00--00--00--00--00--00-    ................
-00--00--00--00--00--00--00--00--00--00--00--00--00--00--00--00-    ................
-00--00--00--00--00--00--00--00--00--00--00--00--00--00--00--00-    ................
-00--00--00--00--00--00--00--00--00--00--00--00--00--00--00--00-    ................
-00--00--00--00--00--00--00--00--00--00--00--00--00--00--00--00-    ................
-00--00--00--00--00--00--00--00--00--00--00--00--00--00--00--00-    ................
-00--00--00--00--00--00--00--00--00--00--00--00--00--00--00--00-    ................
-00--00--00--00--00--00--00--00--00--00--00--00--00--00--00--00-    ................
-00--00--00--00--00--00--00--00--00--00--00--00--00--00--00--00-    ................
-00--00--00--00--00--00--00--00--00--00--00--00--00--00--00--00-    ................
-00--00--00--00--00--00--00--00--00--00--00--00--00--00--00--00-    ................
-00--00--00--00--00--00--00--00--00--00--00--00--00--00--00--00-    ................
-00--00--00--00--00--00--00--00--00--00--00--00--00--00--00--00-    ................
-00--00--00--00--00--00--00--00--00--00--00--00--00--00--00--00-    ................
-00--00--00--00--00--00--00--00--00--00--00--00--00--00--80--00-    ................
-00--00--00--00--00--00--00--00--00--00--00--00--00--00--00--00-    ................
-00--00--00--00--00--00--00--00--00--00--00--00--00--00--00--00-    ................
-00--00--00--00--00--00--00--00--00--00--00--00--00--00--00--00-    ................
-00--00--00--00--00--00--00--00--00--00--00--00--00--00--00--00-    ................
-00--00--00--00--00--00--00--00--00--00--00--00--00--00--00--00-    ................
-00--00--00--00--00--00--00--00--00--00--00--FF--00--FF--80--00-    ................
-00--00--00--00--00--00--00--00--00--00--00--00--00--00--00--00-    ................
-00--00--00--00--00--00--00--83--00--00--00--00--00--00--00--00-    ................
-00--00--00--00--00--00--00--00--00--00--00--00--00--00--00--00-    ................
-00--00--00--00--00--00--00--00--00--00--00--00--00--00--00--00-    ................
-00--00--00--00--00--00--00--00--00--00--00--00--00--00--00--00-    ................
-00--00--00--00--00--00--00--00--00--00--00--00--00--00--00--00-    ................
-00--00--00--00--00--00--00--00--00--00--00--00--00--00--00--00-    ................
-00--00--00--00--00--00--00--00--00--00--00--00--00--00--00--00-    ................
-00--00--00--00--00--00--00--00--00--00--00--00--00--00--00--00-    ................
-00--00--00--00--00--00--00--00--00--00--00--00--00--00--00--00-    ................
-00--00--00--00--00--00--00--00--00--00--00--00--00--00--00--00-    ................
-00--00--00--00--00--00--00--00--00--00--00--00--00--00--00--00-    ................
-00--00--00--00--00--00--00--00--00--00--00--00--00--00--00--00-    ................
-00--00--00--00--00--00--00--00--00--00--00--00--00--00--00--00-    ................
-00--00--00--00--00--00--00--00--00--00--00--00--00--00--00--00-    ................
-00--00--00--00--00--00--00--00--00--00--00--00--00--00--00--00-    ................
-00--00--00--00--00--00--00--00--00--00--00--00--00--00--00--00-    ................
-00--00--00--00--00--00--00--00--00--00--00--00--00--00--00--00-    ................
-00--00--00--00--00--00--00--00--00--00--00--00--00--00--00--00-    ................
-00--00--00--00--00--00--00--00--00--00--00--00--00--00--00--00-    ................
-00--00--00--00--00--00--00--00--00--00--00--00--00--00--00--00-    ................
-00--00--00--00--00--00--00--00--00--00--00--00--00--00--00--00-    ................
-00--00--00--00--00--00--00--00--00--00--00--00--00--00--00--00-    ................
-00--00--00--00--00--00--00--00--00--00--00--00--00--00--00--00-    ................
-00--00--00--00--00--00--00--00--00--00--00--00--00--00--00--00-    ................
-00--00--00--00--00--00--00--00--00--00--00--00--00--00--00--80-    ................
-00--00--00--00--00--00--00--00--00--00--00--00--00--00--00--00-    ................
-00--00--00--00--00--00--00--00--00--00--00--00--00--00--00--00-    ................
-00--00--00--00--00--00--00--00--00--00--00--00--00--00--00--00-    ................
-00--00--00--00--00--00--00--00--00--00--00--00--00--00--00--00-    ................
-00--00--00--00--00--00--00--00--00--00--00--00--00--00--00--00-    ................
-00--00--00--00--00--00--00--00--00--00--00--00--FF--00--FF--80-    ................
-00--00--00--00--00--00--00--00--00--00--00--00--00--00--00--00-    ................
-00--00--00--00--00--00--00--00--83--00--00--00--00--00--00--00-    ................
-00--00--00--00--00--00--00--00--00--00--00--00--00--00--00--00-    ................
-00--00--00--00--00--00--00--00--00--00--00--00--00--00--00--00-    ................
-00--00--00--00--00--00--00--00--00--00--00--00--00--00--00--00-    ................
-00--00--00--00--00--00--00--00--00--00--00--00--00--00--00--00-    ................
-00--00--00--00--00--00--00--00--00--00--00--00--00--00--00--00-    ................
-00--00--00--00--00--00--00--00--00--00--00--00--00--00--00--00-    ................
-00--00--00--00--00--00--00--00--00--00--00--00--00--00--00--00-    ................
-00--00--00--00--00--00--00--00--00--00--00--00--00--00--00--00-    ................
-00--00--00--00--00--00--00--00--00--00--00--00--00--00--00--00-    ................
-00--00--00--00--00--00--00--00--00--00--00--00--00--00--00--00-    ................
-00--00--00--00--00--00--00--00--00--00--00--00--00--00--00--00-    ................
-00--00--00--00--00--00--00--00--00--00--00--00--00--00--00--00-    ................
-00--00--00--00--00--00--00--00--00--00--00--00--00--00--00--00-    ................
-00--00--00--00--00--00--00--00--00--00--00--00--00--00--00--00-    ................
-00--00--00--00--00--00--00--00--00--00--00--00--00--00--00--00-    ................
-00--00--00--00--00--00--00--00--00--00--00--00--00--00--00--00-    ................
-00--00--00--00--00--00--00--00--00--00--00--00--00--00--00--00-    ................
-00--00--00--00--00--00--00--00--00--00--00--00--00--00--00--00-    ................
-00--00--00--00--00--00--00--00--00--00--00--00--00--00--00--00-    ................
-00--00--00--00--00--00--00--00--00--00--00--00--00--00--00--00-    ................
-00--00--00--00--00--00--00--00--00--00--00--00--00--00--00--00-    ................
-00--00--00--00--00--00--00--00--00--00--00--00--00--00--00--00-    ................
-00--00--00--00--00--00--00--00--00--00--00--00--00--00--00--00-    ................
-00--00--00--00--00--00--00--00--00--00--00--00--00--00--00--00-    ................
-80--00--00--00--00--00--00--00--00--00--00--00--00--00--00--00-    ................
-00--00--00--00--00--00--00--00--00--00--00--00--00--00--00--00-    ................
-00--00--00--00--00--00--00--00--00--00--00--00--00--00--00--00-    ................
-00--00--00--00--00--00--00--00--00--00--00--00--00--00--00--00-    ................
-00--00--00--00--00--00--00--00--00--00--00--00--00--00--00--00-    ................
-00--00--00--00--00--00--00--00--00--00--00--00--00--FF--00--FF-    ................
-80--00--00--00--00--00--00--00--00--00--00--00--00--00--00--00-    ................
-00--00--00--00--00--00--00--00--00--83--00--00--00--00--00--00-    ................
-00--00--00--00--00--00--00--00--00--00--00--00--00--00--00--00-    ................
-00--00--00--00--00--00--00--00--00--00--00--00--00--00--00--00-    ................
-00--00--00--00--00--00--00--00--00--00--00--00--00--00--00--00-    ................
-00--00--00--00--00--00--00--00--00--00--00--00--00--00--00--00-    ................
-00--00--00--00--00--00--00--00--00--00--00--00--00--00--00--00-    ................
-00--00--00--00--00--00--00--00--00--00--00--00--00--00--00-        ...............

InfoComm_LED />
If you scan down in the above output and look through the data you will see that there are a couple of channels at 100% (0xFF) and a couple near half (0x80’ish). There are two pretty major issues in trying to read these bytes with standard library read() functions.
- How do we know how to find Channel 1? There are many more than 512 bytes shown here. If you read 512 bytes what you get could start anywhere.
- The data rate at 250 Kbaud supplies 44 complete channel sets per second! That absolutely will overrun the buffer before you can process any of it. The overrun would likely further obfuscate the data.
The fact is that the standard serial communications routines that you may be used to are just not usable here. JANOS will come to the rescue. But first let’s take a look at the data stream so we understand how this is to be resolved.
DMX Format
The DMX data on the RS-485 lines conforms to standard asynchronous serial data with 8 data bits, 2 stop bits and no parity. The bits are marched out from least significant (LSB) D0 to the most significant (MSB) D7. Each byte is called a “Slot”. The standard implementation transfers a START CODE and 512 channels in a total of 513 slots. The START CODE for normal DMX data is 0x00.
The beginning of the sequence is signaled with a Break Condition. This BREAK can be detected by the fixtures which allows them to synchronize with the stream. After the BREAK comes the START CODE (0x00 – NULL START) followed by the value for Channel 1 on through to Channel 512. Not all 512 channels need to be part of the transmission. The number of channels may vary by DMX controller. The complete implementation provides all 512.
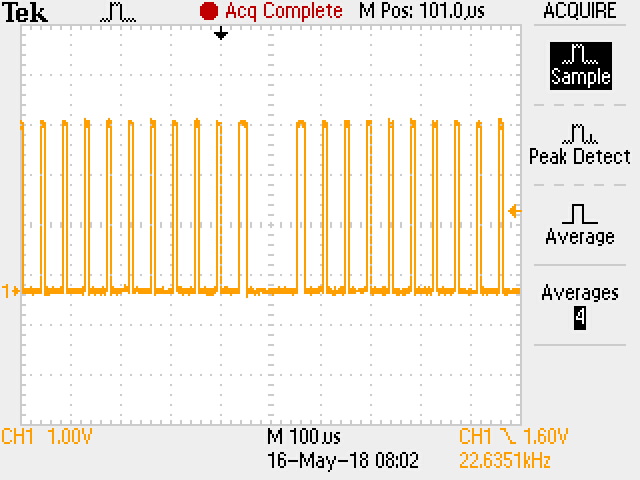
On the oscilloscope the BREAK looks like this. Here all of the channels are 0X00 and so you see only the STOP BITS. That long low pulse is the BREAK.
The issue is that the BREAK is difficult to handle with the standard serial port. It results in a FRAMING ERROR. During the break the signal is held at a low level. When the receiving serial UART expects the STOP BITS and they aren’t there it throws a FRAMING ERROR. While that can be detected and your application can be notified there still is no way to insure that the next bytes read from the port are those that follow the break. They may have been buffered some time before. They may be overrun by oncoming data.
In order to handle this and properly capture a reliable channel set, there must be a special function for that purpose in the AUX port class (AUXSerialPort). Of course, being the author of JANOS, I have implemented exactly what we need. And, those details are next…
Packet Capture
To read the DMX Packet (START CODE plus up to 512 Slots/Channels) we need to detect the Break Condition and then reliably collect as many as 513 serial bytes that immediately follow. Under many other RTOS implementations we would need to write an interrupt driven routine both to detect the Break condition and then also to collect the data. The JNIOR executes application programs written in a managed language (Java) and one does not have low level access to write things like serial interrupt routines. That is actually a good thing as the user generally does not have the programming experience. Such low level user programming often leads to unstable/unpredictable operation.
Here we rely on JANOS to maintain reliable operation. Low level interrupt routines have already been implemented to buffer incoming serial data and otherwise issue a notification of errors. Recall that the Break Condition manifests itself and one or more FRAMING ERRORS. But we have already established that reading buffered serial data and receiving asynchronous notifications is not going to be sufficient for capturing a DMX packet. This is where we benefit from having developed JANOS in-house and having authored 100% of it. Here we identify a need and are able to promptly and correctly implement a solution.
AUXSerialPort.readAfterBreak(byte[] buffer)
I have added the readAfterBreak() method to the AUXSerialPort class in the JANOSClasses.jar library. From the naming its use is self-explanatory. Here you create a buffer as a byte array and pass it to JANOS. The operating system enables the capture and then blocks the thread until the data collection completes. At the low-level JANOS sets up the buffer with a pointer and goes into a kind of ‘armed’ state. The interrupt routine that detects FRAMING errors has a tiny bit of code that checks for an armed capture and ‘triggers’ the collection of data. The interrupt routine that collects and buffers serial bytes from the port has code to set each byte aside into the buffer that you have provided. Once triggered the capture passes into the a ‘collection’ mode. When the buffer is full (or when another Break Condition is detected) the capture is ‘complete’ and the application program can proceed now with a byte array containing the DMX data.
Now to benefit from this new feature, you will need to update your Series 4 to run JANOS v1.6.6 or later. At the moment this is Beta code. We would make it available if you were to want to try this before its release. All you need do is ask.
Next we need to try it out…
DMX Capture Test
Here we create a project in Netbeans (making the few settings needed to target it for JANOS) and create the following test program. This merely takes control of, and fully configures, the AUX port in case it has not been configured through the DCP. Lines 23 and 24 test our new method. The rest merely dumps the byte array content for review.
package dmxfixture;

import com.integpg.comm.AUXSerialPort;
import com.integpg.comm.SerialPort;

public class Dmxfixture {

    public static void main(String[] args) throws Throwable {

        // AUX port access and configuration.  We need to open the port to gain exclusive access and
        //  set the proper baud rate and format.  We enable RS-485 mode and make sure that the receivers
        //  are enabled.  With normal RS-485 you would disable the transmit drivers.  Our adapter doesn't
        //  bridge the transmit and receive lines anyway and the DCP configuration automatically disables
        //  the drivers.  It is here for clarity.
        AUXSerialPort aux = new AUXSerialPort();
        aux.open();
        aux.setSerialPortParams(250000, 8, 1, SerialPort.PARITY_NONE);
        aux.setRS485(true);
        aux.enableReceivers(true);
        aux.enableDrivers(false);

        // capture a complete frame using our new method
        byte[] data = new byte[513];
        aux.readAfterBreak(data);

        // The remainder here is a fancy dump (skipping the START CODE).  Note how JANOS implements the
        //  printf formatting for us.
        for (int i = 1; i < data.length; i++) {
            if (i % 10 == 1)
                System.out.printf("%04d  ", i);
            System.out.printf("%4d ", data[ i ] & 0xff);
            if (i % 10 == 0)
                System.out.println("");
        }
        System.out.println("");
    }

}
To run this we first build it in Netbeans. Then using the DCP we open the Folders tab and select the /flash folder. We then drag the dmxfixture.jar file from the project to the /flash folder (it can be executed from the root too). Then under the Console tab we log in and execute the application. The following is the result.
InfoComm_LED /> dmxfixture
0001     0    0    0    0    0    0    0    0    0    0
0011     0    0    0    0    0    0    0    0    0    0
0021     0    0    0    0    0    0    0    0    0    0
0031     0    0    0    0    0    0    0    0    0    0
0041     0    0    0    0    0    0    0    0    0    0
0051     0    0    0    0    0    0    0    0    0    0
0061     0    0    0    0    0    0    0    0    0    0
0071     0    0    0    0    0    0    0    0    0    0
0081     0    0    0    0    0    0    0    0    0    0
0091     0    0  255    0  255  128    0    0    0    0
0101     0    0    0    0    0    0    0    0    0    0
0111     0    0    0    0    0    0    0    0    0    0
0121   131    0    0    0    0    0    0    0    0    0
0131     0    0    0    0    0    0    0    0    0    0
0141     0    0    0    0    0    0    0    0    0    0
0151     0    0    0    0    0    0    0    0    0    0
0161     0    0    0    0    0    0    0    0    0    0
0171     0    0    0    0    0    0    0    0    0    0
0181     0    0    0    0    0    0    0    0    0    0
0191     0    0    0    0    0    0    0    0    0    0
0201     0    0    0    0    0    0    0    0    0    0
0211     0    0    0    0    0    0    0    0    0    0
0221     0    0    0    0    0    0    0    0    0    0
0231     0    0    0    0    0    0    0    0    0    0
0241     0    0    0    0    0    0    0    0    0    0
0251     0    0    0    0    0    0    0    0    0    0
0261     0    0    0    0    0    0    0    0    0    0
0271     0    0    0    0    0    0    0    0    0    0
0281     0    0    0    0    0    0    0    0    0    0
0291     0    0    0    0    0    0    0    0    0    0
0301     0    0    0    0    0    0    0    0    0    0
0311     0    0    0    0    0    0    0    0    0    0
0321     0    0    0    0    0    0    0    0    0    0
0331     0    0    0    0    0    0    0    0    0    0
0341     0    0    0    0    0    0    0    0    0    0
0351     0    0    0    0    0    0    0    0    0    0
0361     0    0    0    0    0    0    0    0    0    0
0371     0    0    0    0    0    0    0    0    0    0
0381     0    0    0    0    0    0    0    0    0    0
0391     0    0    0    0    0    0    0    0    0    0
0401     0    0    0    0    0    0    0    0    0    0
0411     0    0    0    0    0    0    0    0    0    0
0421     0    0    0    0    0    0    0    0    0    0
0431     0    0    0    0    0    0    0    0    0    0
0441     0    0    0    0    0    0    0    0    0    0
0451     0    0    0    0    0    0    0    0    0    0
0461     0    0    0    0    0    0    0    0    0    0
0471     0    0    0    0    0    0    0    0    0    0
0481     0    0    0    0    0    0    0    0    0    0
0491     0    0    0    0    0    0    0    0    0    0
0501     0    0    0    0    0    0    0    0    0    0
0511     0    0

InfoComm_LED />
We note that channels are correct. Here we go over to the 412DMX controlling this DMX network and check Kevin’s DMX panel page for comparison.
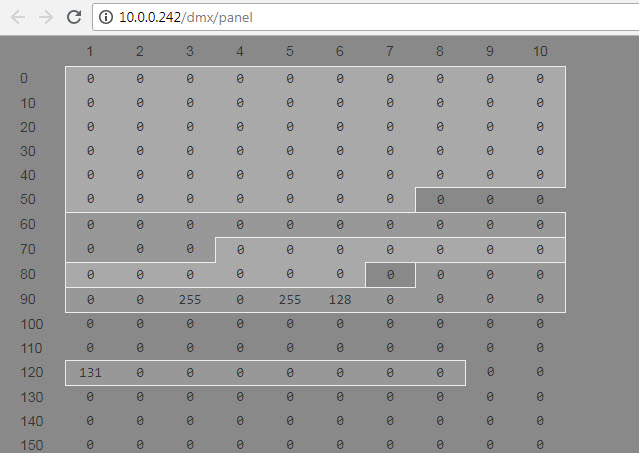
Putting it to Work
Now we can receive a DMX frame and read the individual channels what can we do with it? I mean other than dump it?
Well Kevin has defined an eight channel fixture starting at DMX channel 121. The idea being that each channel would correspond to a JNIOR Relay Output. Channel settings from 0-127 would result in an open/off relay and values in the range 128-255 would close the relay. You can imagine any use that you would want given the flexibility that you now have in JNIOR programming. Let’s implement this particular fixture.
The approach will be to sample a DMX packet periodically and set the relays appropriately. There is no need to catch every DMX packet and in fact we are not likely going to be able to do that. We are also going to be considerate of the JNIOR CPU and anything else that the unit might want to be doing. We will sample say every 1/4 second and sleep in between.
Here is the program. This uses an infinite loop to sample the DMX stream about 4 times a second. The starting address must be defined in the Registry. This could be cached. With this implementation you can change the starting address without rebooting or restarting the DMXFIXTURE program. It is presume that you would start the DMXFIXTURE program automatically at boot with a Registry Run key.
package dmxfixture;

import com.integpg.comm.AUXSerialPort;
import com.integpg.comm.SerialPort;
import com.integpg.system.JANOS;

public class Dmxfixture {

    public static void main(String[] args) throws Throwable {

        // AUX port access and configuration.  We need to open the port to gain exclusive access and
        //  set the proper baud rate and format.  We enable RS-485 mode and make sure that the receivers
        //  are enabled.  With normal RS-485 you would disable the transmit drivers.  Our adapter doesn't
        //  bridge the transmit and receive lines anyway and the DCP configuration automatically disables
        //  the drivers.  It is here for clarity.
        AUXSerialPort aux = new AUXSerialPort();
        aux.open();
        aux.setSerialPortParams(250000, 8, 1, SerialPort.PARITY_NONE);
        aux.setRS485(true);
        aux.enableReceivers(true);
        aux.enableDrivers(false);

        // here we create an infinite loop to continuously process the DMX data
        byte[] data = new byte[513];
        for (;;) {

            // capture a complete frame
            aux.readAfterBreak(data);

            // Obtain the starting address.  If it is invalid or not defined no action is taken.
            int addr = JANOS.getRegistryInt("DMX/Address", 0);
            if (addr > 0 && addr < 505) {

                // Although we don't have to we are going to collect all of the relay states
                //  and set them simultaneously.  This will also take advantage of signed values
                //  in Java.  Values in the range 128-255 will appear to be negative if we don't
                //  mask them with 0xff.
                int bits = 0;
                for (int i = 0; i < 8; i++) {
                    if (data[addr++] < 0)
                        bits += (1 << i);
                }
                JANOS.setOutputStates(bits, 0xff);
            }

            // sleep for a quarter second
            System.sleep(250);
        }
    }

}
This program should be pretty easy to follow. Let’s test it.
Demonstration
A video can best demonstrate the operation of this program. Here we have a DMX application running on a 412DMX (10.0.0.242) allowing us to vary the channels that we associate with our 410 fixture. A separate Model 410 running our DMXFIXTURE (10.0.0.250) program can be monitored remotely through its DCP page. Here we overlap the two browser entities and we can see how modifying the channel fader results in the relay status change out across the DMX network.
Reliability
Let’s look into potential error conditions and the reliability of this approach. The DMX format typically supplies nearly 44 frames per second. If there is a communications error, due to electrical noise for instance, one and possibly up to a few frames might be in error. For a light fixture this might cause a minute flicker or some small flinch in pointing. But, given the frame rate it is quickly corrected and might not be even noticeable. If we are interpreting a frame with our program we need to be extra careful not to trigger a chain of events based upon an error packet.
Typically in data protocols we would have some form of checksum or CRC which we can use to identify an erroneous transmission so it can be ignored. There is no such thing in the DMX512 protocol. So what steps can we take?
Well to start we should verify that the START CODE is the expected NULL START 0x00 and ignore any frame with a different code. The controller might actually be inserting those and we must ignore them. I will adjust the program to check this.
Well… The START CODE is returning 128 (0x80) and the channels appear to be properly registered (e.g. in the right place). Now to look into this.
Synchronization After Break
The DMX512 specification defines the width of the Break Condition as something greater than 92 microseconds. It is important to note that it is something greater than twice that of a single slot time (the time to receive a single byte) of 44 microseconds (11 bit times – start bit, 8 data bits and 2 stop bits). It is not a precise multiple of slot times or even bit times. This forces the receiver to synchronize with each and every packet.
Given this I could make the argument that the Mark After Break should be at least one slot time of 44 microseconds in order to insure that the leading start bit of the first slot is successfully interpreted. The DMX512 specification however specifies the minimum Mark after Break of 12 microseconds. This puts us at the mercy of the UART design and its ability to synchronize following a Break Condition of arbitrary length. There are a number of possible outcomes that depend on what the UART decides is the first STOP BIT once the Break Condition passes.
- For example, if the beginning of the Mark After Break is seen as a valid STOP BIT then a 0x00 byte is received AHEAD OF the normal NULL START code 0x00. This extra 0x00 can be interpreted as a valid START CODE but all of the channel slots are off by 1. Channel 2 would have the value for Channel 1. This is an ERROR!
- If the Mark condition just slightly into to Mark After Break is interpreted as a valid start bit then an extra 0x80 is received AHEAD of the START CODE. This might be seen as a bad packet if the START CODE is verified. Channels are also shifted if values are used. This is a ERROR!
- The above continues with each bit time advance into the Mark After Break generating an initial extra byte of 0xC0, 0xE0, 0xF0, 0xF8, 0xFC, 0xFE and 0xFF depending on the length of the Mark After Break. In each case the START CODE would then be considered the Channel 1 value. ERRORs result!
- With a short Mark After Break the UART might look at a low bit value in the START CODE as a missing STOP BIT and generate yet another FRAMING ERROR. Again depending on the timing the START CODE might be returned as 0x80 with the first STOP BIT actually being interpreted as the MSB. In this case the Channel data is properly positioned. This is actually the most common mode I am seeing in the current set up. It is timing sensitive. This is also an ERROR!
If you follow this logic you might see that it is possible that it may take a couple of regular slot times before the UART grabs something it is happy about. It is all about the synchronization aspect of the hardware design.
The question is how to know when you are receiving valid data and properly aligned slots? Is there a solution to this?
A UART that requires a Marking Condition before attempting to detect a START BIT (falling edge) would function properly. Apparently they don’t work this way. At least not all of them.
UART Issue
The problem that we run into is an ancient design flaw in serial ports.
A Framing Error results when the UART (RX SCI) expects a Stop Bit and none is detected. A Stop Bit is a high (1 Marking) and during a Break Condition the signal is held low (0 Space) so a Framing Error is quickly encountered. Now most descriptions of UART logic suggest that after a Break the UART locates the next Start Bit (0 Marking) and that this is detected by a high to low transition of signal (1 -> 0). Logically it is done that way for asynchronous reception as the UART clock needs to synchronize and then sample the middle of each bit period.
In reality after a Framing Error the UART seems to see the next low (0 Space) as a Start Bit and continues to read bit data. As a result Framing Errors are repeated throughout the break period. A bogus byte value might appear to be properly read if the tail end of the Break Condition aligns with the UART in a way to make the high (1 Marking) after the Break look like a Stop Bit.
The likelihood of this bogus data byte and its content can vary depending on the length of the Break and the length of the Marking after the Break and before actual data is present. Since bytes are serialized LSB first these extra bytes look like one of 0xFF, 0xFE, 0xFC, 0xF8, 0xF0, 0xE0, 0xC0, 0x80 and even 0x00.
If the Marking after Break is brief (only a few bit times) and the alignment falls such that the UART looks at bits in the first byte of data for that magic Stop Bit, you will receive an incorrect value for the fist byte. It is conceivable that the UART might take several bytes before synchronizing and providing real data.
If the UART simply fell into a mode whereby it actually did search for the next Start Bit by looking for a valid high to low transition (1 -> 0), you would get a single Framing Error followed by the proper collection of data. But no… after 50+ years we have not addressed this issue. I half recall struggling with this exact thing maybe 30 or so years back now. The fact that it is still an problem is not impressive.
I guess I shouldn’t be surprised in that these hi-tech MCU processors all still include the Real Time Clock (RTC) circuit first designed for the very first digital watches in the late 1960’s. This forces us to parse time into Day, Month , Year, Hour, Minute and Seconds as if setting a watch on your wrist. In fact Seconds can only be reset to 00 and not directly set. On boot we have to read the time and reassemble it into Linux or Internet time as a tally of milliseconds since some epoch. Lots of work that causes loss of precision. And the ideal would be a non-volatile battery-backed 64-bit millisecond counter. Sometimes silicon space is limited and this counter would save lots of that. But no… these integrated circuit companies aren’t as swift as we would like to think.
Since DMX512 signals can have different lengths of Break and Marking after Break and these can vary depending on source, and since the protocol has no leading header that can be used in identifying valid frames, we are NOT ABLE to reliably receive data. Note that if the DMX512 Standard had forced the Mark After Break to be at least one data Slot long (> 44 microseconds) then UARTs would likely properly synchronize and reliably present the first byte of data. But the spec does not and the problem is that changing the standard now does not correct all of the DMX controllers already in use all over the world. So it is what it is.
So for us to insure that we read a valid frame, we need to resort to some trickery, filtering and indeed AI. While that can be fun, it’s unfortunate.
