What is the JNIOR Web Page?
The JNIOR Web Page is the website served by the Series 4 JNIOR out of the box. Once you have powered your JNIOR, connected it to the network, and assigned it an IP Address you can access the JNIOR Web Page using your favorite browser. This website is contained in, and served from, the /flash/www.zip file on the JNIOR.
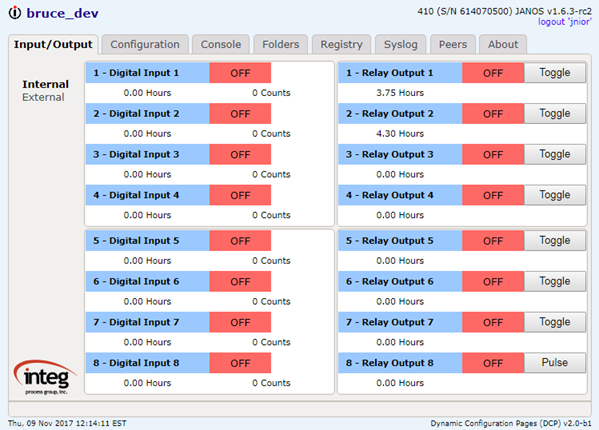
Input/Output Tab
You can use the JNIOR Web Page to monitor your JNIOR. Through the Input/Output tab you can see the status of each Digital Input and Output Relay. This tab offers two pages (listed down the left column). These are the Internal I/O and External I/O pages.
Internal I/O Section
If you log into an account with sufficient permissions you can control the relays. The appearance of this page can be configured through the Configuration tab. The labels can be redefined as might be appropriate for your application. You can remove unused inputs and outputs and even mask features such as usage metering if not of use.
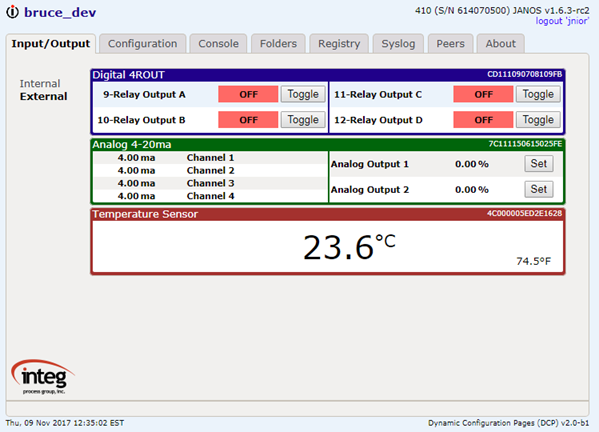
External I/O Section
The External I/O refers to external modules that you may optionally use with your JNIOR. INTEG can supply a Power Relay module, analog modules for 10V or 4-20ma, and even temperature sensors. One or more of these may be daisy-chained on the Sensor Port. If you have any of those they can be monitored and controlled in the External section of the Input/Output tab.
Configuration Tab
The Configuration tab is available only to Administrator accounts. This provides a dozen and a half pages covering most every aspect of your JNIOR.
Display Section
The Display page configures settings that affect the appearance of the Input/Output Internal page. Here you may disable any channel which simply removes the channel from view on the Input/Output tab. This does not disable the function of the input or output. It merely allows you to hide unused or background channels. Similarly you can hide Counters, Usage Meters, Alarm indications and Controls. For relay outputs you can select the Pulse control instead of Toggle if appropriate. You may even alter the coloring used in showing the input or output state.
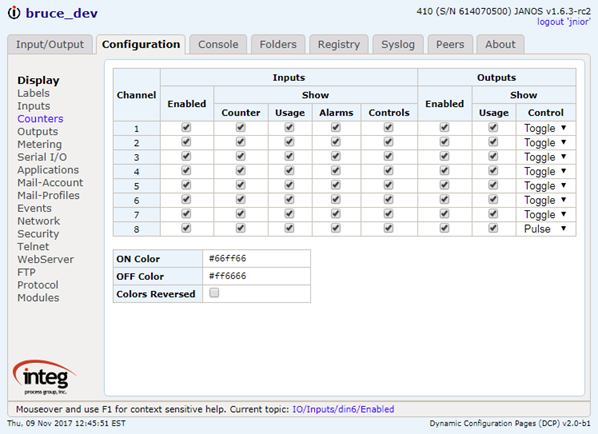
Note that each item of configuration is associated with a Registry Key. If you hold the mouse over a setting the related key is displayed in a Tooltip. Configuration settings that differ from default will appear in the Registry which can be viewed and edited directly using the Registry tab. More on that in a bit. While the mouse is hovering you may hit F1 to view the built-in Registry documentation.
Labels Section
The Labels page provides the ability to configure the text displayed on the Input/Output Internal page. In addition to Descriptions and I/O State labels you can change the units for the Counter.
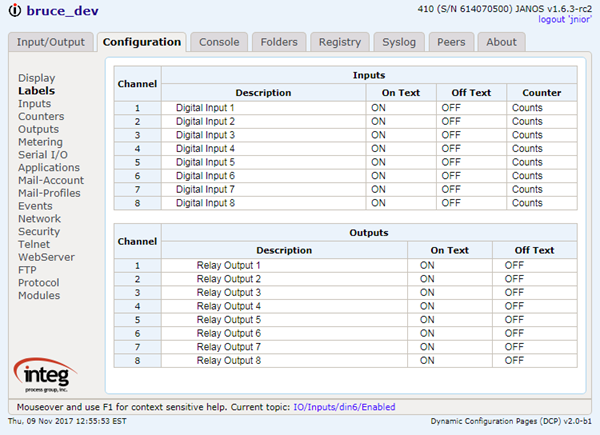
This page is shown for the Model 410 which has 8 inputs and 8 outputs. The JNIOR Web Page will display different arrangements for the Model 412 and 414. The former having 12 relay outputs and only 4 inputs. The latter with 12 inputs and only 4 outputs.
Inputs Section
The Inputs page affects the function of each input. Here you can configure inversion, debounce and a number of other characteristics for each of the available inputs.
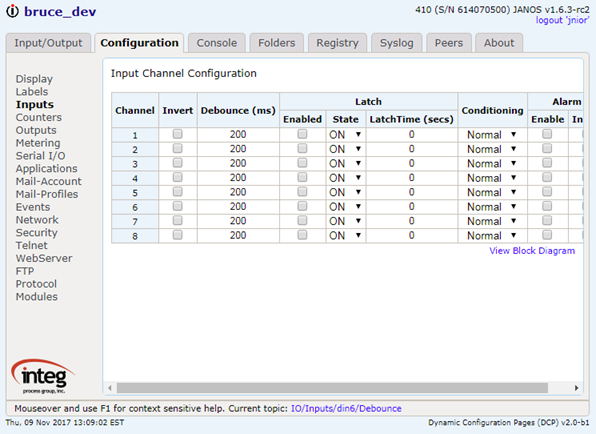
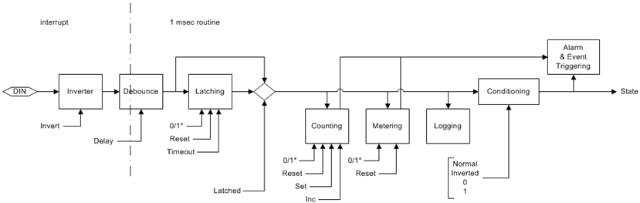
A Block Diagram is available through the provided link to help in visualizing input configuration. We can cover the details under another topic.
Counters Section
The Counters page sets counter configuration for each input. The JNIOR counts each activation of an input. Here you can configure how that is to happen and how it is displayed. You can scale a counter if each activation represented a number of items or a fractional amount of something. Here you can see the value of changing the displayed counter units which are configured on the Labels page.
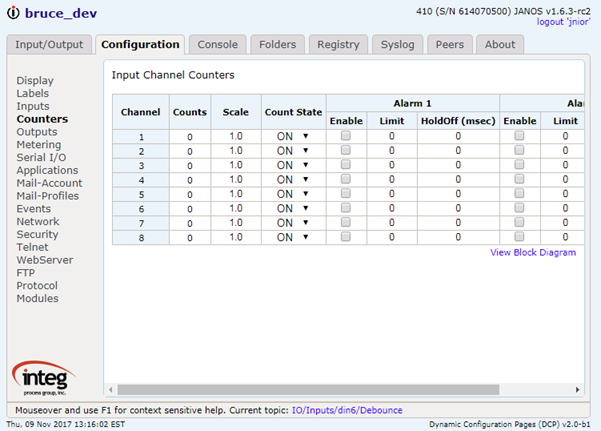
Here you can also configure two different Alarm levels. Alarms are displayed on the Input/Output Internal page. They are also Events that can issue email notifications.
On this page you can also mouse over an input and click the displayed “X” to easily reset a counter to 0.
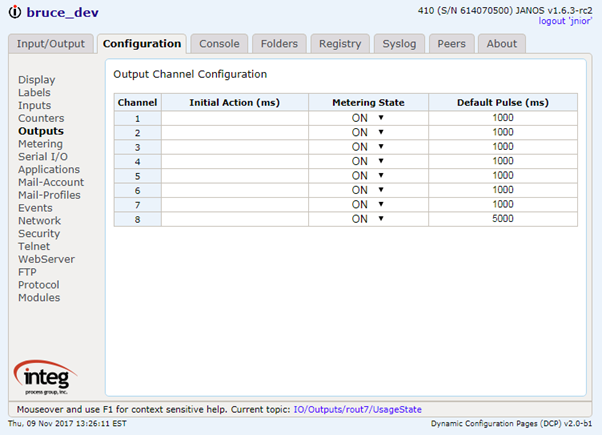
Outputs Section
The Outputs page provides state configuration for Usage Metering. The JNIOR tallies time for each activated input or output. This would potentially be useful for Preventative Maintenance. Here you can also set the default Pulse duration that would be used if you elected to configure a Pulse control (button) for the output on the Input/Output Internal page. If you want more information on this section, click here.
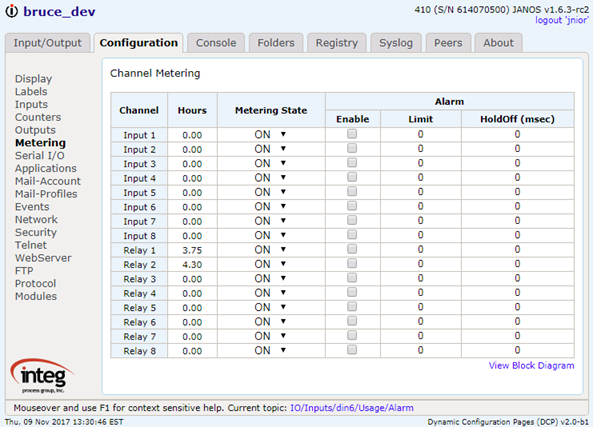
Metering Section
The Metering page displays the accumulated time for each Usage Meter. Like the Counters page you can mouse over a Channel and click the displayed “X” to reset the usage. Here you can also set the active usage state and configure alarms. This alarm can be set to send an email notification on the Events page.
Serial I/O Section
The JNIOR has two serial ports. The Serial I/O page can be used to set communications parameters for each port. The defaults are shown.
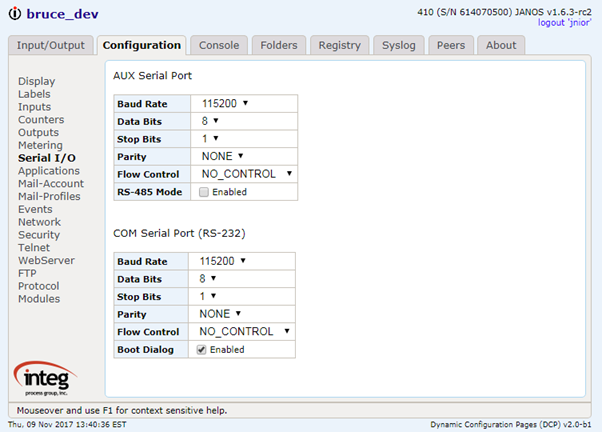
Generally an Application Program is used to perform communications over a serial port. The program itself may configure communications parameters. There are times where you may wish to set the parameters outside of an application. The IOLOG command provides access to a Transmission Log for the AUX port. You can set the Baud Rate and then check the IOLOG to see if data has been received properly.
Applications Section
The Applications page lists Registered Applications. Applications are automatically Registered during boot provided that a JAR file exists in the /flash folder containing a properly formatted appinfo.ini file. The content of the Applications page then may vary significantly from one JNIOR to another.
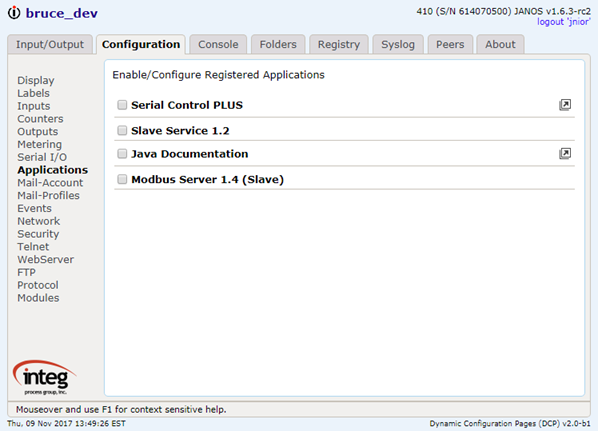
An application may be set to run at boot. When you check the box associated with the application the appropriate Registry Run Key is created. On reboot the application will automatically start. If available a link is displayed that can lead to additional configuration pages specific to the application.
Note that the checkbox only affects the status of the application after boot. The starting and stopping of applications at any other time is performed at the Command Line which can be accessed through the Console tab.
Mail-Account Section
Each JNIOR has the ability to send email notifications. Applications can be written to generate emails and potentially received them. Outgoing email requires a valid client account. The Mail-Account page is used to configure the outgoing email capability.
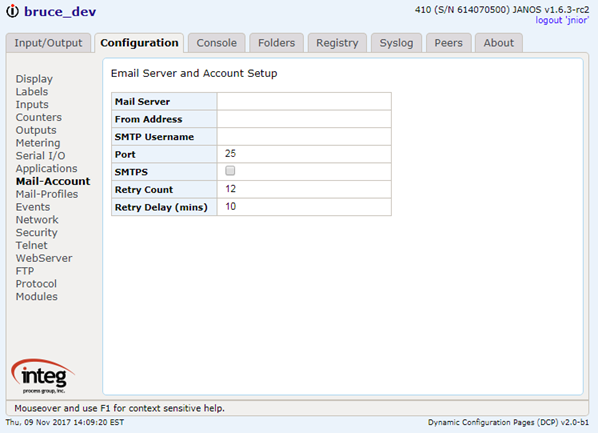
Here the Mail Server is something like smtp.comcast.net and the From Address would be the email address for a Comcast account. When you enter the SMTP Username you will be asked for a valid Password. The password is securely stored in the Registry. The remaining settings define the SMTP port, security and other characteristics for the communication. These are the credentials use in submitting outgoing emails.
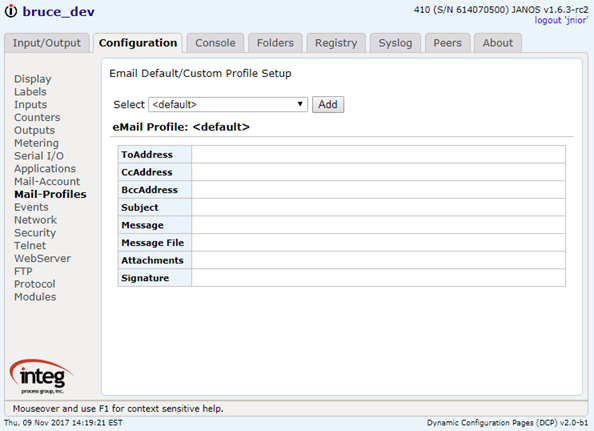
Mail-Profiles Section
Email notifications can be generated for a number of Events if enabled. JANOS has default structures for those notifications. You can optionally define any number of custom email messages as Profiles using the Mail-Profiles page. When the default content is insufficient these profiles can be referenced by name to define custom email recipients and content.
Events Section
There is a small set of built-in events. The Events page is used to configure the actions associated with those events. For the most part this involves enabling an email notification and defining an optional email profile.
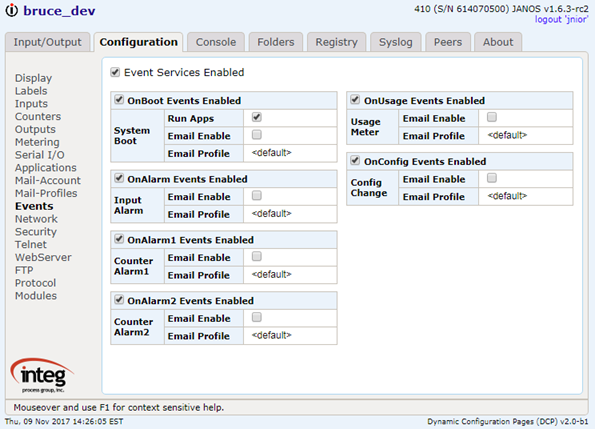
Beyond those listed here an unlimited number of events and actions can be accommodated through application programming or direct configuration of the Registry.
Note that the automatic starting of application programs can be disabled here without need for removing the Run keys.
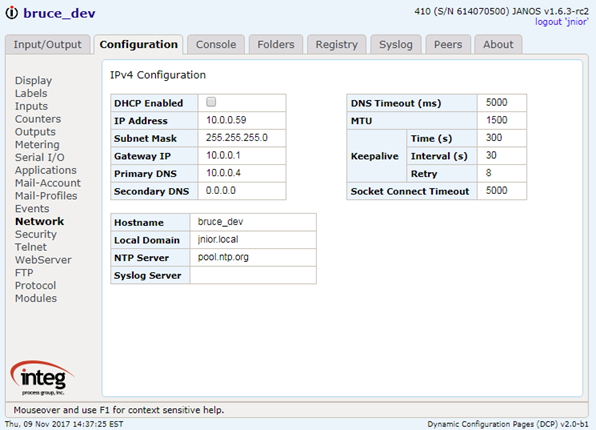
Network Section
The JNIOR is shipped configured with an IP Address of 10.0.0.201. This likely will not work for you.
To configure the network addressing you can run the Support Tool. The Support Tool is a Windows application that you can download for free from the INTEG website https://integpg.com/jnior-support-tool/. You can also make a serial connection to the RS-232 (COM) port and use the IPCONFIG command at the command line.
Once you can access the JNIOR Web Page you can modify settings through the Network page.
Security Section
The Security page offers a couple of settings.
The Series 4 JNIOR can perform secure communications using Public Key encryption and SSL/TLSv1.2. By default a 1024-bit RSA key pair is used in concert with automatic self-signed certificates. This means that you can access the JNIOR Web Page using a HTTPS connection. You can also perform secure FTP transfers and Telnet connections. The latter is best done with a client program available from us. Of course, you do not need either FTP or Telnet as the JNIOR Web Page offers most of that functionality.
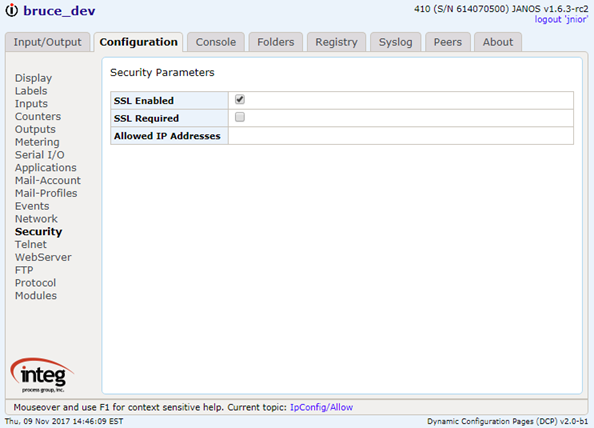
While it doesn’t seem prudent you can disable the SSL capability here by deselecting SSL Enabled. Perhaps more appropriate is enabling SSL Required. In this case FTP and Telnet connections must perform STARTTLS and proceed securely. The standard HTTP port (Port 80) is closed. You can continue to make the secure connection using HTTPS (Port 443). Email will only be transmitted securely.
IP Address filtering is available. The Allowed IP Addresses field can be set with a comma delimited list of IP addresses that can make connection to the unit. This field can also contain a sophisticated filter string. It is recommended that the documentation (use F1) be viewed before setting this field. You can block yourself. In that case you will need to make the serial Command Line connection and remove the filter through the REGISTRY command.
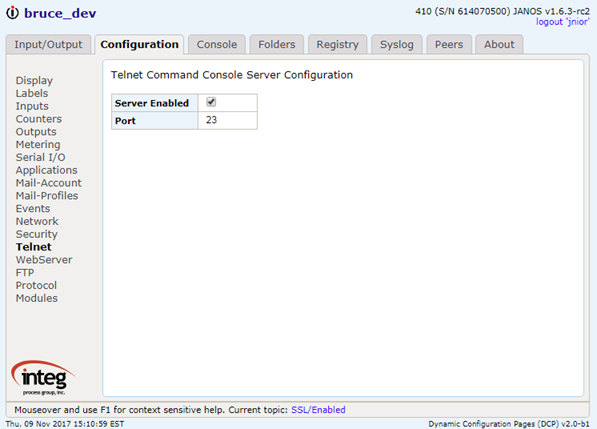
Telnet Section
The Telnet page simply lets you relocate the port. You may want to do that to hide it from casual connections. You can also disable the server entirely. You can do that since you can access the Command Line through the Console tab of the JNIOR Web Page.
WebServer Section
The WebServer page is used to configure the Web Server. Here you can relocate either the HTTP or HTTPS ports or both. You can disable the Web Server entirely. That also prevents use of the JNIOR Web Page but your application might demand the limited access.
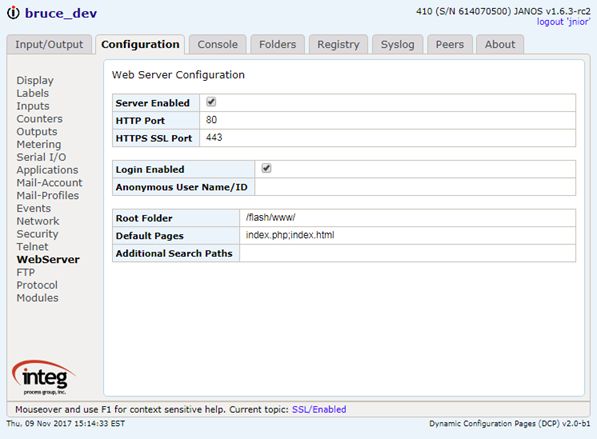
By default web access requires a login. You can disable the login requirement and to do so you must also define a user account for anonymous access. If your JNIOR is physically secure and the network is isolated from the larger network you might disable the login. If otherwise you have some pages that you wish to share publicly you can place them in the /flash/public root. Pages are served from that area without the need for authentication.
FTP Section
You can relocate or disable FTP using the FTP page. You can disable FTP and still manage the JNIOR’s file system through the Folders tab of the JNIOR Web Page.
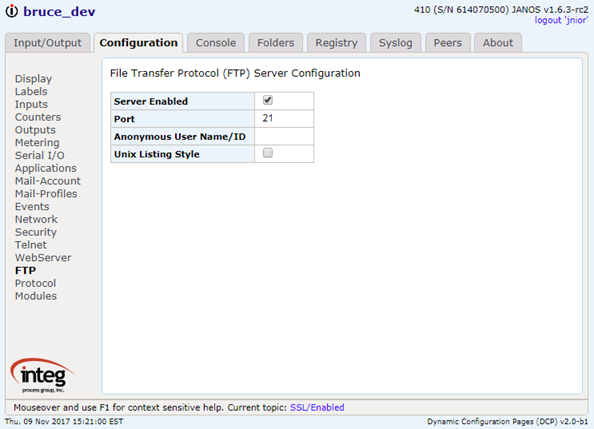
Anonymous FTP access is not recommended. You can allow that by defining a user account to be used for that.
Protocol Section
The JNIOR Protocol is deprecated and not recommended for new applications. The Series 4 offers a more modern Websockets interface which performs all of the same function and much more. It is also not binary. The JNIOR Protocol is still supported.
The Protocol page can be used to relocate the JNIOR Protocol port. The server can also be disabled.
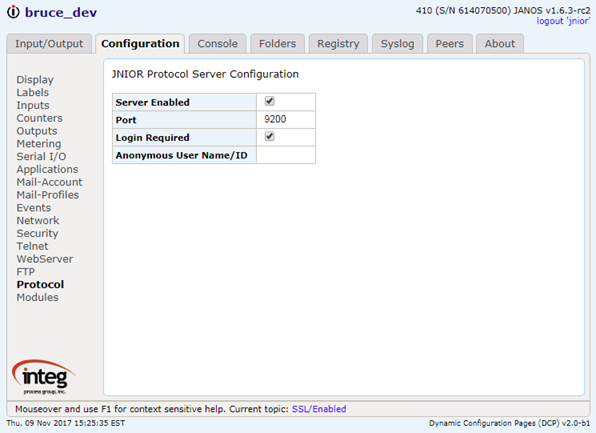
We would recommend disabling the JNIOR Protocol unless you know that it is used. It is also highly recommended that the login requirement not be disabled. If you do so you must then define a user account for the anonymous access.
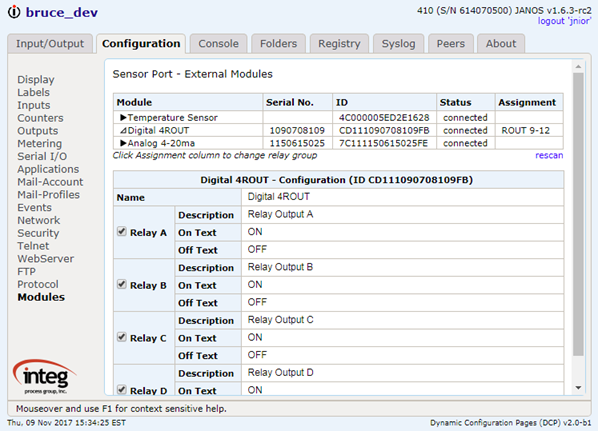
Modules Section
And finally for the Configuration tab is a page for the configuration of external modules. If you use an external module it will be listed here on the Modules page. If you have recently connected a module and don’t see that one you can select ‘rescan’ to update the list.
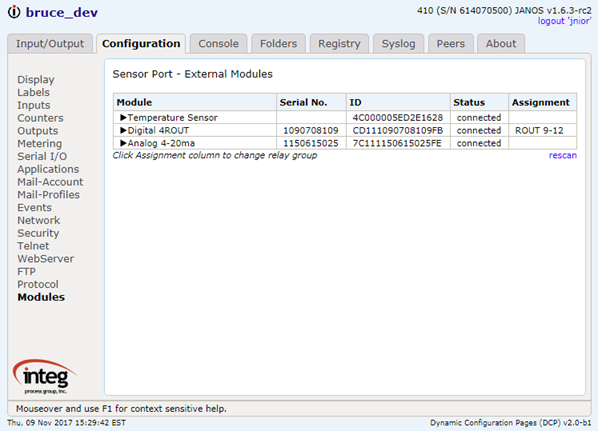
If the external module has configuration setting those can be seen by expanding the module. Click the triangle shape. For instance the 4ROUT labels can be altered for use on the Input/Output Externals page.
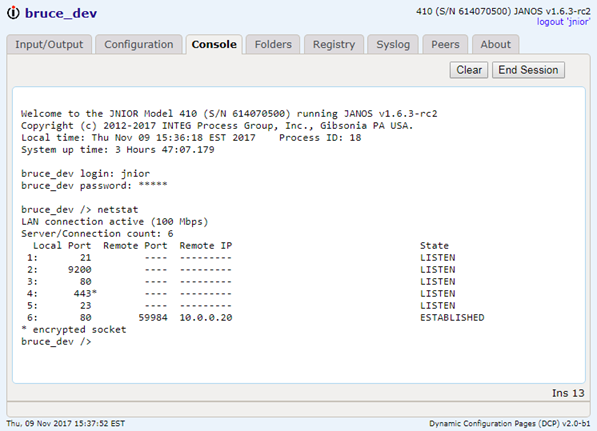
Console Tab
The Console tab provides access to the Command Line interface. This is similar to a Telnet connection but performed entirely through the web interface (Websockets). Note that an additional login is required here.
You can cut and paste here. That would be one advantage over a Telnet client. You can also drag a file to this window. That will place the file into the /temp folder convenient for further use from the command line. You might drag a UPD here and once it transfers use the JRUPDATE command to update the operating system as an example.
Folders Tab
The Folders tab provides a file explorer formatted view into the file system.
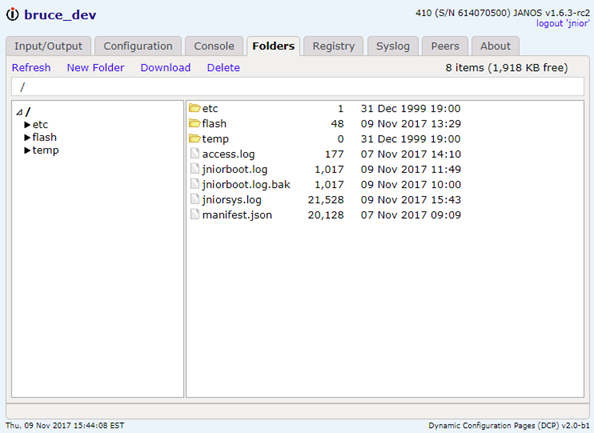
You can navigate through folders by clicking on the left tree or double-clicking folders on the right as you might expect. Files can be selected and downloaded. You can also delete files and create folders. Drag and Drop is supported both into and out of the folder. Although in that case there is some variation in availability depending on the browser you are using. I use Chrome extensively. That seems to provide all of the needed capability.
If you need to move entire folders including subfolders then FTP is a better bet. Here I recommend FileZilla. https://filezilla-project.org/
Registry Tab
The Registry tab provides an explorer view into the Registry. Here you can edit and remove keys as needed. Each setting found in the Configuration tab is associated with a Registry Key. You can make settings here if you know the proper key and format.
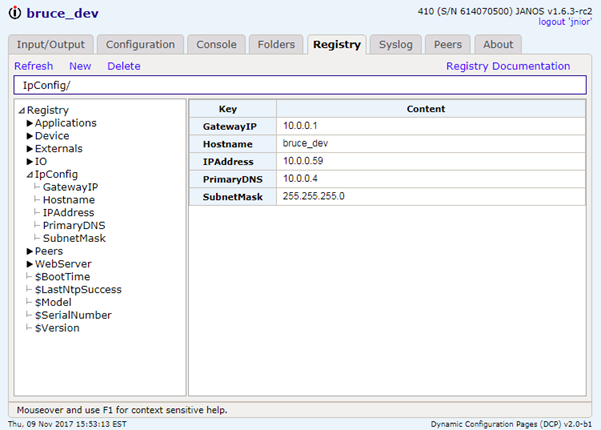
It is recommended that you become familiar with the Registry, There are some settings that are not accommodated by the JNIOR Web Page GUI. You will need to enter those here. The Registry can also be manipulated from the Command Line.
The JNIOR Web Page contains built-in and detailed Registry documentation.
Syslog Tab
The Syslog tab displays the System log detail in chronological order with the most recent event at the top. This is the content of the /jniorsys.log and /jniorsys.log.bak files concatenated. You can scroll then through all of the available log history in order from most recent to the oldest.
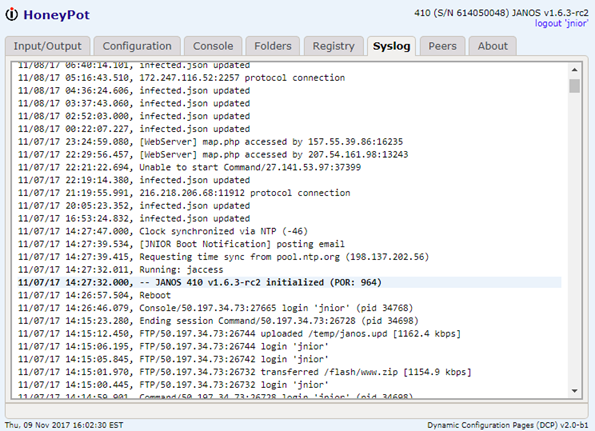
Here I’ll show a segment of the HoneyPot Syslog since my development unit sees a lot of crazy use and its log is full of confusing stuff. In fact you can see in this log where JANOS was recently updated. The infected.json file that keeps getting updated is the database for the http://honeypot.integpg.com/map.php application running on that unit. The HoneyPot JNIOR is connected directly to the Internet.
Peers Tab
The Peers tab provides quick link access to other JNIORs that you may have on the network. The Series 4 JNIOR is aware of nearby peer products. Here you can move to the JNIOR Web Page on these other units using the link provided. That can be convenient if you have many JNIORs. Okay, so here at INTEG the Peer list gets crazy.
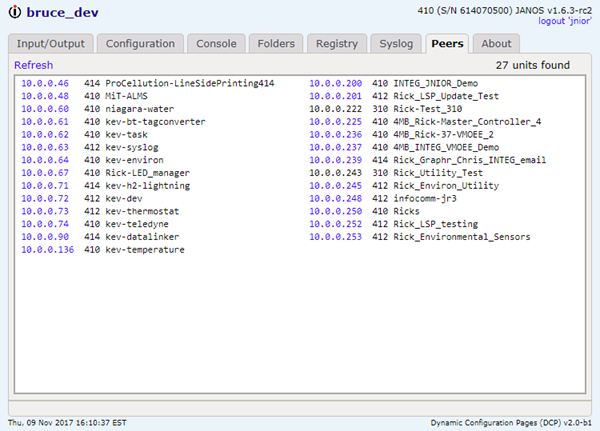
For many this list will be short if there are any at all.
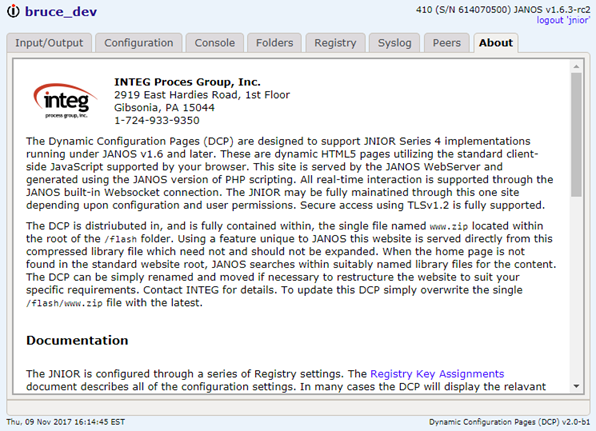
About Tab
And FINALLY! We have the About tab. This actually contains some text and potentially useful information.