Update Projects – JNIOR Supporter
A panel on the right side of the JNIOR Supporter is update projects. Update Projects are zip files that contain instructions to Update/Install applications or settings to a JNIOR. Below is how to take/distribute Update Projects.

Official Update Projects
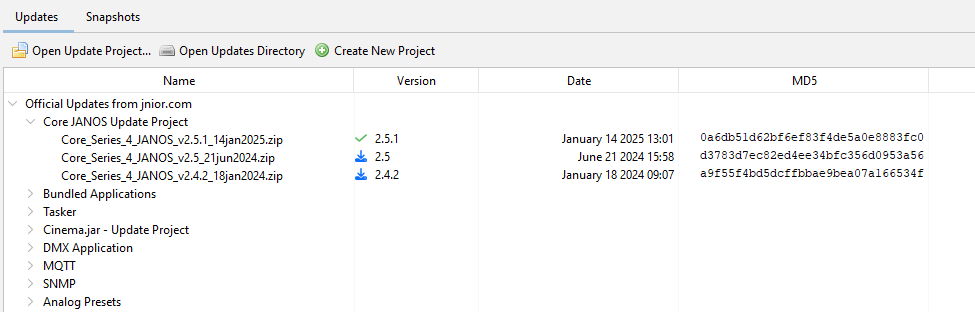
When selecting the Update Projects tab, there are two sections of Update Projects: Official Updates from Jnior.com and Local Update Projects. The first section is populated with the most recent updated projects on INTEG’s website. When viewing Official Update projects, they will have their version, date created, and MD5 information available. Next to the version numbers are icons showing if an update project has been downloaded. A checkmark means it is downloaded while a download icon means it hasn’t yet. When an Official Update project is opened, it downloads it from INTEG’s website if it hasn’t already been downloaded. This requires an internet connection.
Local Update Projects
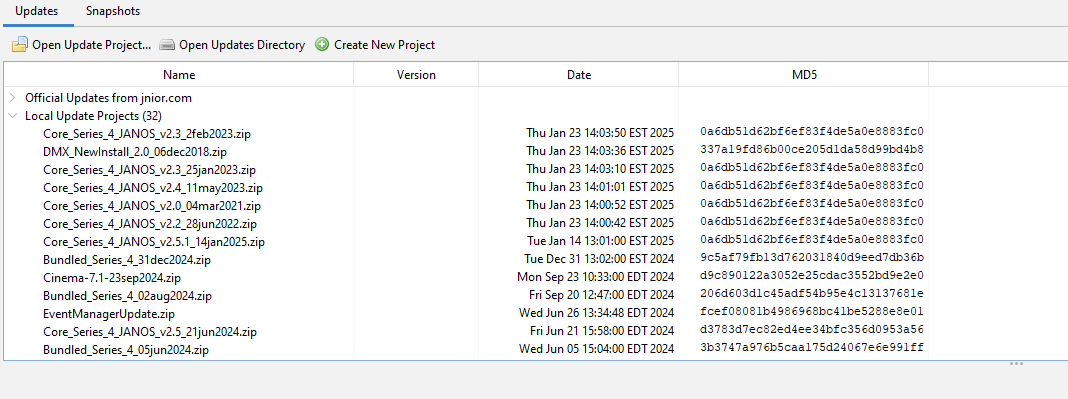
The Local Update Project section is for Update Projects that are custom-made (either by yourself or from INTEG), or an older version of an official release on the INTEG website. Any Local Update Project displayed by the Supporter application is detected from your Update Project Directory. Therefore any Local Update project displayed in the Supporter application has already been downloaded. Local Update projects aren’t version-tracked either, so they don’t display any info for their version column. When one or multiple Update Projects are selected, you can hit the ‘Open Selected’ button at the top of the Update Projects tab or double-click it to launch the Update Projects under the Update Projects Tab. Hitting the ‘Open Updates Directory’ will open the file directory in your file explorer where Update Projects are saved locally on your PC.
Using an Opened Update Project
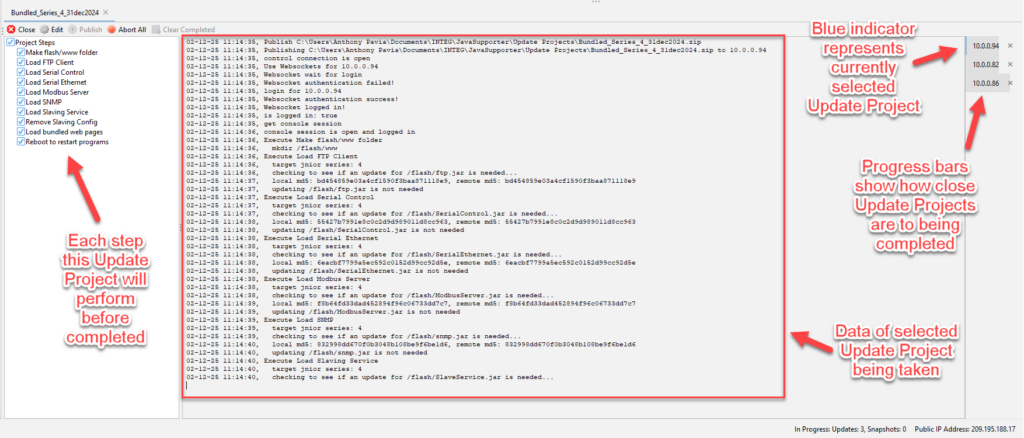
Once an Update Project is opened and displayed in the bottom panel of the JNIOR Supporter, you can then close, edit, publish, or abort the Update Project. Closing the Update Project will remove it from the bottom panel under the Update Tab, but it can be opened again from the Update Tab. Editing the Update Project will allow you to view each step of the Update Project and change it as needed. Before clicking the edit button, you can view these steps on the left side of the Update Project. This view allows you to enable/disable any steps you’d like without removing them from the update project. Publishing an Update Project opens a JNIOR Selection Dialog that lets you choose which JNIORs from the Beacon Tab you wish to publish to. (If they are on the network and not displaying in Beacon, you can manually enter in there IPs to publish to them.) Then once selected, clicking the okay button in the Selection Dialog makes the Update Project(s) go through each step and perform it on the selected JNIOR(s). These steps range from loading applications on the JNIOR, changing registry keys, rebooting, and more. Progress on publishing the Update Projects is shown via Progress bars for each JNIOR being updated. Notifications are displayed when update projects are finished. Lastly, aborting an Update Project can only be selected once an Update Project begins publishing to a JNIOR, and cancels the Update Project where it’s currently at.