Beacon – JNIOR Supporter
Written by Kevin Cloutier on Sep 17, 2020 8:32 am
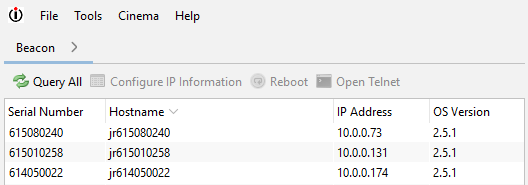
The Beacon tab shows you information about the JNIORs that were found. The Beacon technology uses UDP over port 4444. A UDP broadcast is used to discover JNIORs on the network. UDP broadcasts are usually blocked by routers therefore restricting the UDP broadcast to the local segment of the network.

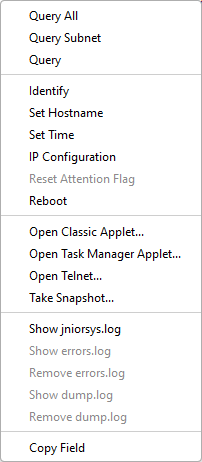
Right-click for options

Right-clicking presents you with actions that can be taken for the selected JNIOR.
- Query All – Broadcasts the Query message to the Network to ask JNIORs to report back
- Query – Broadcasts a query message to only the selected JNIOR on the network.
- Identify – This will flash the amber status LED on the selected JNIOR for a few seconds.
- Set Hostname – A prompt will be presented asking for the new Hostname. The current Hostname will be pre-filled.
- Set Time – Synchronizes the JNIOR’s time to the PC’s time that the Supporter runs on.
- IP Configuration – The Network Configuration dialog will be displayed. You can choose between DHCP and static addressing. If a static IP Address is chosen you’ll need to enter an IP Address, Subnet Mask, Gateway Address, and DNS Servers information.
- Reset Attention Flag – Attention flags are messages displayed in Beacon’s Message column. Selecting this will clear all messages in the Message column of Beacon. (If errors are thrown the attention flags will re-populate until they are handled.)
- Reboot – This will reboot the JNIOR. Rebooting will make the JNIOR disappear from Beacon for a brief moment.
- Launch WebUI- This will launch the main web user interface for monitoring and controlling the I/O as well as general JNIOR configuration.
- Open Telnet – Opens a telnet session for console-level access. Here is a link to different telnet commands a JNIOR can be given.
- Take a Snapshot – Initiates the Snapshot process. A snapshot is a copy of a JNIOR configuration, downloaded as a Zip File. These can be used to move configuration from one JNIOR to another or to debug/troubleshoot JNIORs.
- Get Network Capture – Create a network capture file on the JNIOR, and if Wireshark is downloaded on your PC, the Supporter will open the network capture in Wireshark.
- Show jniorsys.log – Loads the jniorsys.log.bak and jniorsys.log files into a dialog for real-time viewing.
- Show/Remove errors.log – With these options, you can either load the errors.log.bak and errors.log files into a dialog for real-time viewing, or remove them from the JNIOR. This option is only enabled if the Attention flag indicates that there is an error file.
- Show/Remove dump.log – With these options, you can either load the dump.log.bak and dump.log files into a dialog for real-time viewing or remove them from the JNIOR. This option is only enabled if the Attention flag indicates that there is a dump file.
- Copy Field – Copies the data inside the field currently selected in Beacon. This is to easily grab values from the Beacon tab if needed.