IP Configuration for direct PC Connection
When setting up a JNIOR, one of the most important things to establish is a proper IP to connect with it on your computer. Your computer’s IP determines what IP the JNIOR needs to be compatible with it. This post will go over how the JNIOR chooses an IP by default, how to check your own PC’s IP, and then how to change your JNIOR’s IP to a compatible one.
DHCP
DHCP (Dynamic Host Configuration Protocol) is a network management protocol used on TCP/IP networks. The DHCP server automatically assigns IP addresses and other network configurations like subnet mask, default gateway, DNS server, and more to the connected devices so they can exchange information. DHCP lets devices get the necessary TCP/IP configuration data from the DHCP server. The JNIOR is set to be a DHCP client out of the box, so unless you need to set the JNIOR’s IP to a specific one, or if the network doesn’t have a DHCP server, then just connecting your JNIOR to your computer or a network should allow the JNIOR to request a valid IP from the DHCP server and automatically assign itself that IP.
Checking your PC’s IP
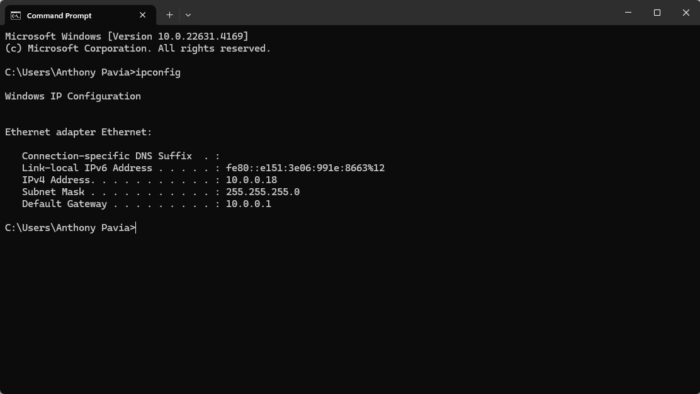
If you need to set your JNIOR’s IP to a valid one without DHCP, you’ll first need to know the computer’s IP. To check your computer’s IP, you can do so by opening your computer’s command prompt. Opening the command prompt may vary depending on what Operating System your computer is using. For Windows, an easy way to do so is by clicking the start button at the bottom left and searching for ‘cmd’ or ‘command prompt’. Once you have an open command prompt, you type the command ‘ipconfig’ and it will display the computer’s IP info. From the displayed ethernet connection information, you’ll want to keep track of your IPv4 Address and Subnet Mask. Once you have those, you can begin changing the JNIOR’s IP.
Setting the JNIOR’s IP
To interact with a JNIOR to change its IP, the best way to do so with a new unit is to download the JNIOR Support Tool. The JNIOR support tool uses a UDP protocol to detect units, so using it will allow you to see what units are on the network. When the support tool is downloaded and opened, to change a JNIOR’s IP you navigate to the Beacon tab you’ll right-click the JNIOR whose IP you wish to change, and select Configure -> IP Configuration. This will open up the JNIOR IP Configuration Dialog.

For choosing what IP you can set your JNIOR to, you should start by making your JNIOR’s subnet mask match your computers so that they are on the same subnetwork. So for example, if the subnet mask you got from doing the ‘ipconfig’ command earlier was 255.255.255.0, then you should set your JNIORs to be the same. Once you have that, you’ll choose an IP for the JNIOR. For selecting the IP, the subnet mask determines part of how the IP should be. For example, if your computer IP was 192.168.40.100 and its subnet mask was 255.255.255.0, you’ll first set your JNIOR’s subnet mask to 255.255.255.0 so that your JNIOR and your PC can be on the same subnetwork. Then for the IP that you set for your JNIOR, the first three octets need to match your PC’s for the first three octets of the subnet mask which were 255, so you would do 192.168.40.XXX for your JNIOR’s IP. The X’s can be whatever you want, as when a subnet mask has 0, it means that the octet of your IP can be any number from 0 – 254. Just check that the IP doesn’t exactly match your PC’s IP or any other device’s IP on the network or your JNIOR will default its IP to 0.0.0.0 to avoid IP conflicts. This should help explain setting a valid IP for your JNIOR without DHCP. If you still need assistance, please join our chat or email us at support@integpg.com for more help!