Error logs on the JNIOR
Once a JNIOR is running, over time it might experience an error. When this happens, it should log that error in a log file. This post will briefly explain how to access error logs.
Accessing an Error File
There are a few ways to interact with files on the JNIOR: Using a telnet connection, Using the JNIOR Web Page, or using FTP from the Support Tool.
Viewing an Error File with a telnet connection
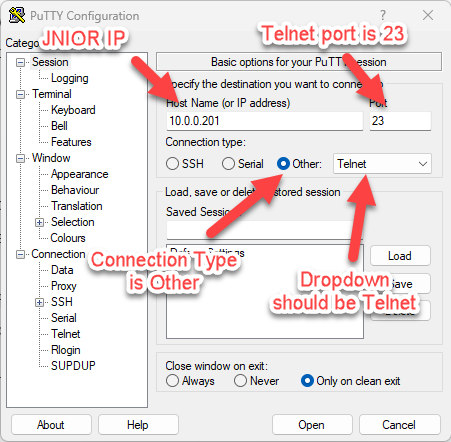
To open a telnet connection to a JNIOR, you’ll need PuTTY downloaded to your computer. PuTTY is an SSH and telnet client and can facilitate the telnet connection between your PC and the JNIOR. The Support Tool can be used as an easy way to open PuTTY. This can be done by going to the top of the Support Tool and selecting Tools -> Command Line, or by right-clicking a JNIOR in the Beacon tab and selecting Tools -> Open Telnet. If you open PuTTY from the Tools tab at the top of the Support Tool, you’ll enter additional info to PuTTY to connect to the JNIOR. You must have the JNIOR’s IP entered, the Port is 23, the Connection Type is Other, and the Other Dropdown has Telnet selected. Clicking open should then launch the PuTTY telnet terminal.
If you open PuTTY by right-clicking the JNIOR, the info required will automatically be entered into PuTTY and the telnet connection will immediately open.
Once opened, you can check what error files there are on the JNIOR by typing the command ‘ls’. This will show all files located in the root directory, which should contain the log files. If any are error files, you can view a printout in the terminal of what is in the file by typing ‘cat FILENAME’. For example, if the file is called errors.log, the command to view the printout would be ‘cat errors.log’. Files can also be removed with an ‘rm’ or ‘del’ command.
Accessing an Error File with the JNIOR web page
Another way to view error files is by opening the JNIOR’s web page. This can be done by right-clicking a JNIOR in the Support Tool and selecting Tools -> Open Webpage, or by opening an Internet Browser and entering the JNIOR’s IP into the URL.
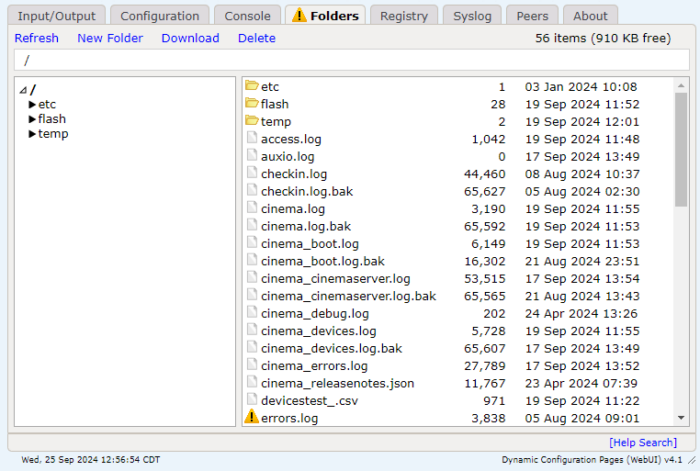
Once the JNIOR web page is open, you can navigate to the Folder tab to view all files on the JNIOR. Double-clicking any of them will download the file locally for you to open. Files can also be deleted using the Delete button near the top of the Folders tab.
Accessing an Error File using FTP
NOTE: This method is only available for the JNIOR Support Tool and not the JNIOR Supporter.
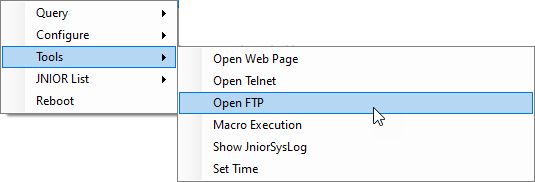
FTP stands for File Transfer Protocol, a network protocol that allows users to transfer files between computers over a network, such as the Internet. FTP can access the files on your JNIOR via your Window’s File Explorer. To do this, open the Support Tool, and once you right-click a JNIOR in the beacon tab you’ll select Tools -> Open FTP. This will display the files on your JNIOR in File Explorer. You can then open or download any error files you wish to view. Files can be deleted through File Explorer by right-clicking and deleting them.
Error File Message Tag in the Support Tool
Another place where you may see an error file being reported is in the Support Tool. One of the columns of information that displays for each JNIOR in the Beacon tab is the message column. This column reports information for occurrences on the JNIOR. This can range from the clock being offset, the SRAM being reformatted, and in our instance when error files are generated from problems occurring on the JNIOR.

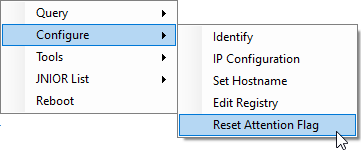
If the file has been reviewed and this message is no longer needed, this tag can be removed by right-clicking the unit and selecting Configure -> Reset Attention Flag. Keep in mind if the error file hasn’t been removed from the JNIOR when this is done, the error message will not be cleared.