Series 3 Power Supply
If you have a 310/312/314 Series 3 JNIOR you may also have its wall power supply. As we ship JNIORs in bulk we often supply them without the corresponding power supplies. Customers often use their own power sources. So you might just have the JNIOR or perhaps its original supply is still in service with a replacement Series 4.
By itself the JNIOR is not self explanatory. It’s a 6″ by 4″ by a little over 1″ black box with connectors filling the 4 sides. On the cover there are places for 18 LED indicators. You may recognize two DB-9F connectors for serial communications. You likely notice the CAT5 LAN connector. But the rest is somewhat mysterious. So what is next?
Typically we supply the JNIOR with a 12VDC Regulated 1A wall mounted power supply. Some series 3 are labelled with ‘9-24V DC/AC’ and some with ’12-24V DC/AC’. While the JNIOR will operate with a 9VDC supply that turns out to be too close to the low side and does not afford enough margin to insure reliable operation under all conditions. So at some point we made 12V the recommended low end.
The 4-position connector at the top of the unit is for the supply. The positive lead is connected to either of the left two positions (1 or 2) and the negative to either of the right two (3 or 4). We supply connectors wired to the center two positions, positive to pin 2 and negative to pin 3. The other two pins are there to allow you to tap this voltage for use in simple circuits involving the digital inputs or relay outputs as needed. Of course if an AC power source is used it is connected to pins 2 and 3 without regards to polarity.
One advantage to this particular design is that if you make an error and connect the DC supply backwards it will still work. Note though that the negative lead IS NOT circuit GND. More on that later.
Using any appropriate power source (and we all have a box of them laying around these days) the JNIOR should power up. A GREEN LED to the left next to the power specification will illuminate to indicate that power has been applied. We improved on this in the Series 4. The leftmost LED on the Series 4 is BLUE. That greatly enhances the product. ![]()
Actually, it is hard to resist a BLUE LED. They were a rarity for many years. When we built the first Series 4 units the prototype boards were installed in Series 3 enclosures. I elected to use a BLUE LED for the power indicator so we could easily tell a prototype Series 4 from a standard Series 3. We have so many mounted around the office. It was supposed to be temporary but democracy prevailed and we were destined to leave it that way.
So power up your Series 3. If the LED illuminates then your internal power rails have reached their proper voltages. You should also see the rightmost LED (ORANGE) come on for a brief period. That is illuminated during the OS boot. It also flashes indicating connection status. More on that at some other time. The rest of the indicators are RED and will display the state of the corresponding input or output.
By the way if you have a Series 4 you will notice one other difference (besides the BLUE LED). When the Series 4 boots the ORANGE Status LED flashes on for no more than a second or two. That is because JANOS boots in just a couple of seconds and applications start in seconds.
The operating system on the Series 3 however can take minutes to boot. The ORANGE status LED only illuminating as the base TINI operating system loads and subsequently the JniorOS loads. Once that is done applications then load. The boot process is lengthy but the unit will get it job done.
So the Series 3 internal power supply is a bit unconventional. While we typically power the unit with 12VDC it is designed to be powered by an AC source. Here is the front end. I had to go back and reinstall OrCAD to get to these schematics. We use Altium for the Series 4.
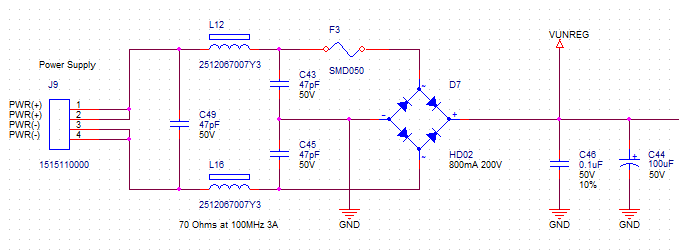
It is important here to note that the negative (-) power supply connection IS NOT the same as GND.
Now that generally isn’t an issue as all of the JNIOR’s inputs are isolated and all of the outputs are dry relay contacts and therefore also isolated. The GND signal does appear on the serial connectors and on the Sensor Port. The external modules that are designed to run on our Sensor Port are also isolated. The bottom line is that you can possibly cause an issue if you ground (GND) the negative (-) supply lead and then also connect the GND pin of either serial port. This is also true with the Series 4 with the exception of the 412DMX that is currently under development.
Another issue that has been corrected in the Series 4 JNIOR is that the negative path is not fused. In this case if a grounding problem occurs and you use the GND pin of one of the serial ports you can cause high current to flow through the product. As mentioned this has been corrected with the addition of the second fuse on Series 4 units.
The VUNREG here supplies the rest of the power supply regulation. With a 12VDC regulated source VUNREG will be somewhat less than 12V but sufficient to power the regulator that generates the internal 5V rail. That was not true with a 9VDC source under some load. Thus, the change to a minimum 12VDC.
Another concern here is that if you use a 24VRMS AC source VUNREG becomes 34V challenging the 5V regulator to follow. This is easily worsened in an HVAC environment where the 24VAC supply can be an unloaded transformer with more like 30V+ RMS. VUNREG can exceed 40V and component ratings including the rating of the subsequent 5V regulator become a concern.
So run the JNIOR with a 12VDC 1A regulated supply and avoid issues. Use increased voltages with caution.
One does not need to use a Regulated external supply. That does insure though that you have precisely the voltage that you want. Unregulated supplies tend to vary more significantly in voltage than you would think from the nominal.
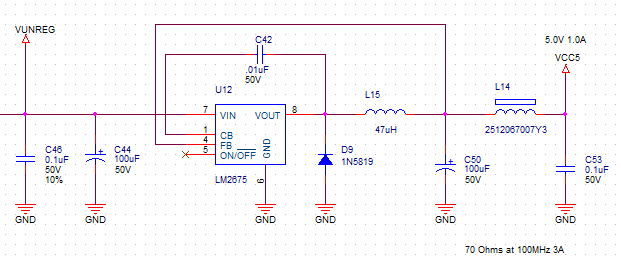
The internal 5V (VCC5) is used to power our relay coils. It if stepped down further to provide the 3.3V (VCC) and 1.8V (VCC1) rails that the processor and digital circuits require.
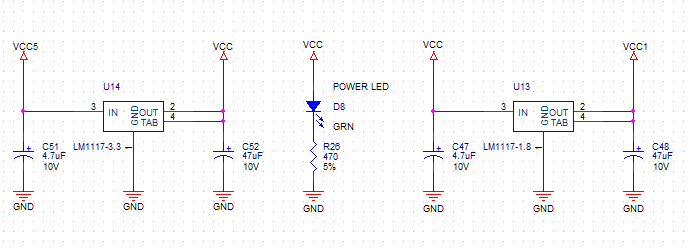
You can see here that the GREEN (BLUE in Series 4) Power LED illuminates when the 3.3V rail is powered.
The internal Series 3 power supply produces 5V at 0.75A (stepped up to 1A with Series 4) driving the rest of the product. In addition to relay coils the 5V is presented to the Sensor Port circuit as a source of power for external modules. The Series 3 also supplies the VUNREG to the Sensor Port which was not used and removed for Series 4.
To verify the supplies on the bench, power the JNIOR with 12VDC. You can check each rail across the associated capacitors as show below.
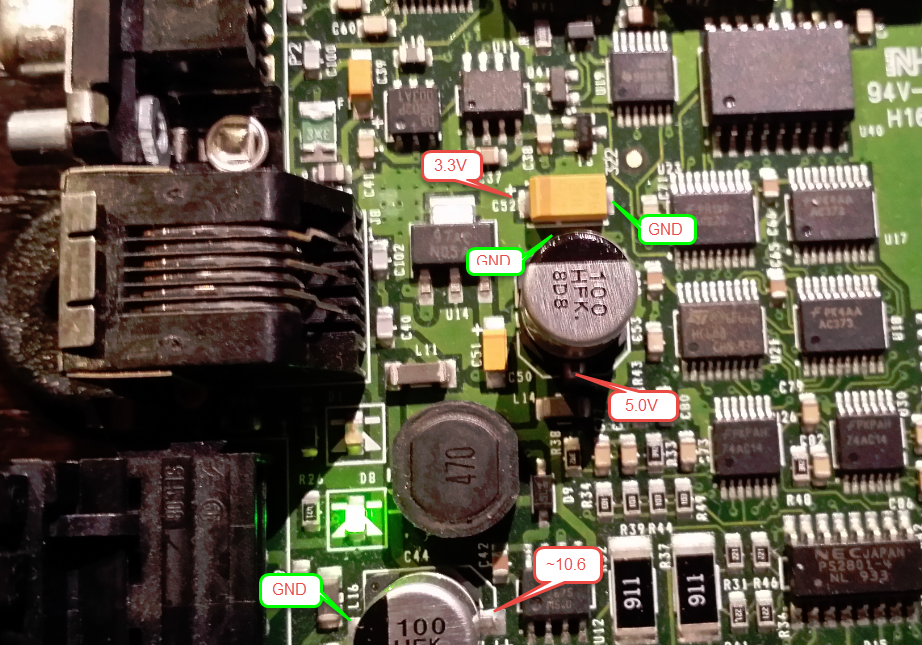
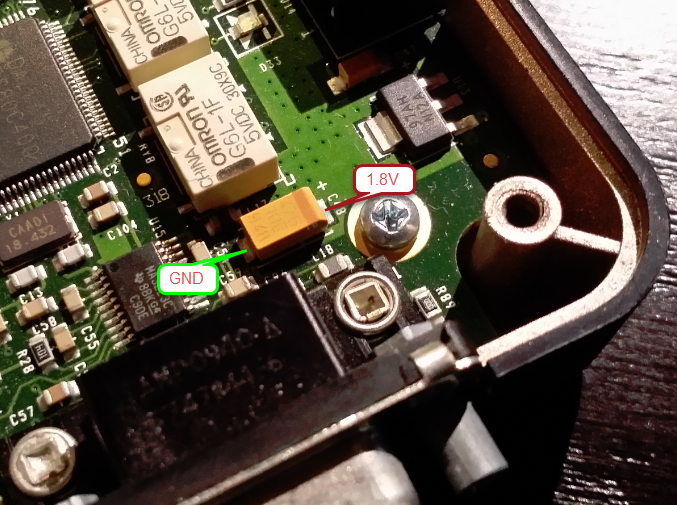
Here we note that VUNREG is approximately 10.6V showing the diode drops from the supplied 12V inherent in the full-wave bridge. The 5V (VCC5) and 3.3V (VCC) rails are nearby and easily checked. The 1.8V (VCC1) rail is developed at the far other end of the board as shown below.
That pretty much covers the power supply requirements, powering your JNIOR and testing voltages.
If you have a Series 3 that no longer functions, check carefully for evidence of damage from over-voltage or high-current in the area of the 5V regulator. The use of excessive input voltages can melt traces around the power connector. A grounding issue can cause damage to the 5V regulator U12 which can show physical damage. In these cases the JNIOR more than likely cannot be repaired.
In some cases the Power LED did not illuminate as a result of a bad LED or poor soldering. Voltages are otherwise as expected. Most of those failures are caught in production. A marginal solder joint can operate for some time but as pass production tests. But after aging it can present as an open circuit.
This power supply has proven to be very reliable. INTEG has seen an extremely small percentage in failure rate. In general, most causes have been tracked to improper external wiring and severe grounding issues.